Weighguru – Weighbridge Management System
End‑User Manual · Version 1.0 · © 2025 Hepta Infotech Services LLP
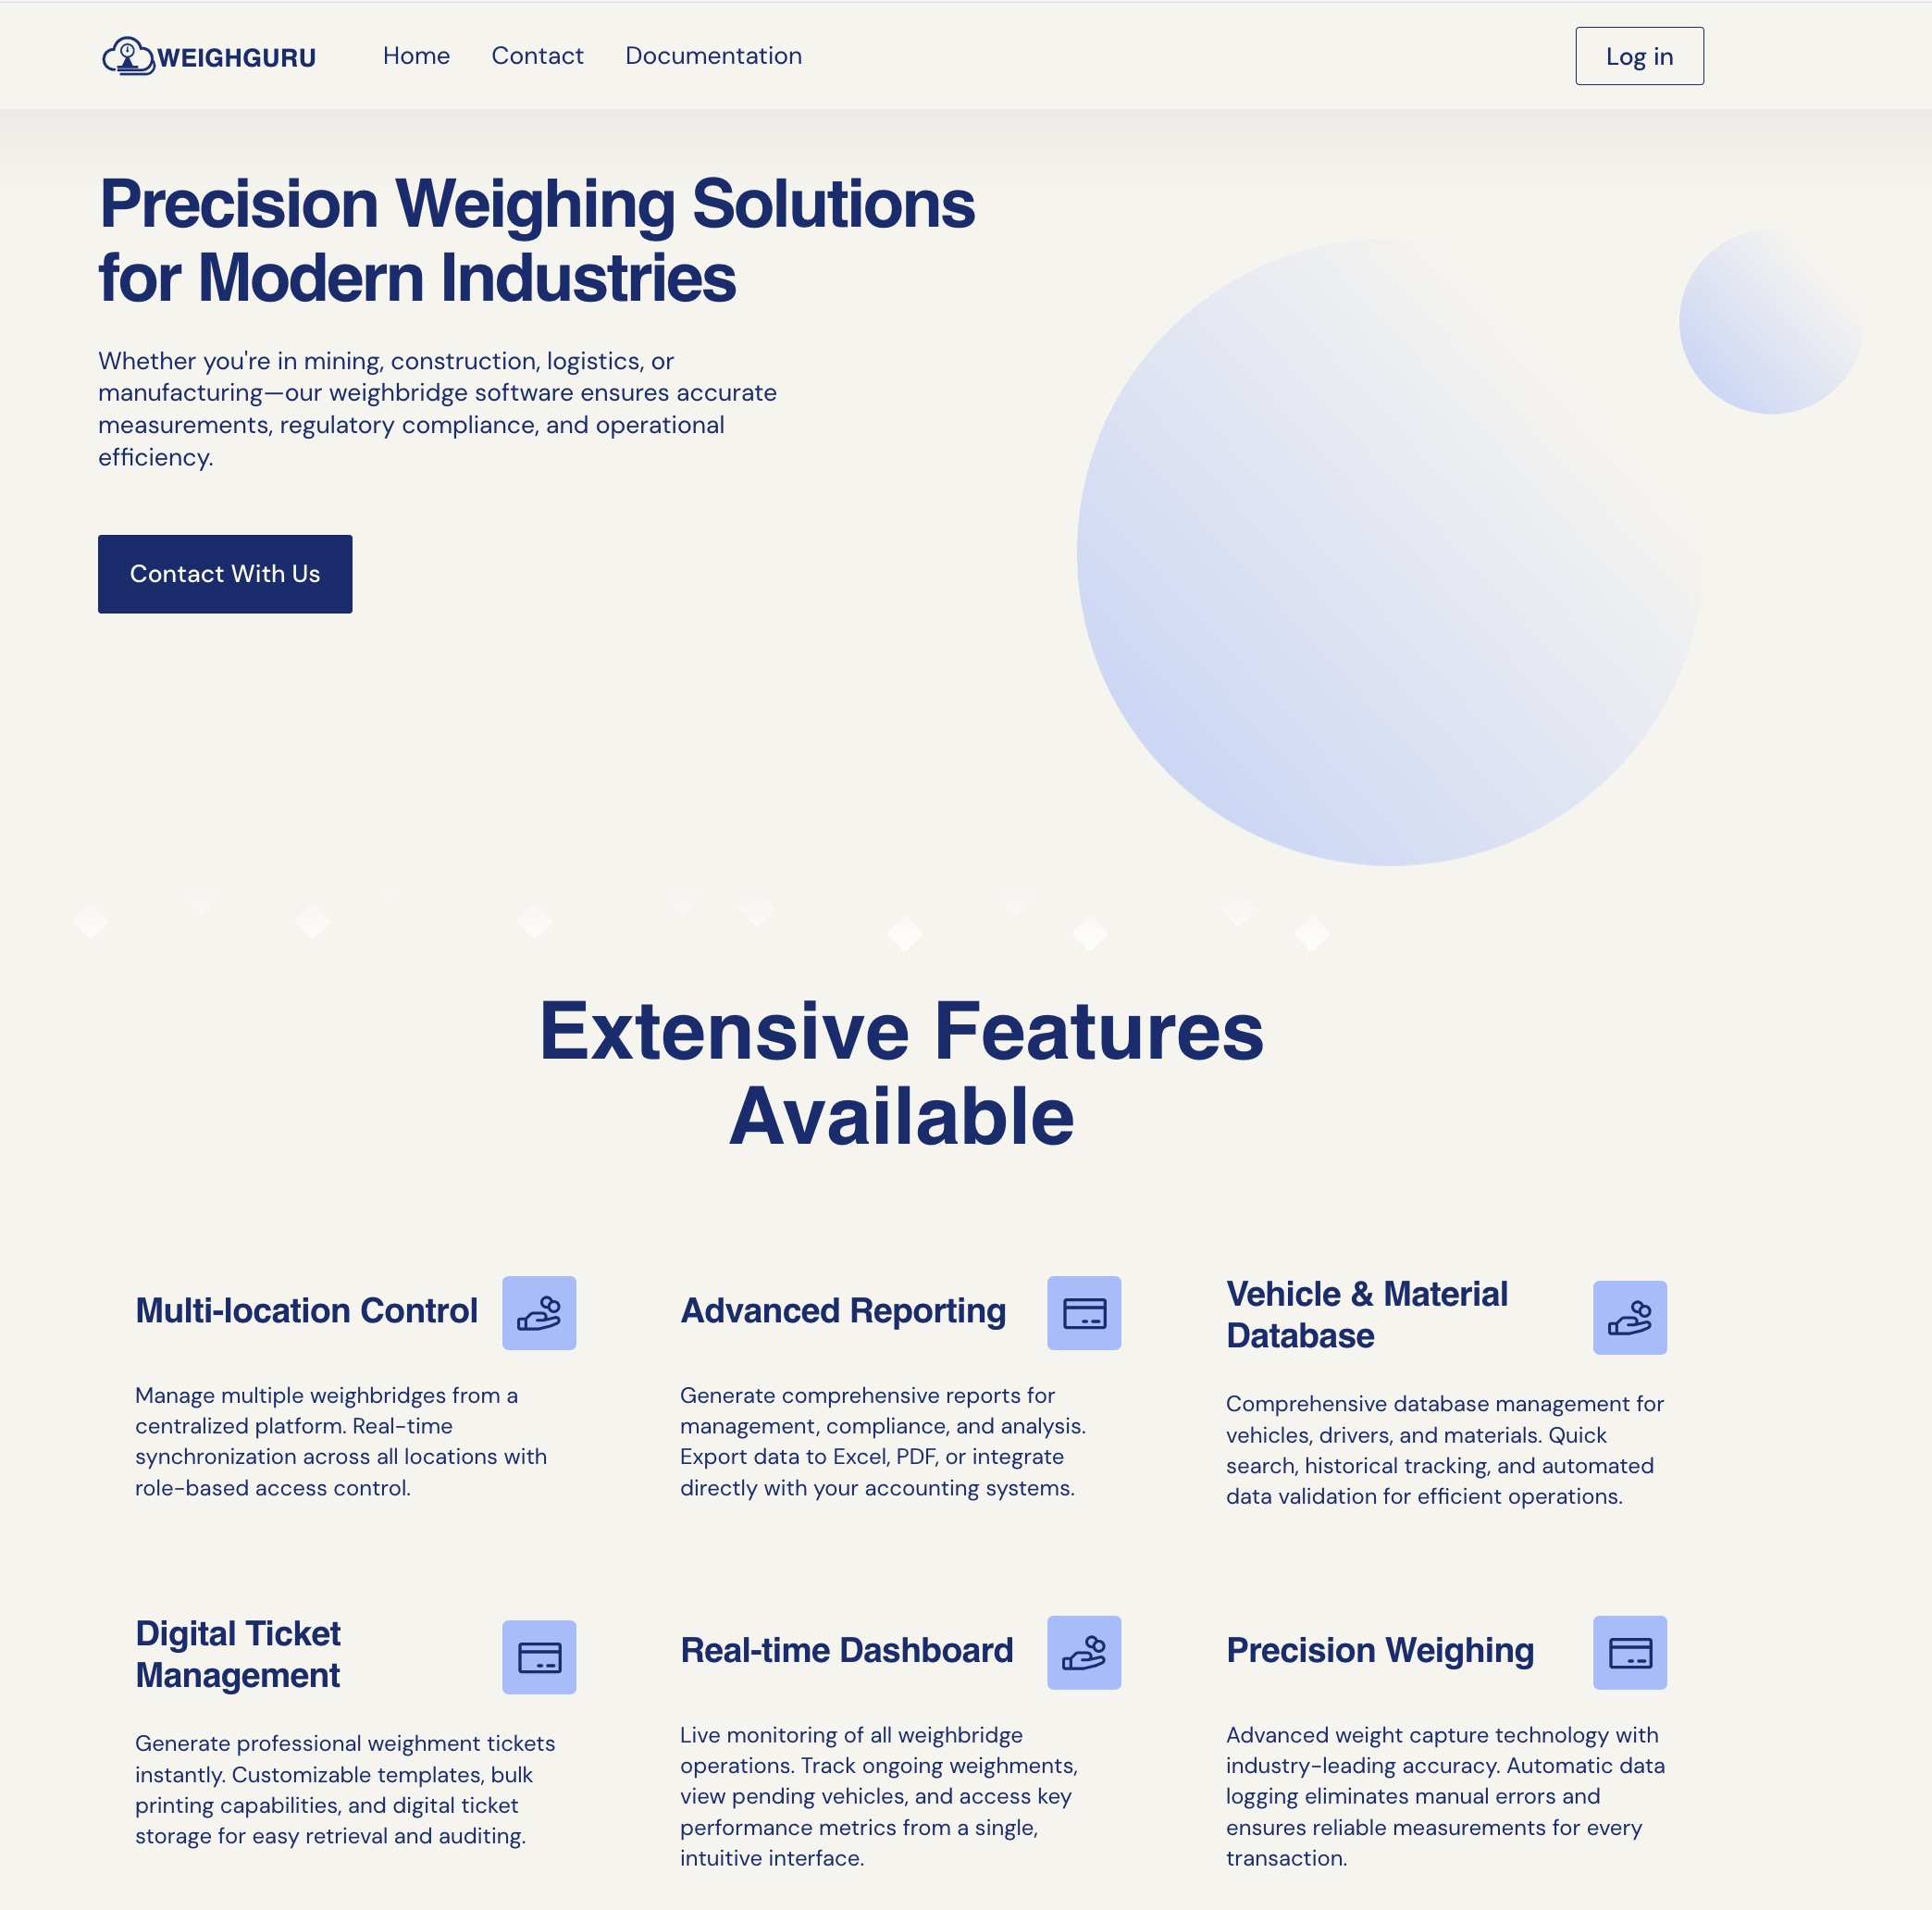
Web‑based weighbridge management for mining, construction, logistics, and manufacturing industries.
1. Introduction
1.1 About Weighguru
Weighguru is a web‑based weighbridge system for industries that need accurate, traceable vehicle weighing.
The application centralizes weighment operations, connects to weighbridges, and records every transaction.
1.2 Key Benefits
Accurate & Consistent Weights
Weighguru connects directly to your weighbridge and always uses the right units (Kg/MT) for accurate results.
Tare Weight Master
Keeps track of saved tare weights and suggests them to you, making entry faster and reducing mistakes.
Scale Integration & Print Support
Direct scale integration for automated capture and Dot‑Matrix/A4 printing.
Operational Efficiency
Single-screen entry for internal and external weighments with inline master creation to speed processing.
Flexible Reporting & Exports
Built-in reports with export to Excel/CSV and PDF for analysis, invoicing, and compliance.
Audit Trail & Traceability
All weighment actions and tickets are saved, so you can track and review everything if needed.
Strong Control & Compliance
Role-based access, form permissions, Active/Locked flags, and printable tickets keep control over operations.
Multi‑Location Visibility
Multi‑company and multi‑weighbridge support with centralized reporting and dashboards for distributed operations.
Mobile‑friendly Interface
Responsive UI and compact screens enable quick lookups and simple operations from tablets and mobile devices.

2. Getting Started
2.1 System Requirements
- Modern browser: Chrome, Edge, Firefox, or Safari (latest versions recommended)
- Stable internet connection
- For integrated weight capture: local scale client configured by IT team
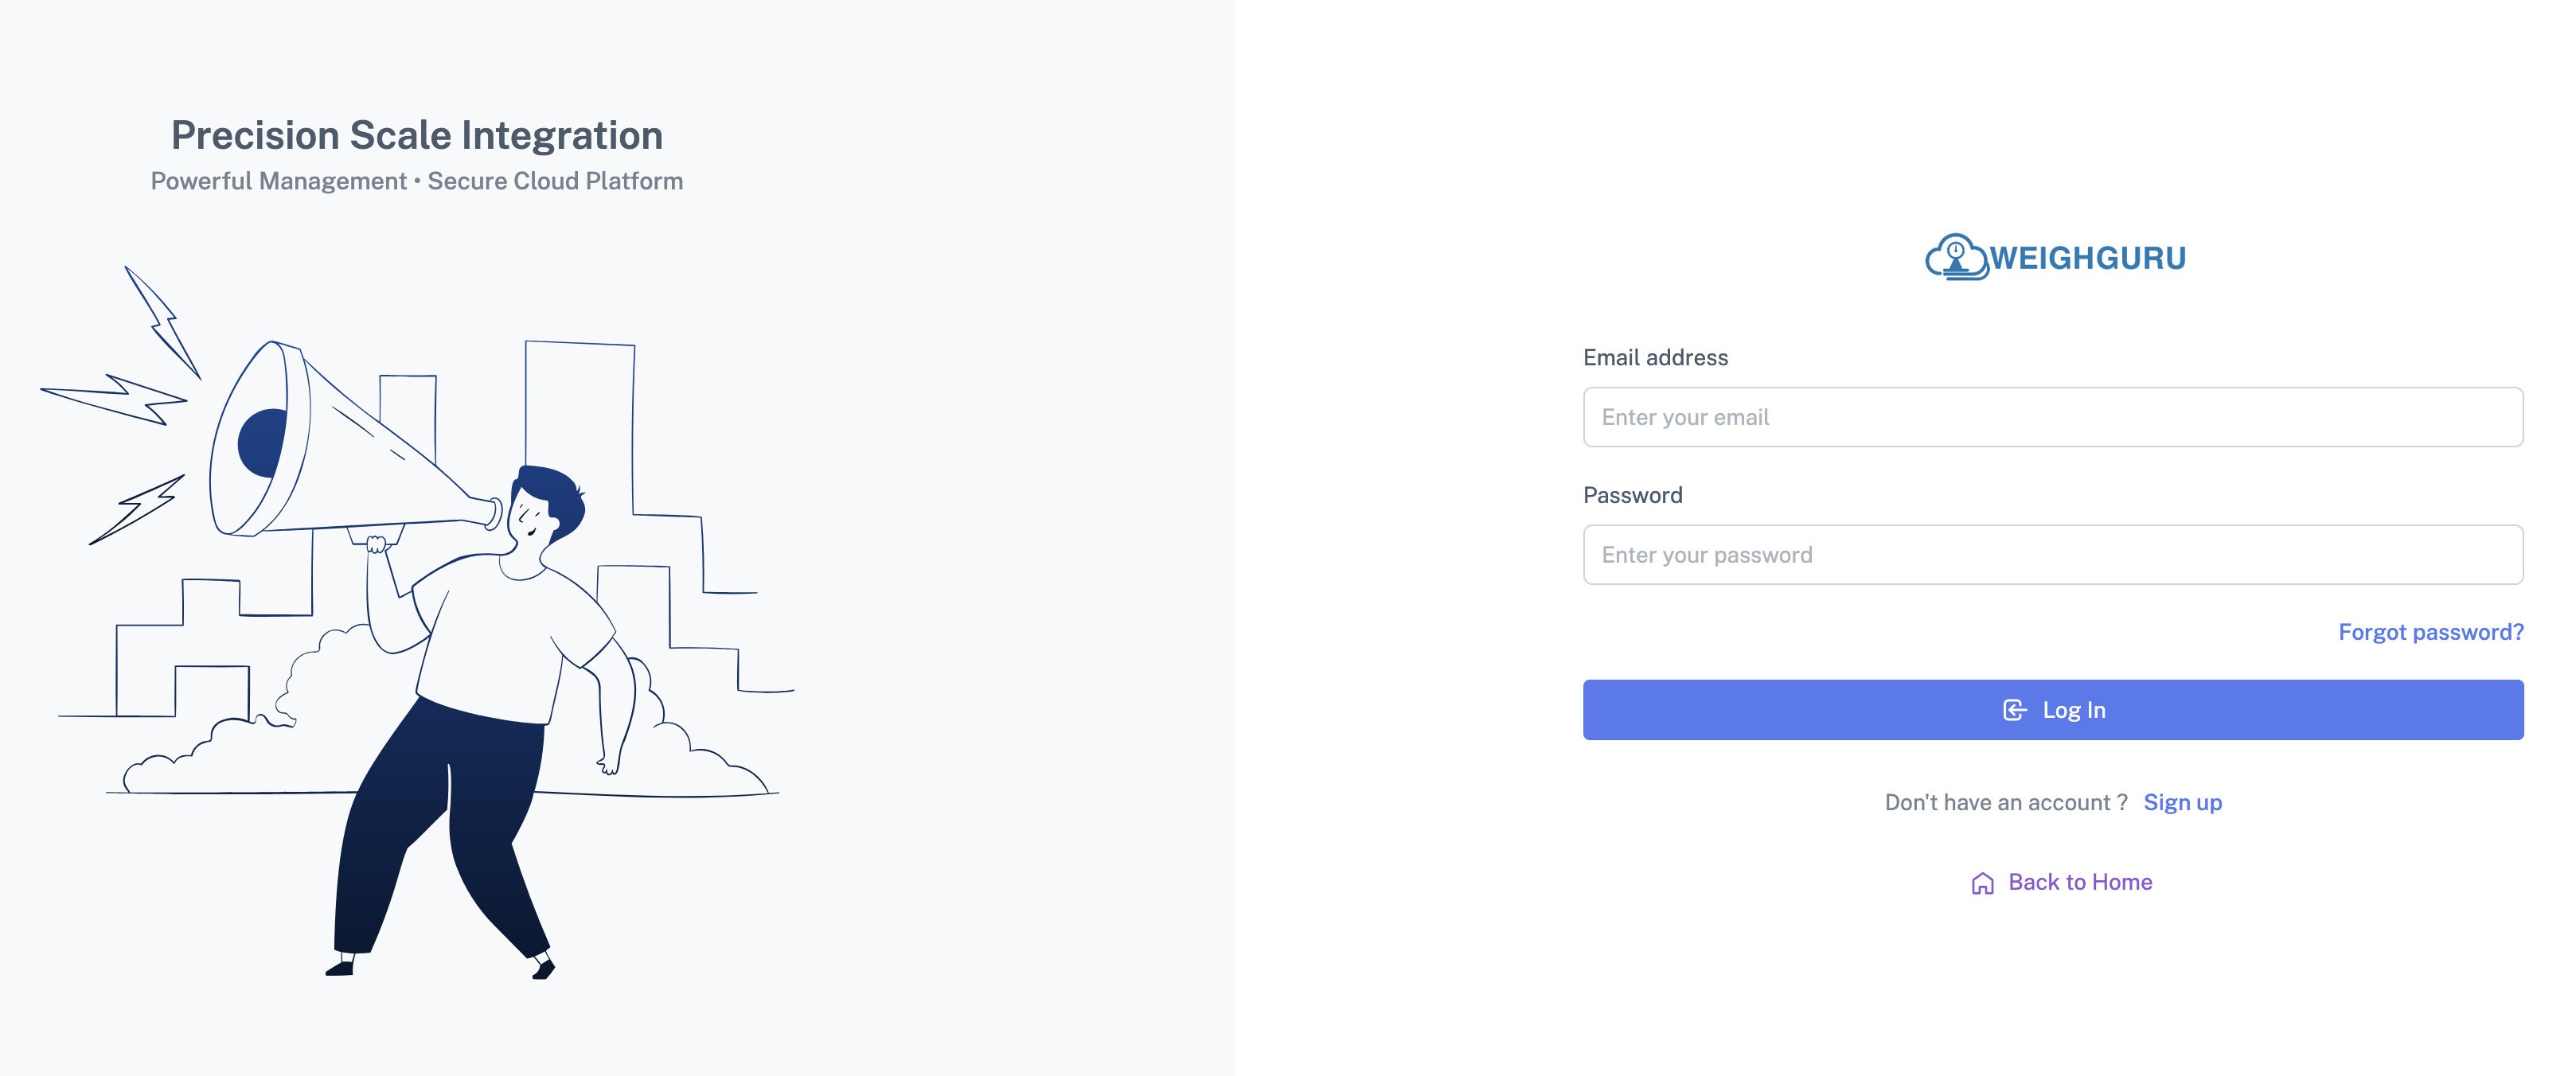
2.2 Accessing Weighguru
- Open browser and navigate to:
https://weighguru.fleetnet.in - Click Log in in the top‑right corner
2.3 Logging In
- Enter your Username and Password
- Click Login
3. Understanding the Interface
3.1 Main Layout
After login, the main layout contains:
Top Navigation Bar
Company name and logo, user name and role, logout/profile options
Left Sidebar Menu
Dashboard, Masters, Transactions, Utilities, Reports
Content Area
Lists, forms, and grids for selected menu
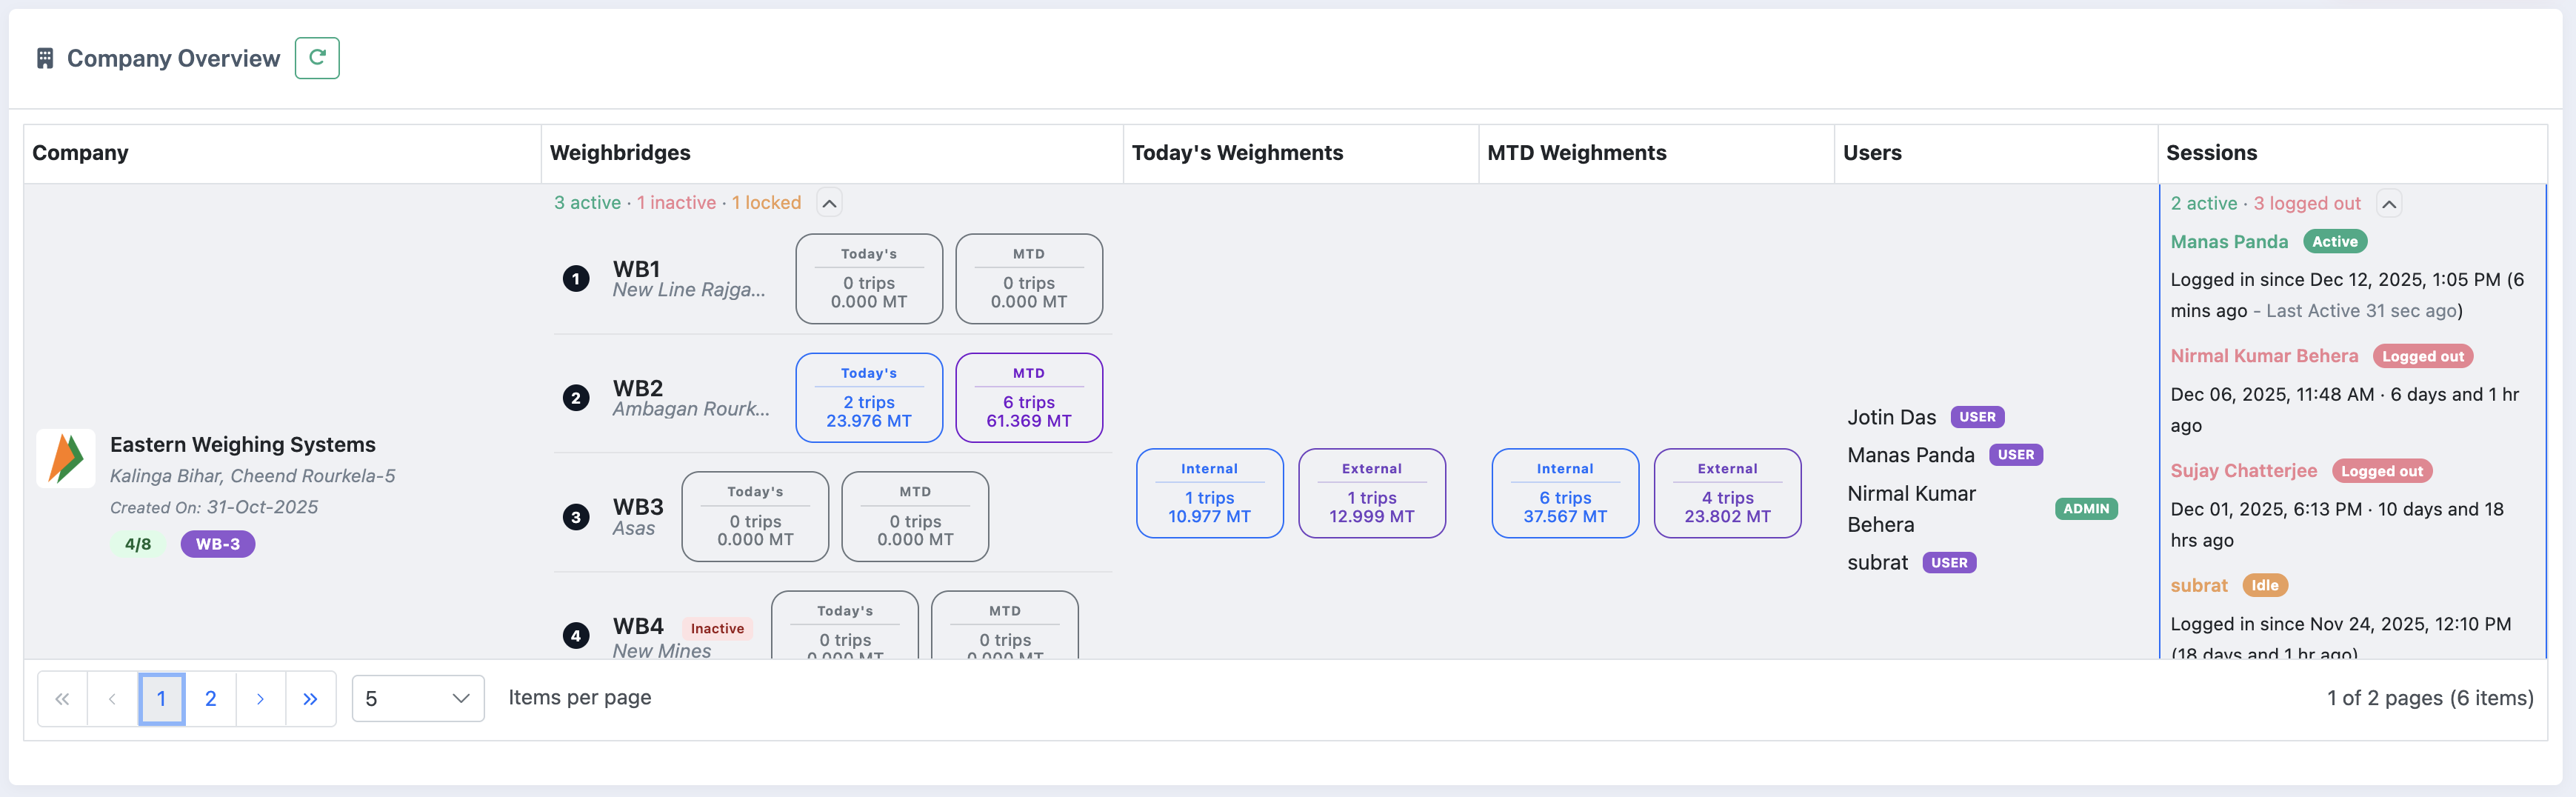
3.2 Dashboard Overview
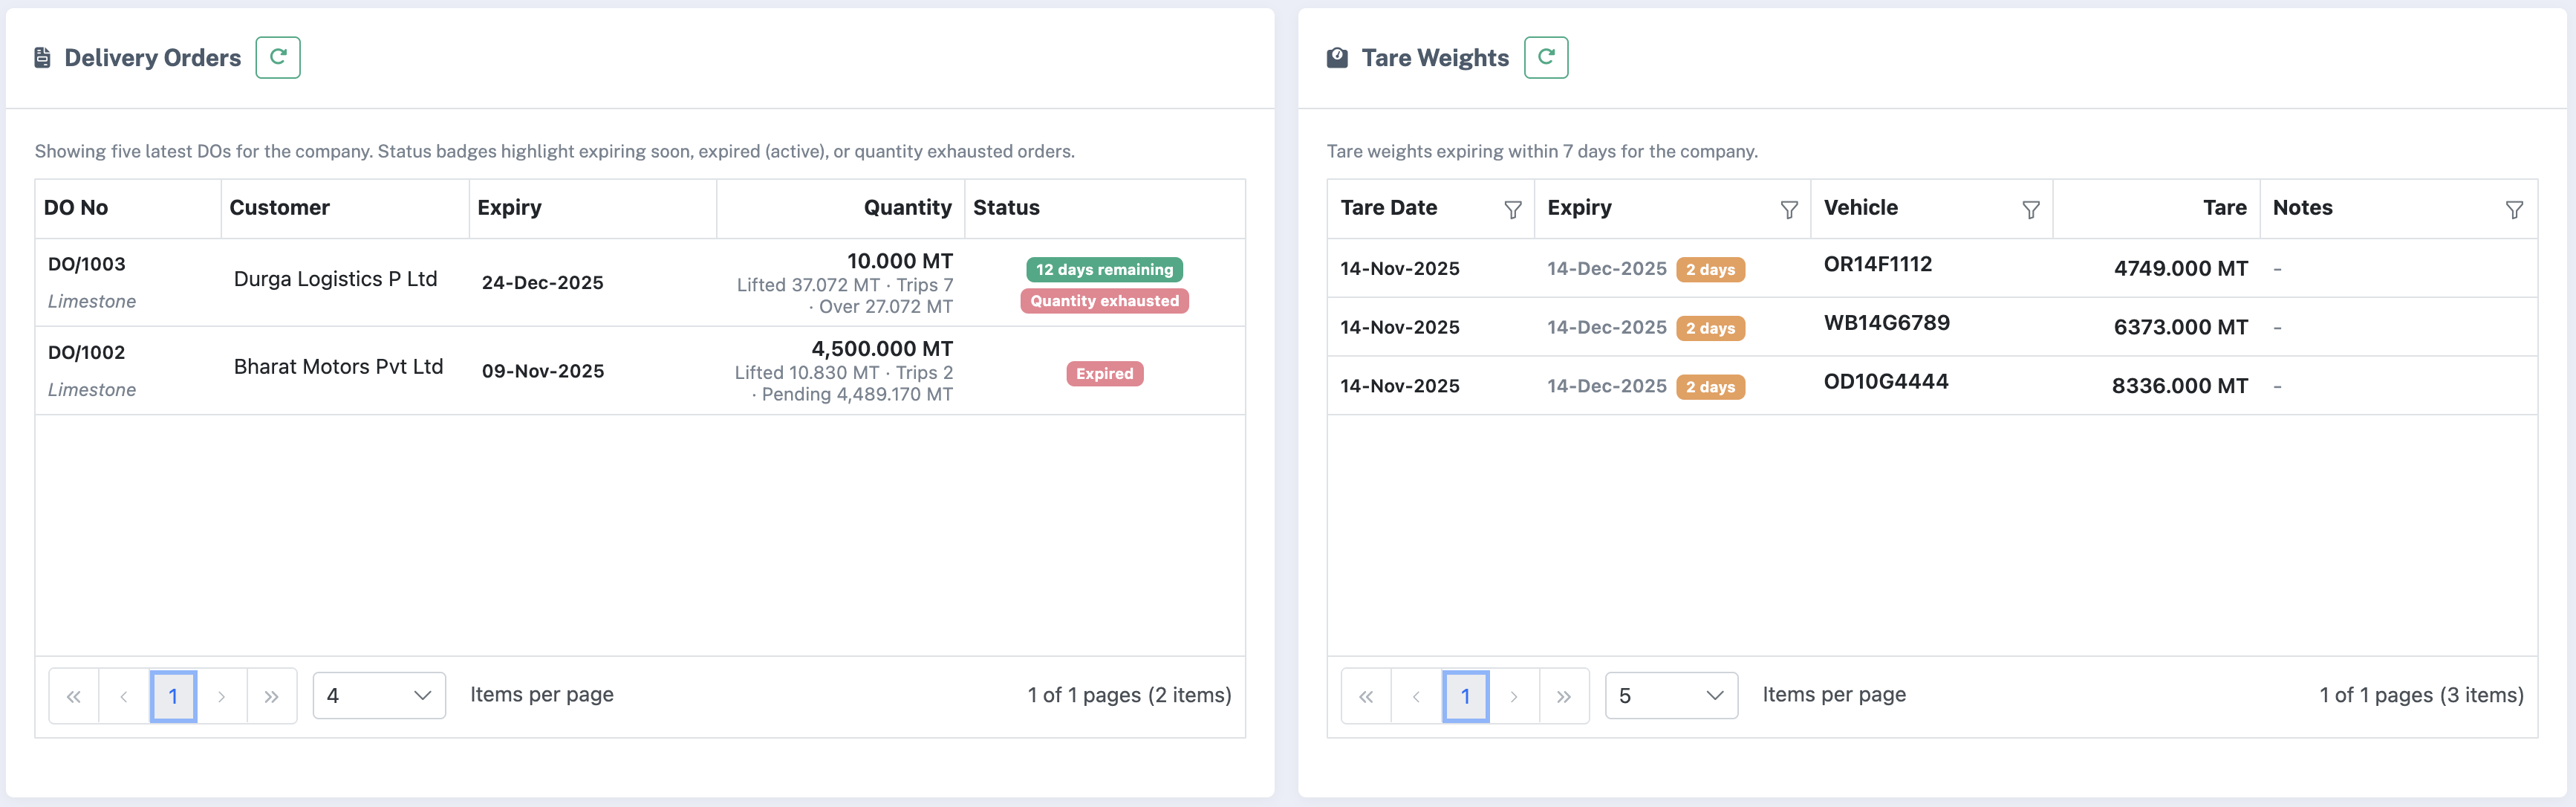
After login, the Dashboard shows current company and weighbridge activity. It highlights active weighbridges, in‑progress weighments, and DO/Tare entries that need attention.
For Super Admin users, a company selector appears at the top of the dashboard. Cards and grids filter automatically to the selected company. Until a company is chosen, the company‑specific cards (Company Overview, Weighbridge Details, Internal/External Weighments, DO Master, Tare Weight Master) remain hidden.
- Company Overview – Shows key metrics for the selected company: active weighbridges, weighments today, active users, and open sessions. For Super Admin, each row represents a company. Use the Reload button to refresh.
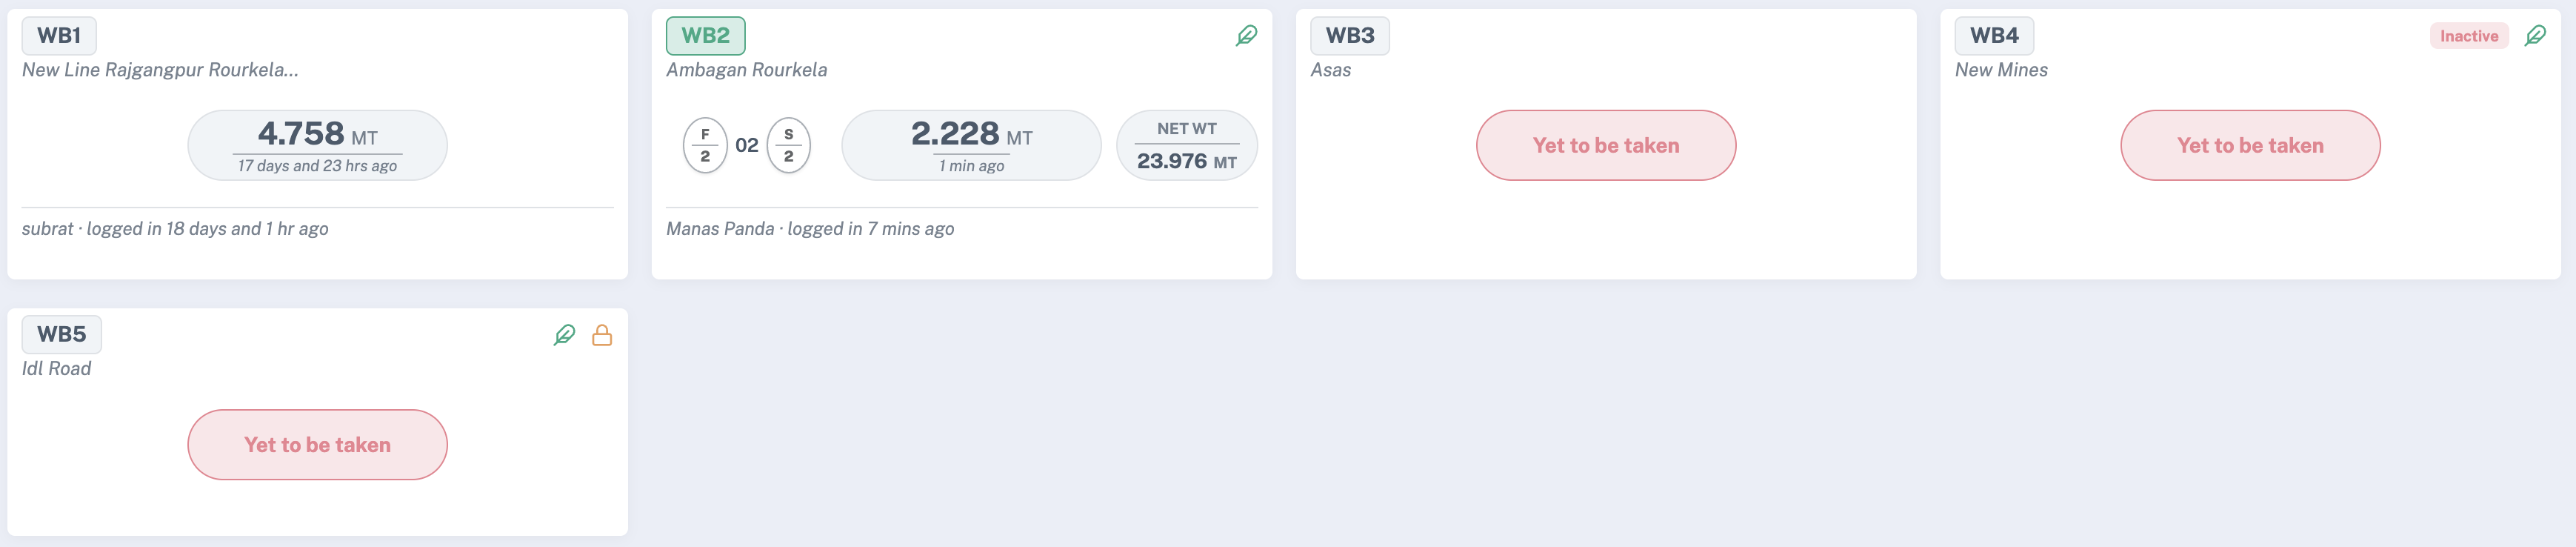
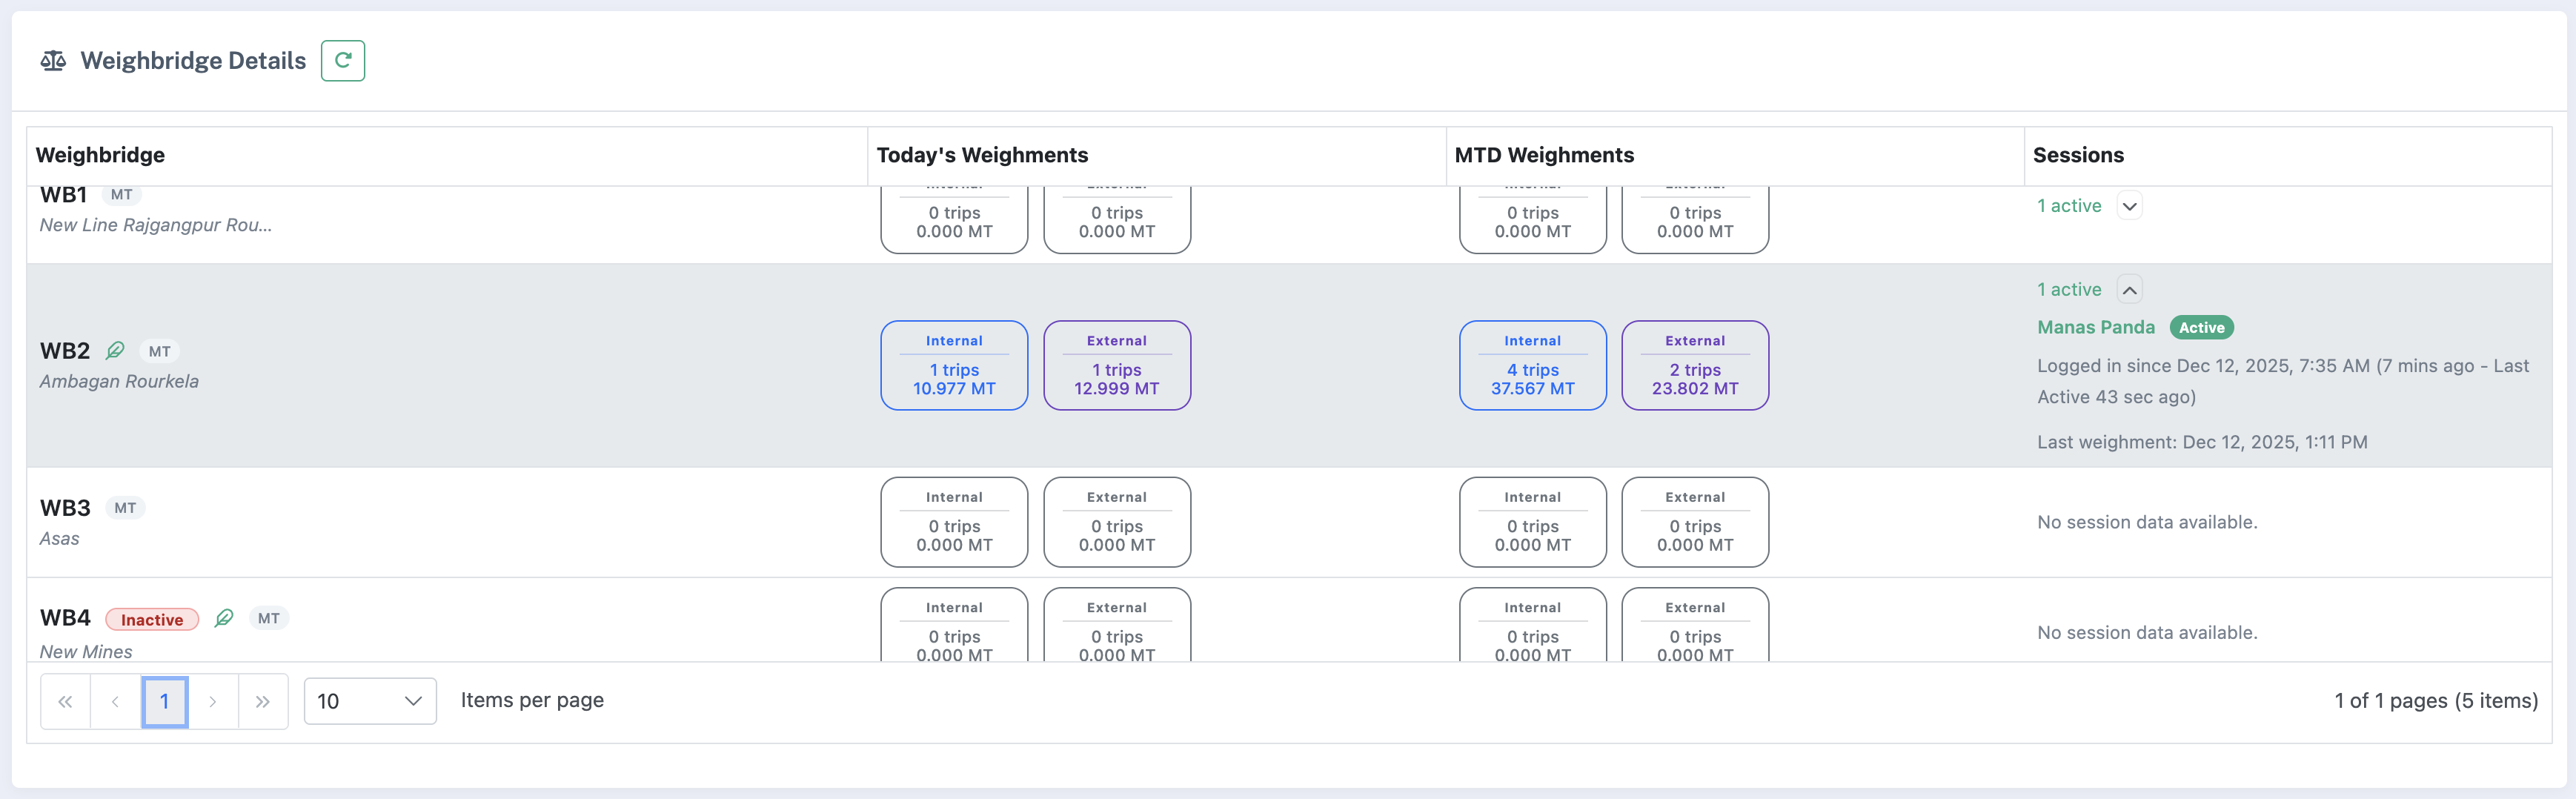
- Weighbridges & Weighbridge Details – The top card lists configured weighbridges with status (Active/Locked) and location. The Weighbridge Details grid below shows recent weighments and current activity for the selected bridge.
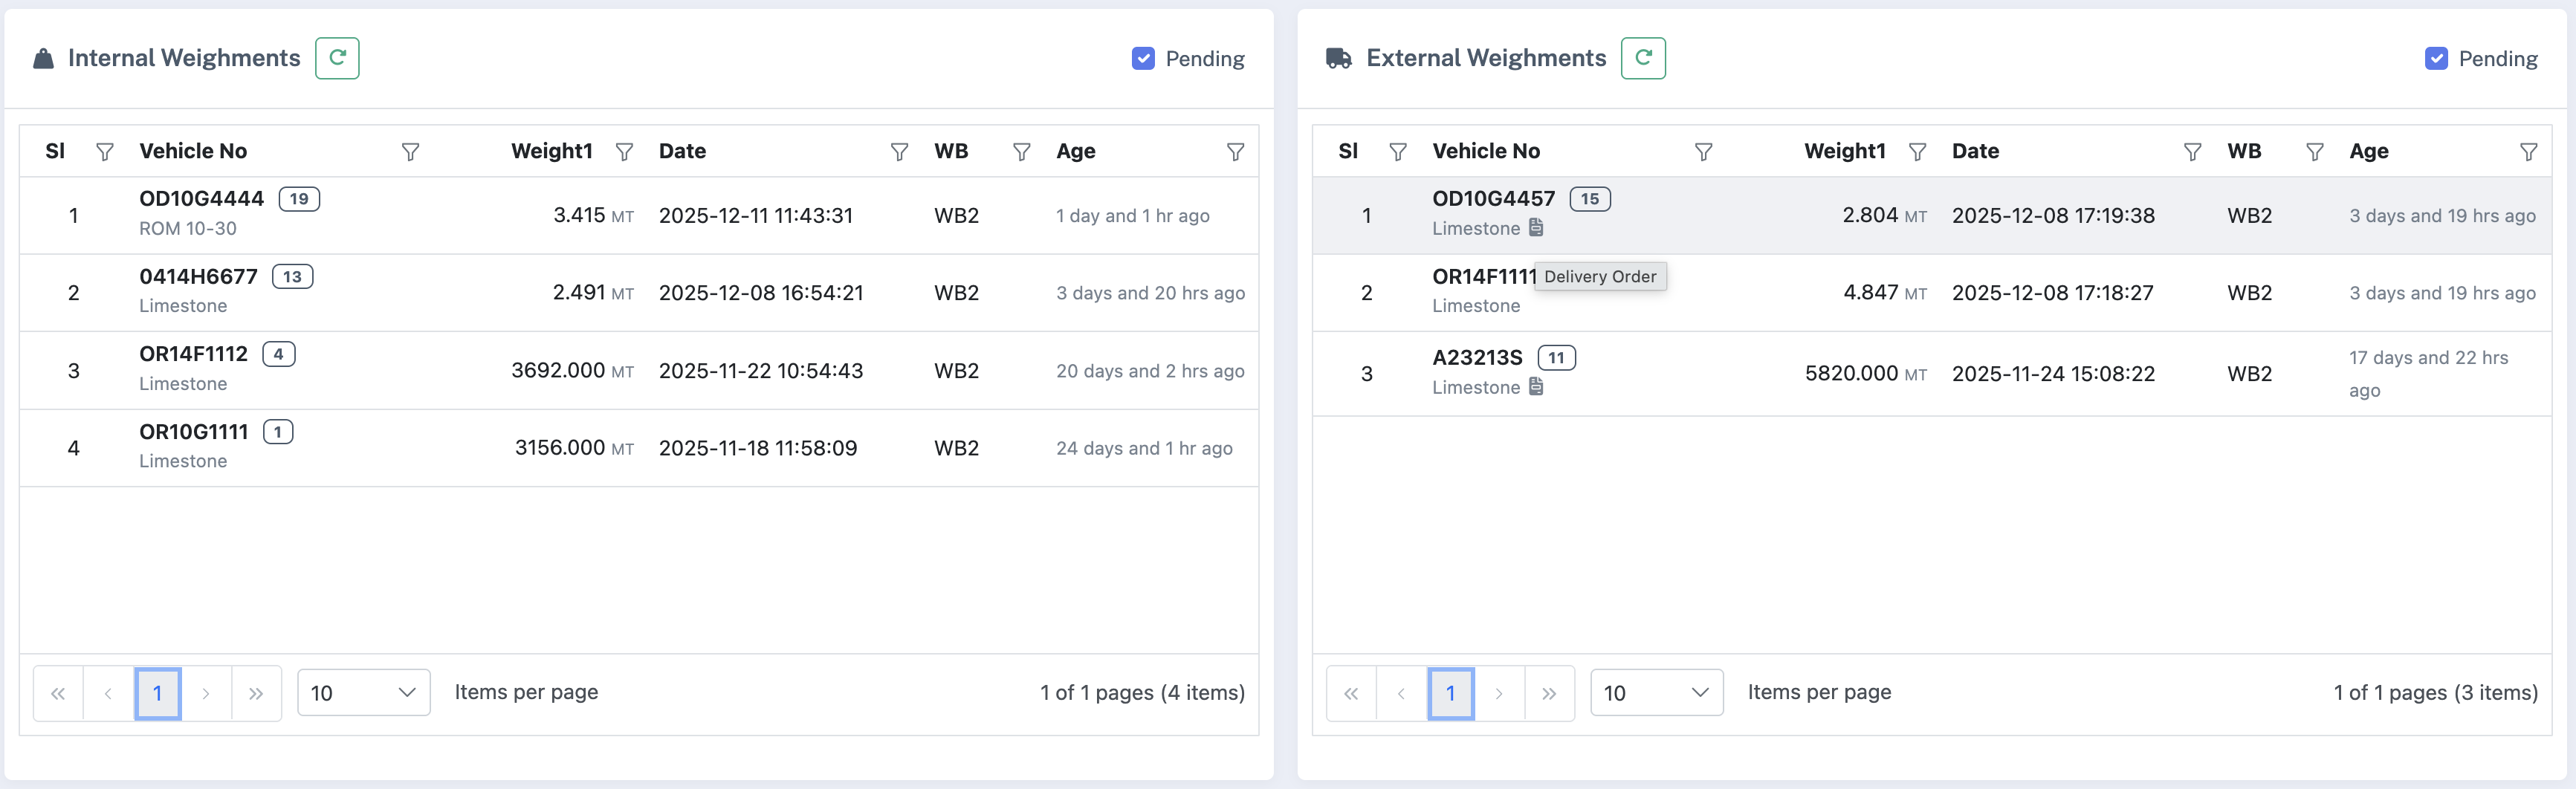
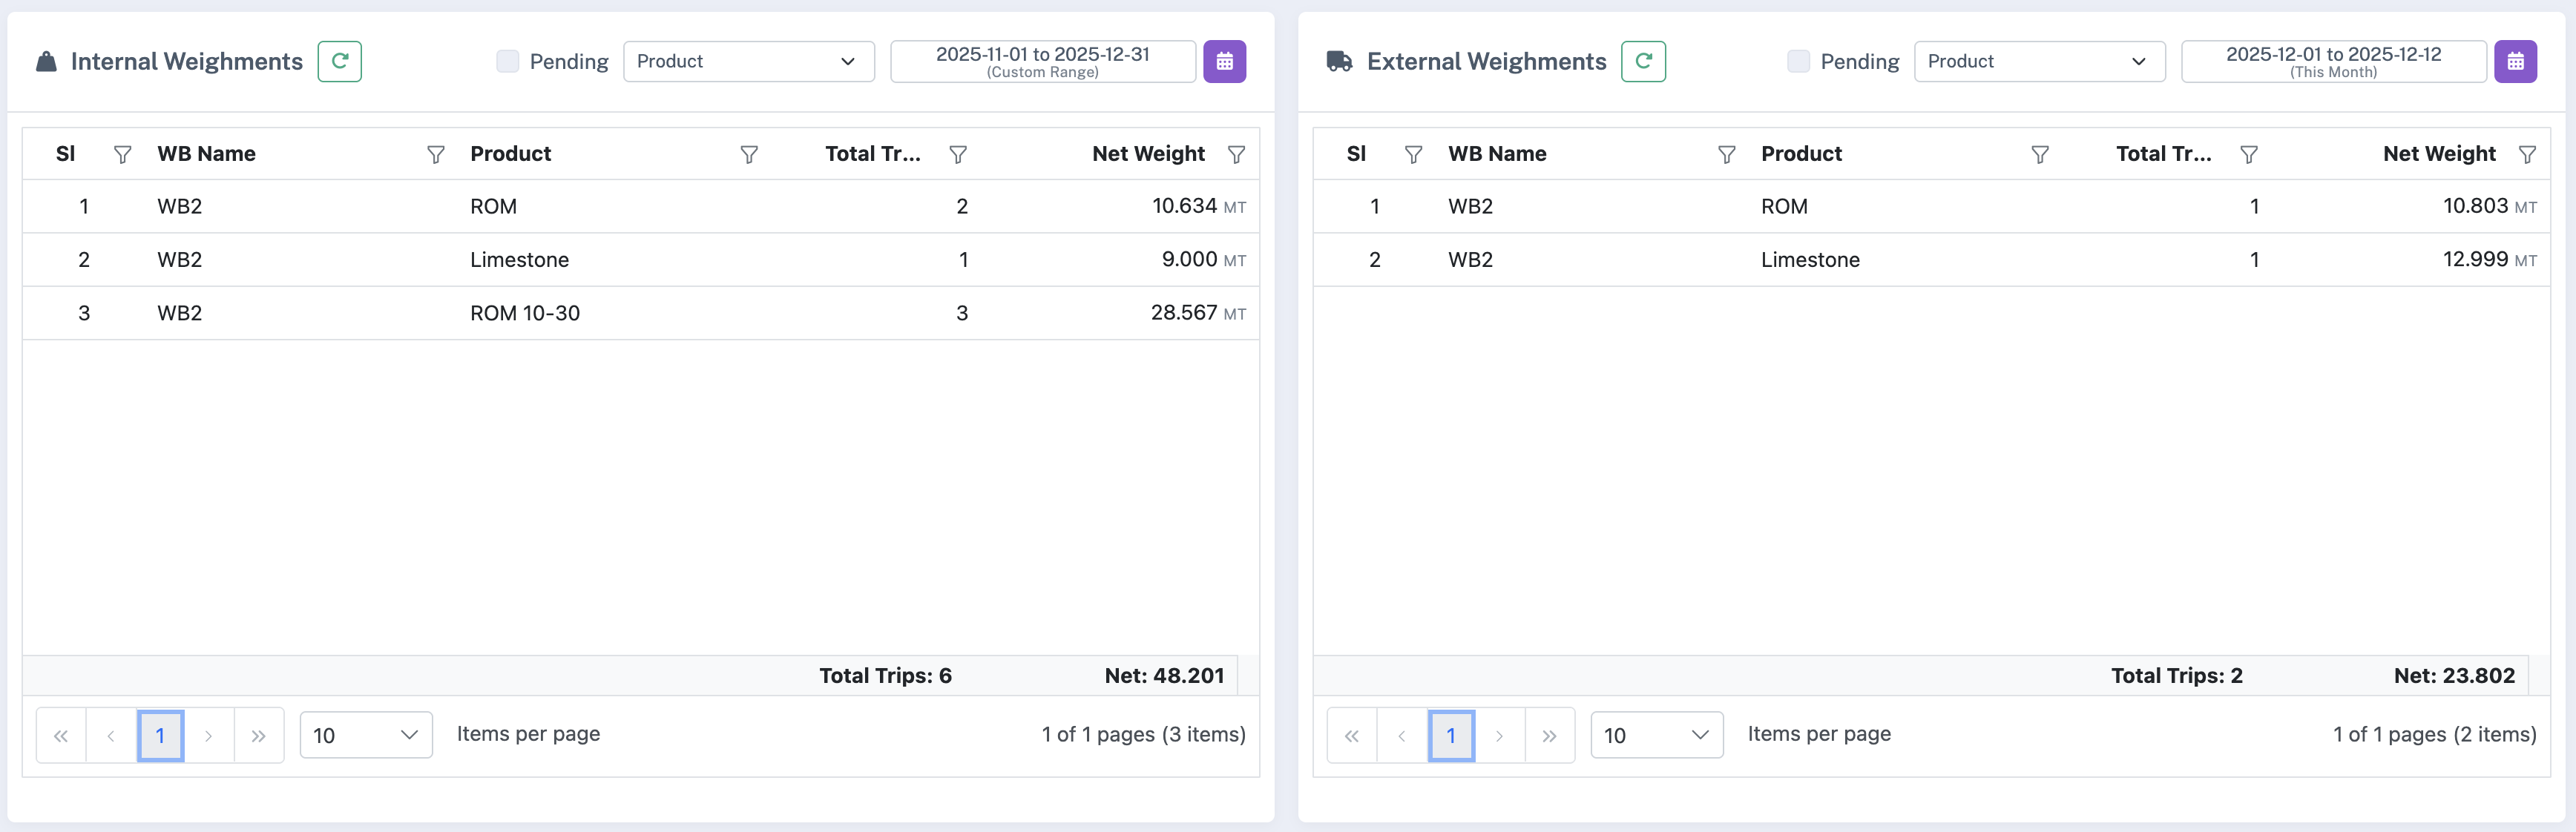
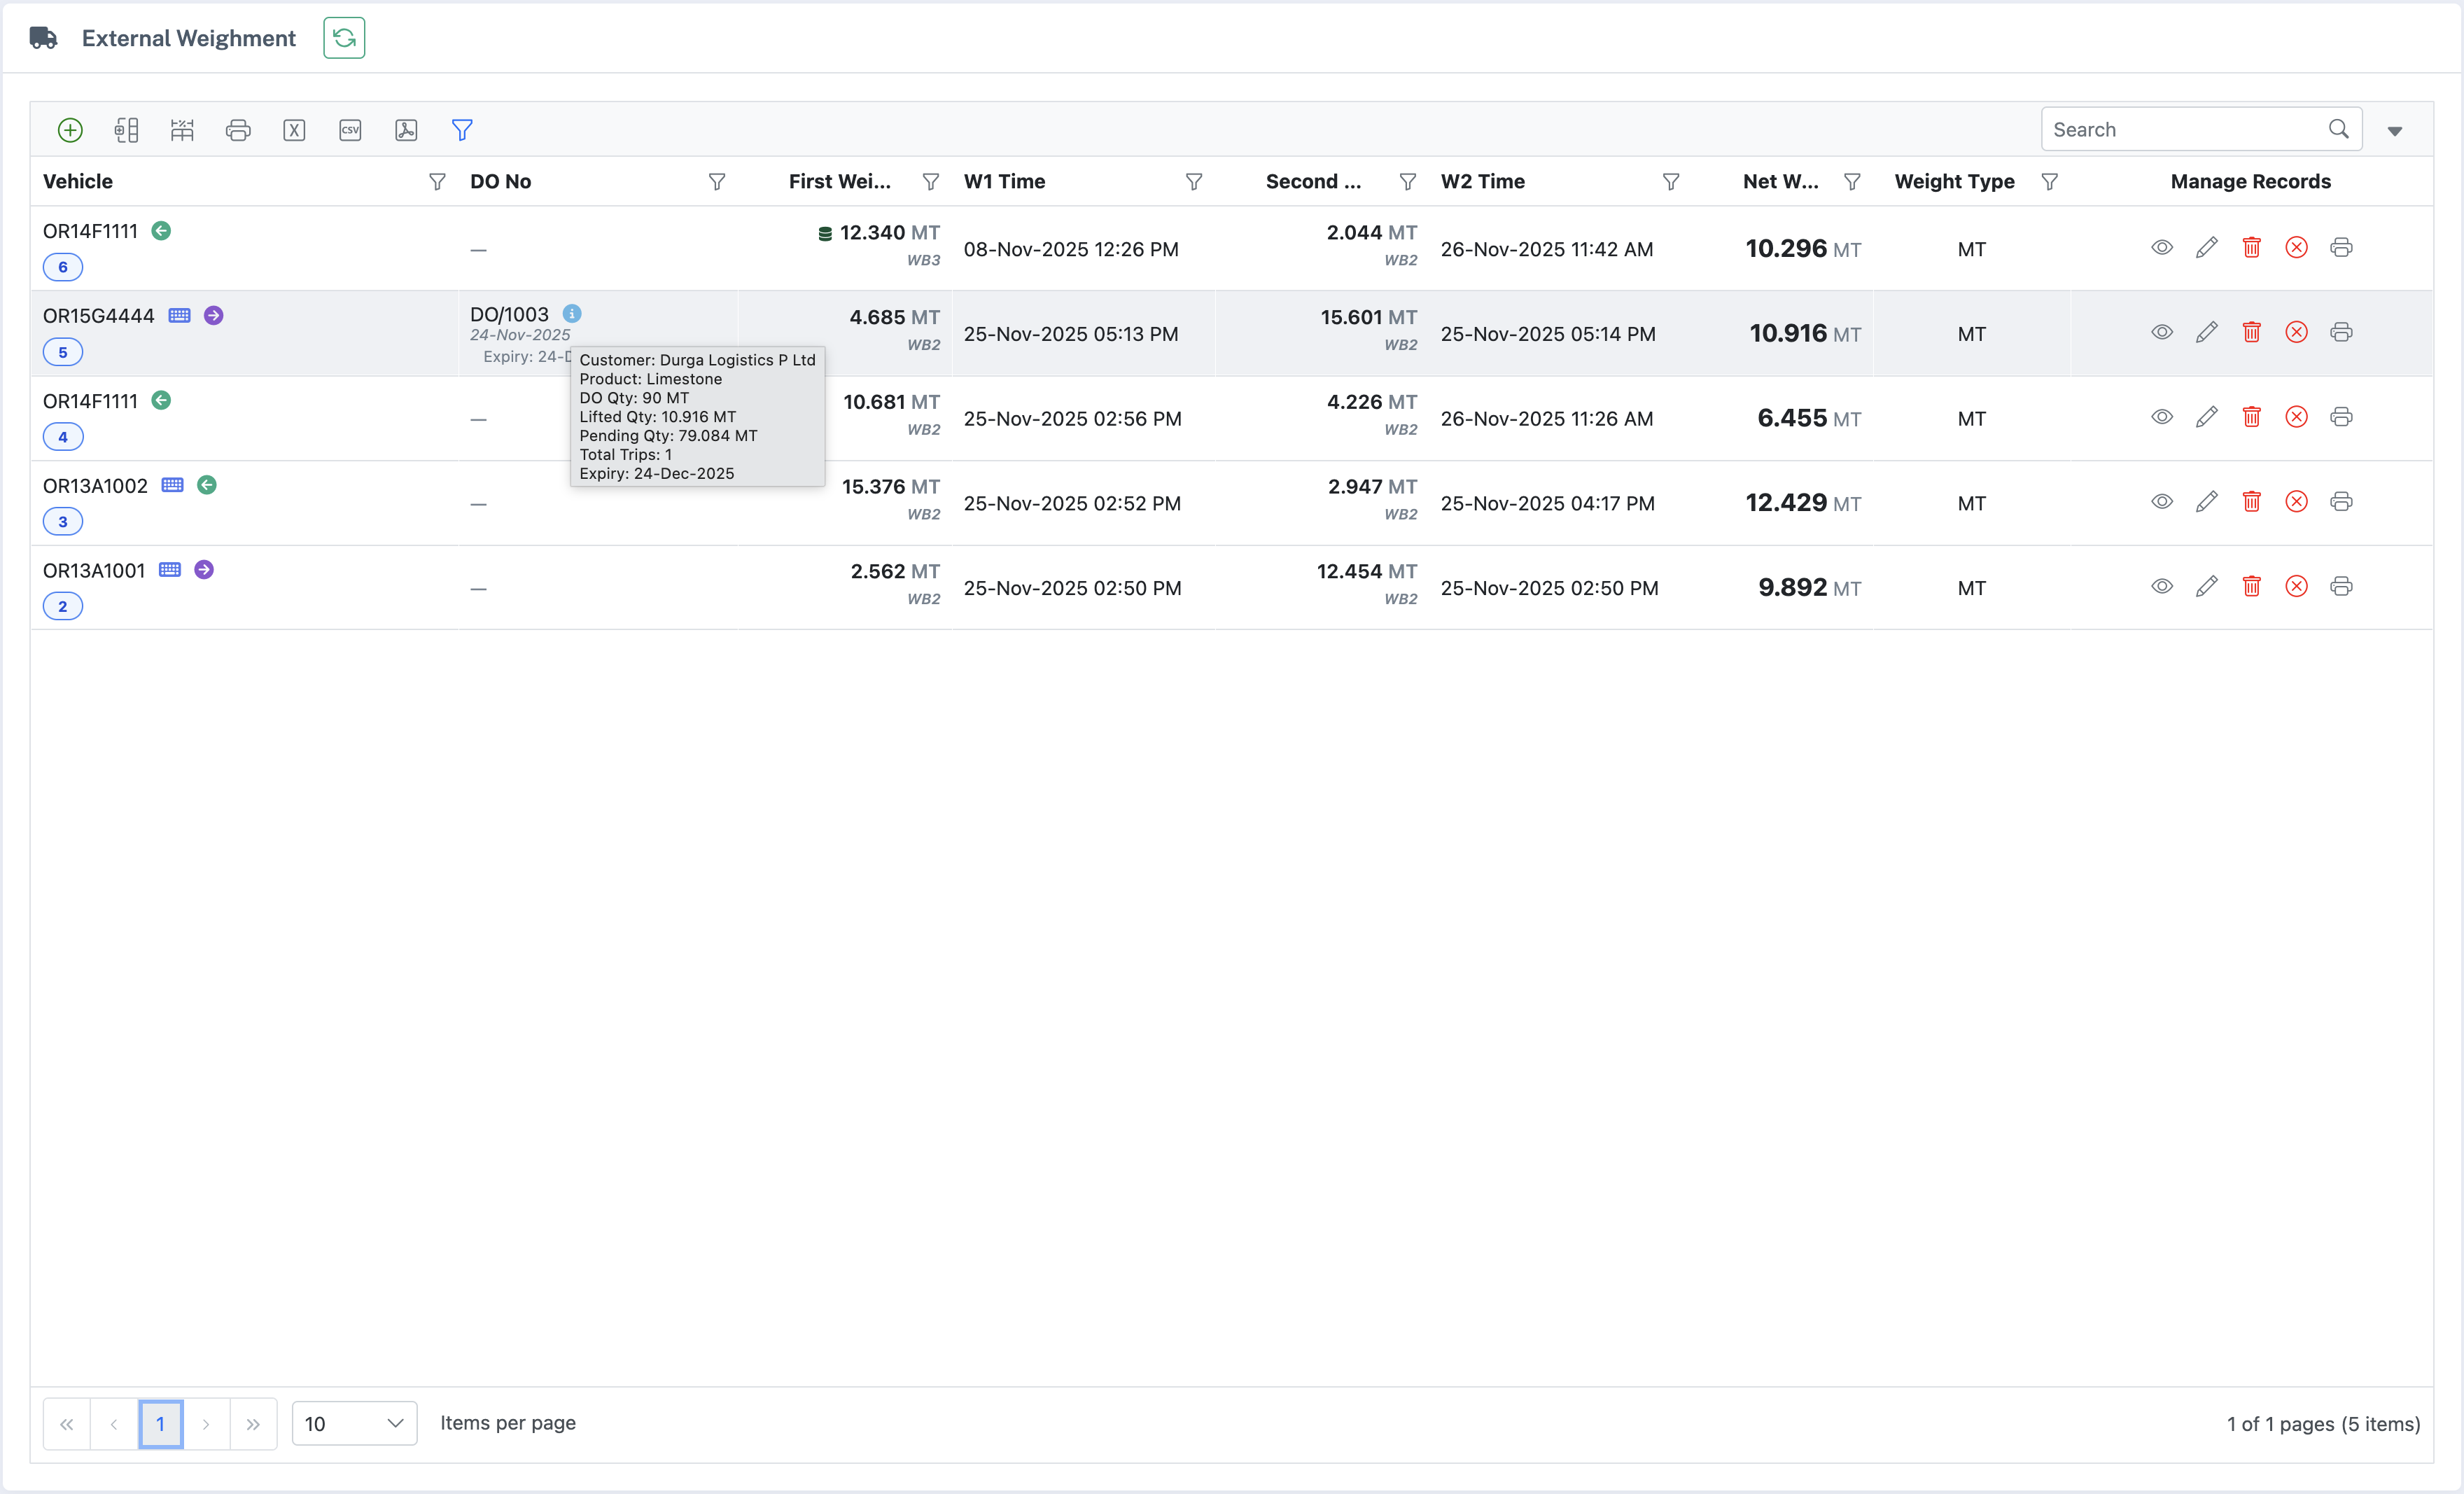
- Internal & External Weighments (Mini‑Grids) – Two cards shows recent internal and external weighments. Each card provides quick filters, grouping (product/transporter/vehicle etc), and a date range selector. Use these grids to monitor queues and find pending transactions.
-
DO Master Card – Shows recent DO Master entries for the selected company. Columns: DO number, product, party, quantity, and expiry date. The Status column uses coloured badges to indicate expiry and usage:
- Expired – DO expiry date has passed.
- X days remaining – DO is approaching expiry; number of days left is shown.
- Quantity exhausted – Ordered quantity is fully utilised.
| Role | Permissions |
|---|---|
| Operator | Captures weighments, may add basic masters if permitted. |
| Supervisor / Admin | Manages masters and weighbridges, edits or deletes weighments, and accesses reports. |
| Super Admin | Full control for support and onboarding |
4. Core Concepts
Company
Represents legal/operational entity. Each weighbridge is tied to a company.
Weighbridge
Physical scale with name, code, unit (Kg/MT), DMP flag, Active/Locked status.
Internal Weighment
Internal movements within own units/stockyards.
External Weighment
Third‑party transactions linked to DO Master and Suppliers.
4.2 Tare Weight Master
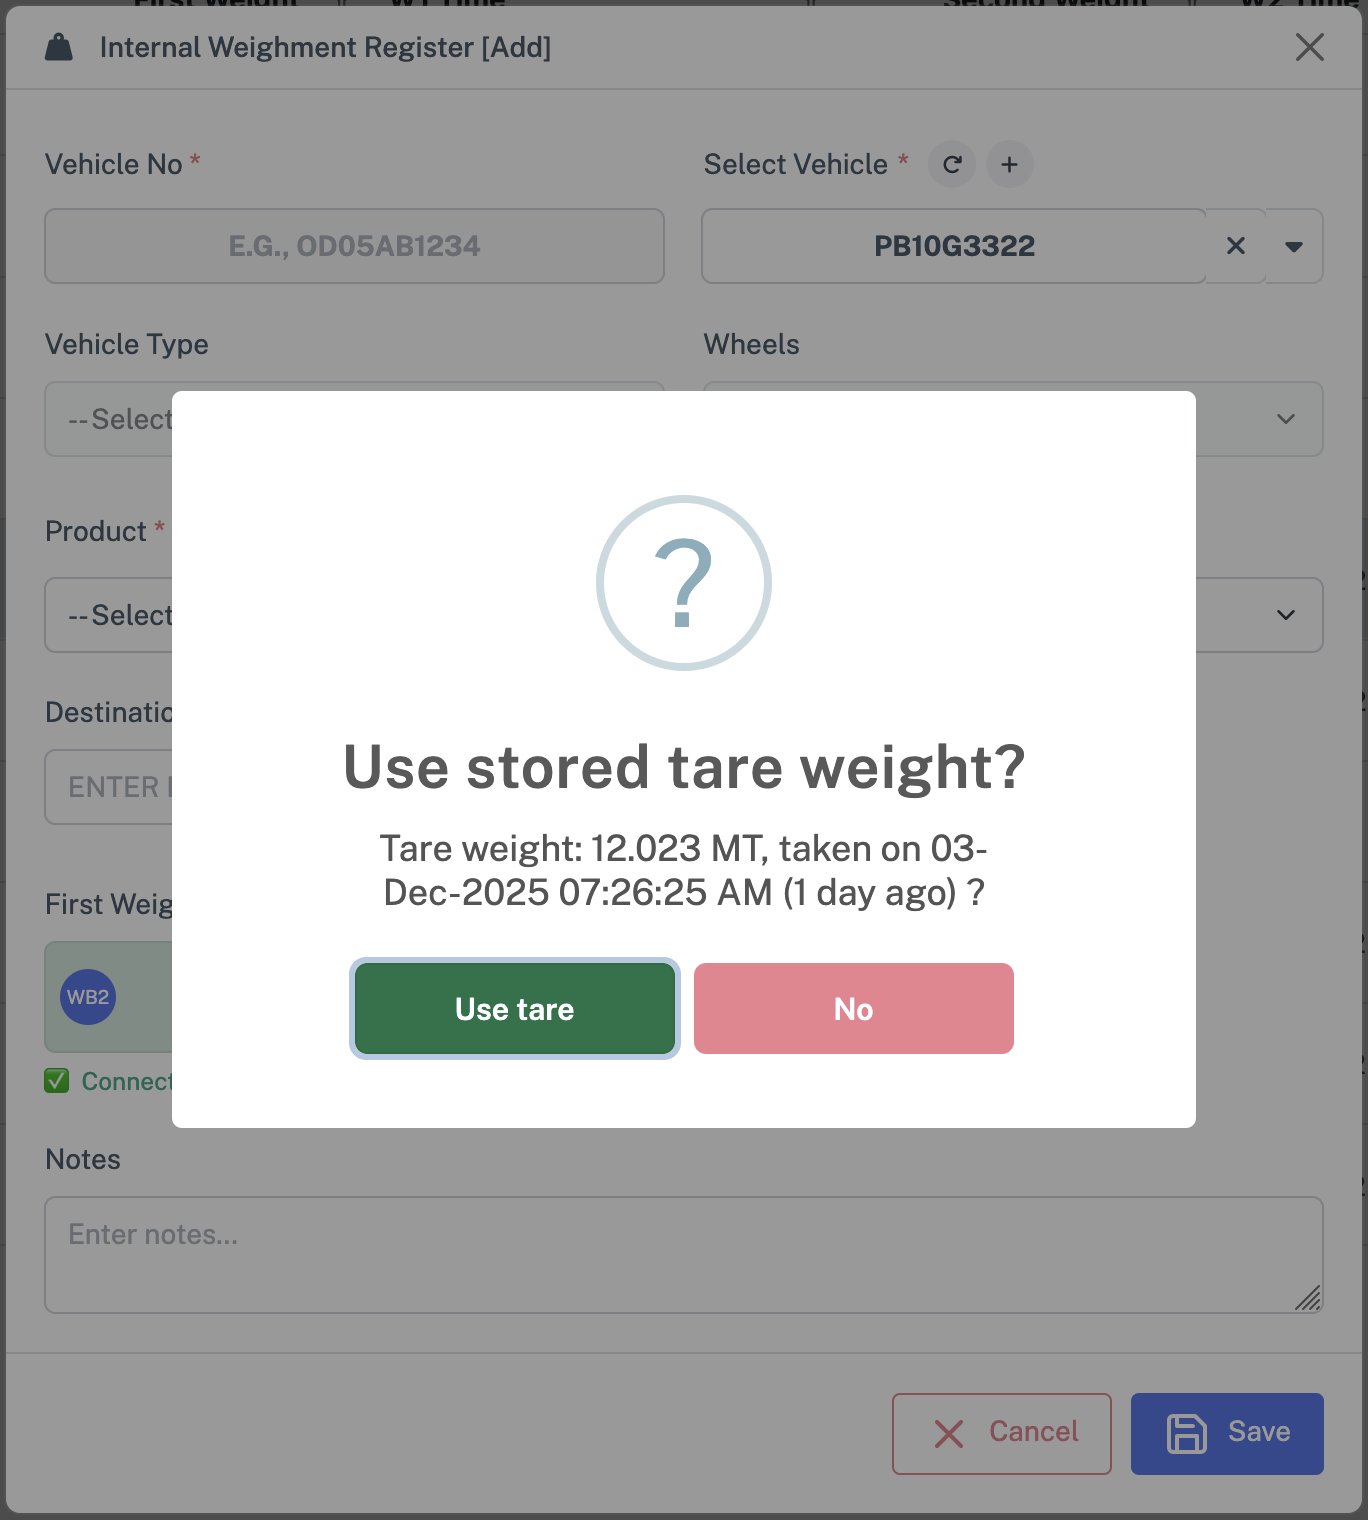
The Tare Weight Master stores vehicle tare weights with timestamps. If a stored tare exists, the system suggests it during weighment and shows its date and age. Supervisors can review, edit, or deactivate entries.
4.3 DO Master (Delivery Orders)
DO Master provides the commercial context for external weighments. It shows pending quantities, dates, and status. Selecting a DO links the weight record to the shipment or invoice and enables auditable traceability between the physical weighment and commercial documents.
4.4 Masters
- Vehicle Master: Vehicle number, type, wheels
- Product Master: Items being weighed (ore, clinker, sand, etc.)
- Transporter Master: Logistics providers
- Supplier Master: Suppliers for external weighments
- Customer Master: Customers for external weighments
- Tare Weight Master: Stored tare records for vehicles
- DO Master: Delivery Orders for commercial linkage
4.5 Weights and Units
First Weight
Captured when vehicle first arrives (Gross or Tare, based on your process).
Second Weight
Captured when vehicle returns (Tare or Gross).
Net Weight
Automatically shows calculated difference.
Always interpreted in the correct unit (Kg/MT) according to weighbridge configuration.
Stored Tare (Tare Weight Master)
Previously recorded tare weight for a vehicle (from the Tare Weight Master) that can be reused with confirmation.
5. Master Data Management
All masters can be created from their respective screens or inline during weighment.
5.1 Vehicle Master
Masters → Vehicle Master: register vehicle number, type and wheels for reuse in weighments.
5.2 Product Master
Masters → Product Master: maintain list of materials (ore, clinker, sand, etc.).
5.3 Transporter Master
Masters → Transporter Master: store logistics providers for Internal/External weighments.
5.4 Supplier & Customer Master
Masters → Supplier Master / Customer Master: maintain counterparties for External weighments and DOs.
5.5 Tare Weight Master
Tare Weight Master: manage stored vehicle tares used as suggestions during weighment.
5.6 DO Master
DO Master: define quantity and context for External weighments linked to customers.
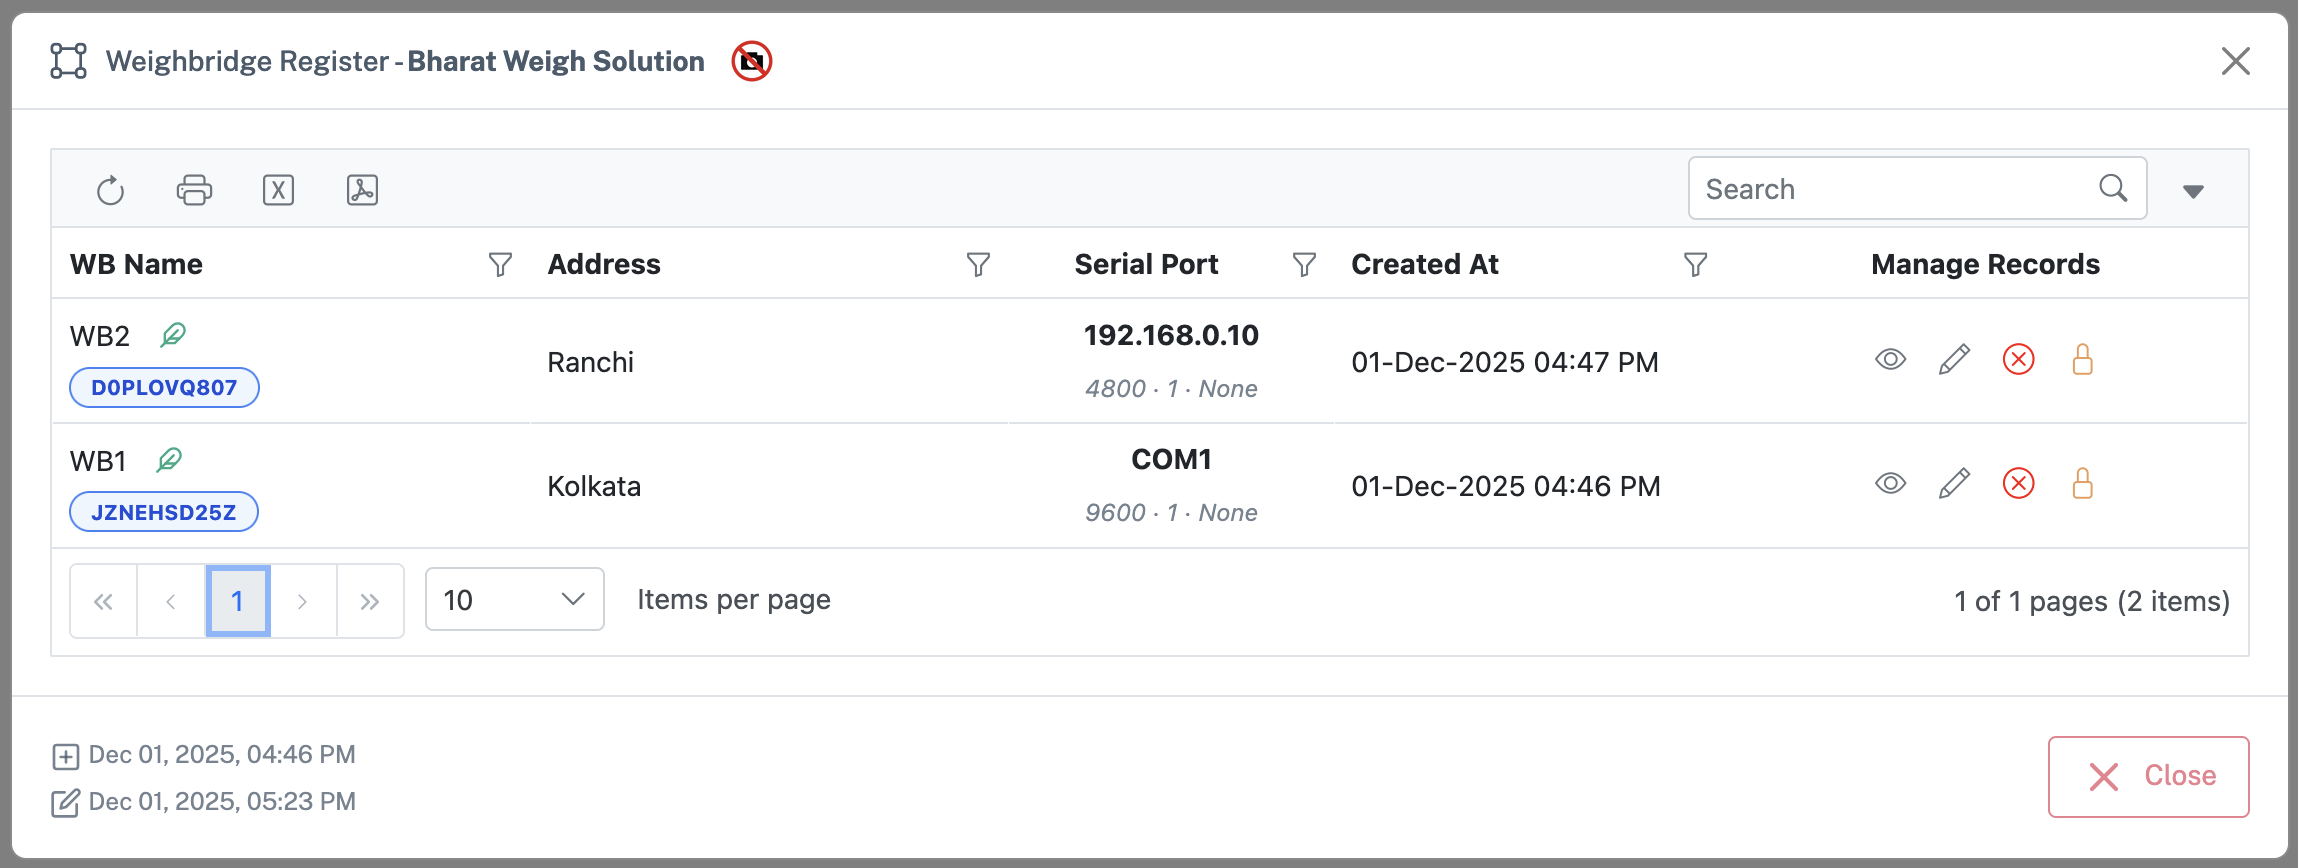
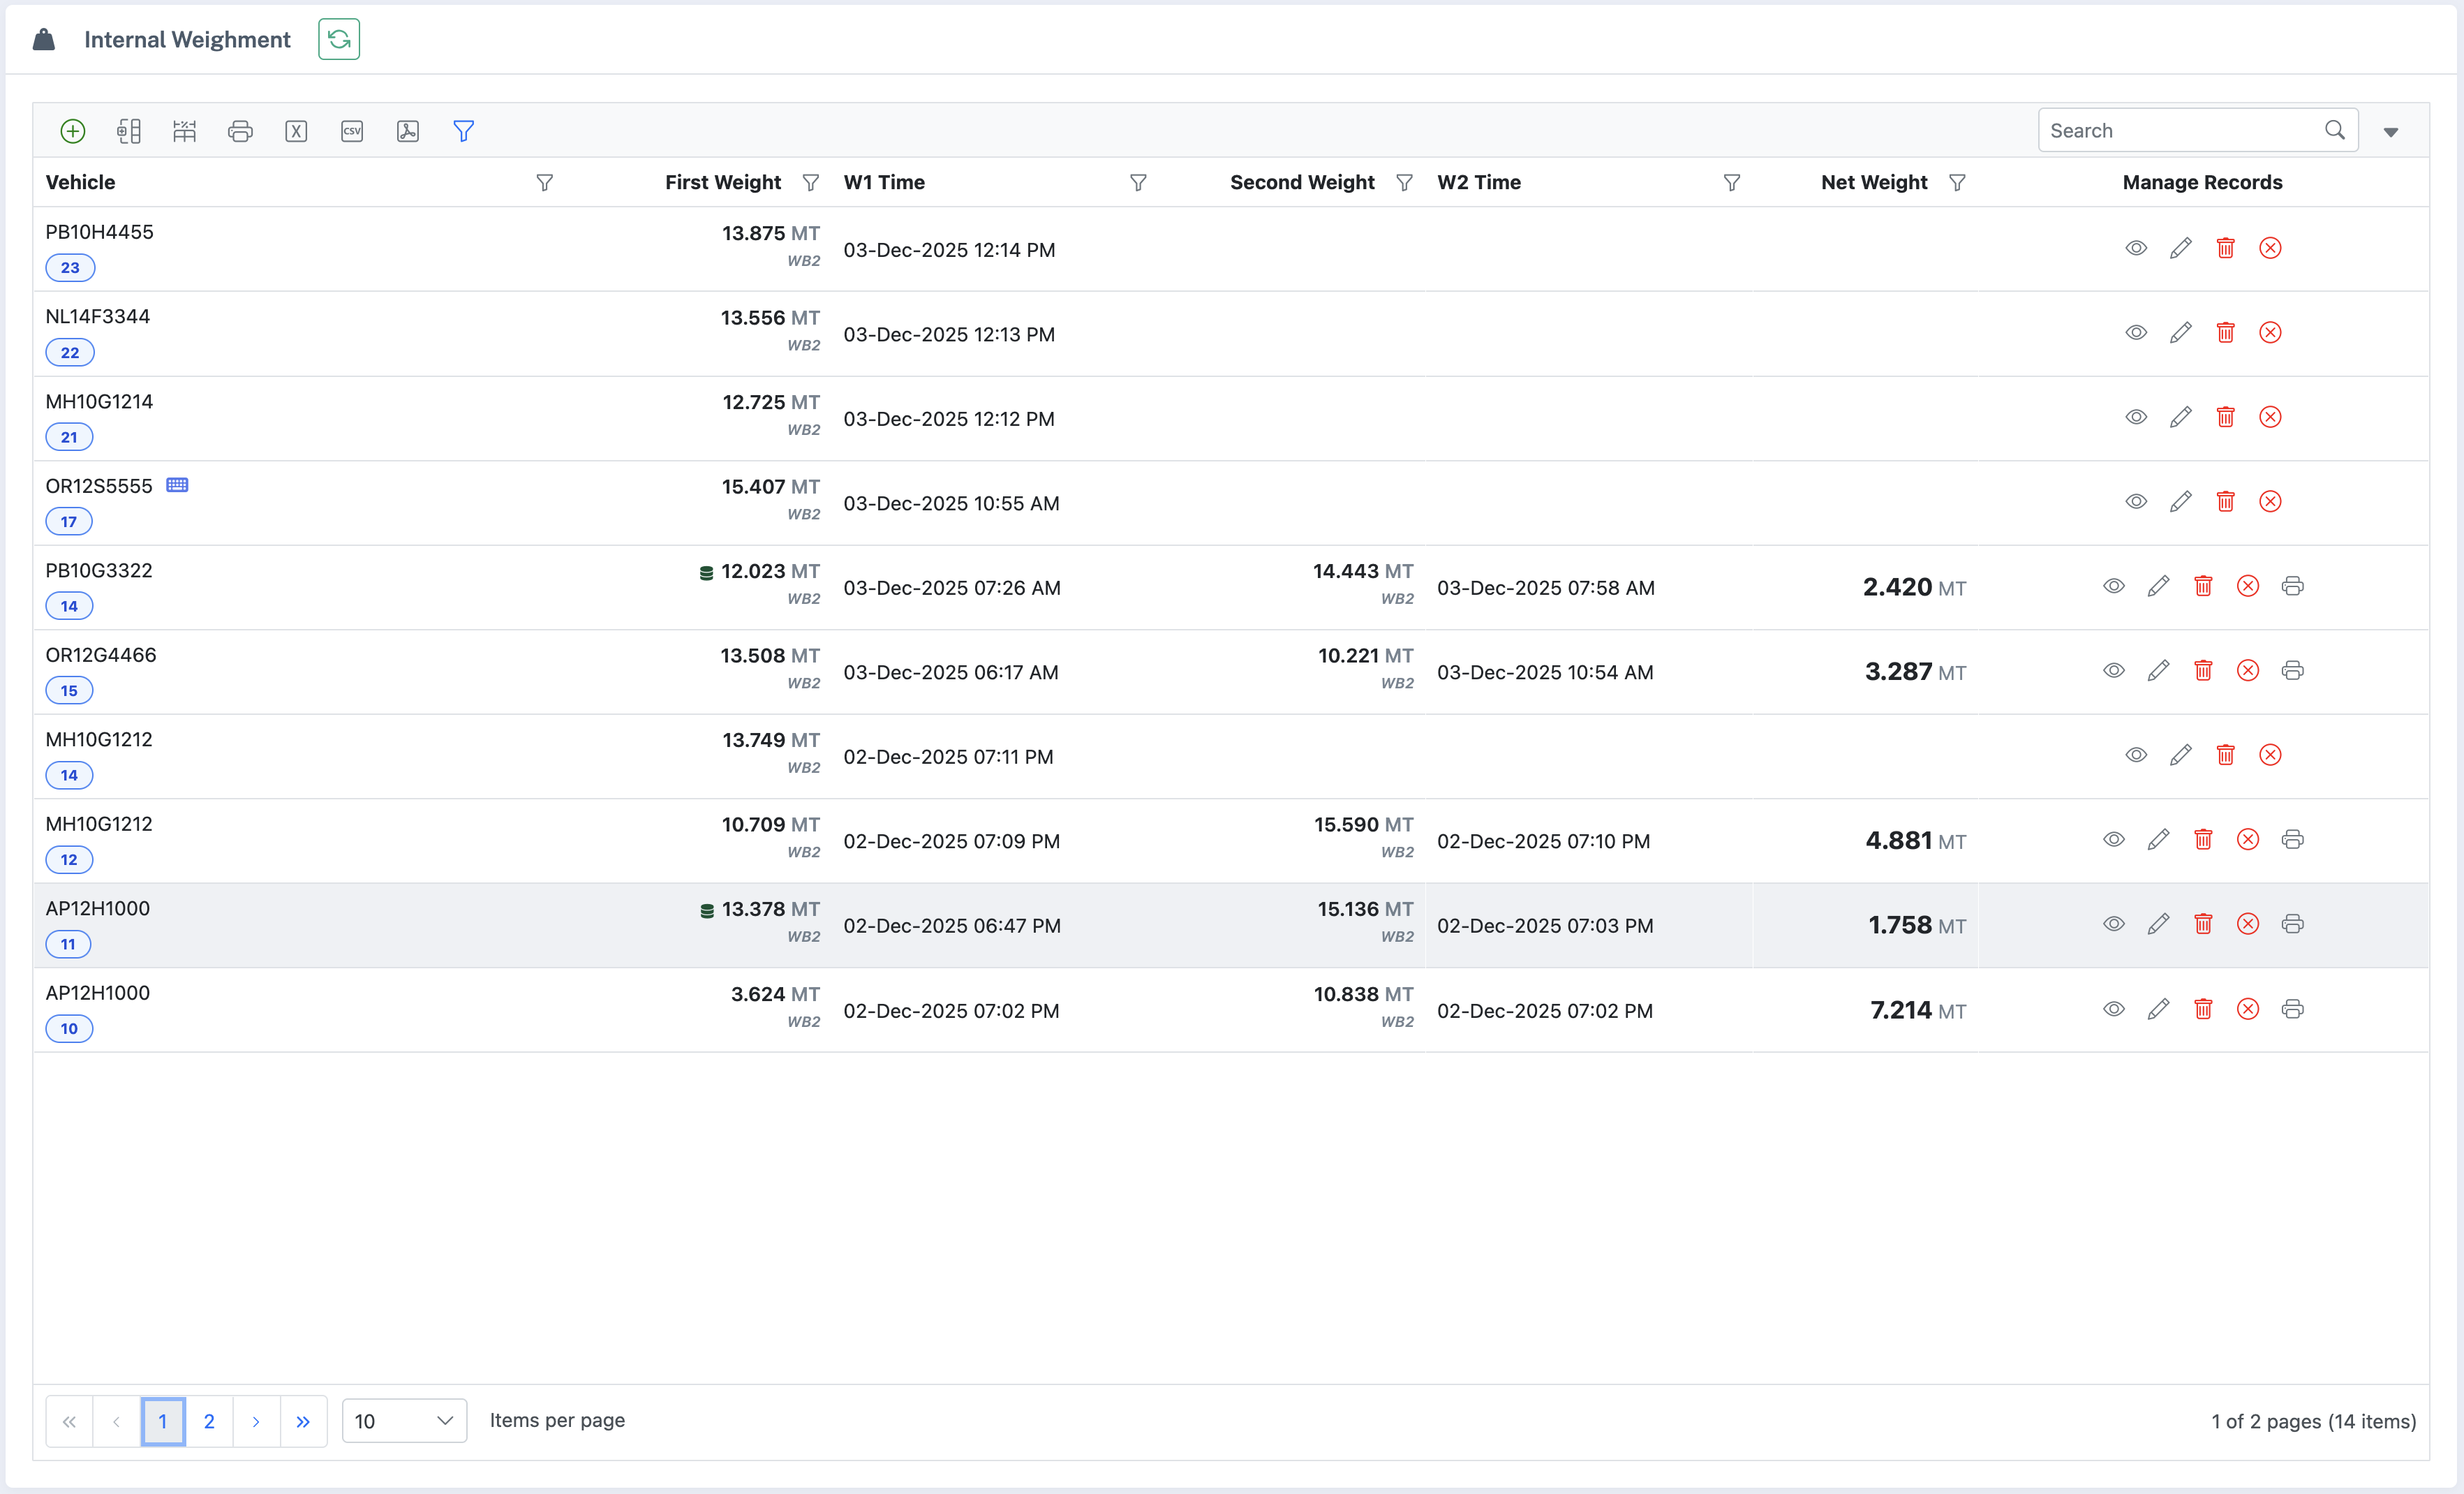
6. Weighment Register (Common Behavior)
6.1 Accessing Weighment Registers
- Internal Weighment: Weighment → Internal Weighment
- External Weighment: Weighment → External Weighment
6.2 Local Scale Client & Weight Capture
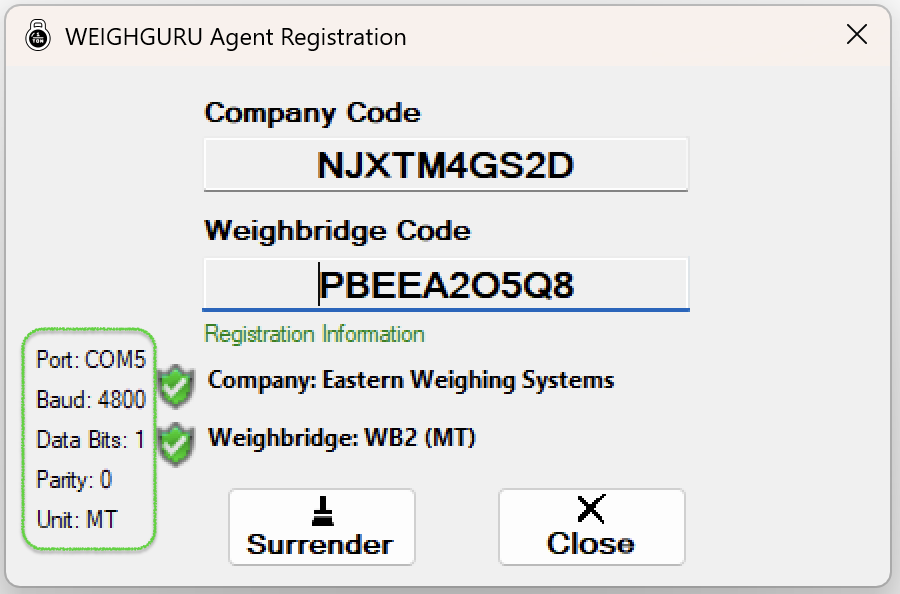
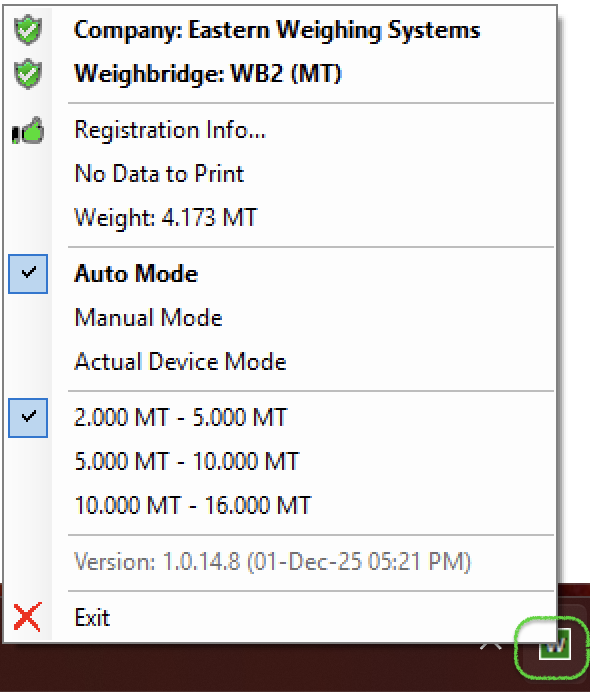
Weighguru connects to a Local WeighGuru Scale (scale client) running on the weighbridge PC. This client is registered to a specific weighbridge and company.
The weighment form shows live weight from the scale. Operators use the buttons to capture Weight 1 and Weight 2, then click Save to store them.
- Registration: IT configures the scale client with Company and Weighbridge code. After registration, the client shows as Active.
- Online Status: When the client runs and is connected, the weighbridge shows as online and ready.
- Capture flow: Click Save to fetch the live weight from the scale. The value is recorded only after saving; operators cannot enter weights manually.
- Live feed not showing: confirm the local client is Registered and Online.
- Client connectivity: restart the local scale client and verify there are no network/firewall issues between client and server.
- Permissions: ensure the operator has permission to capture and save weights.
Screenshots show client registration, online status, and weight capture.
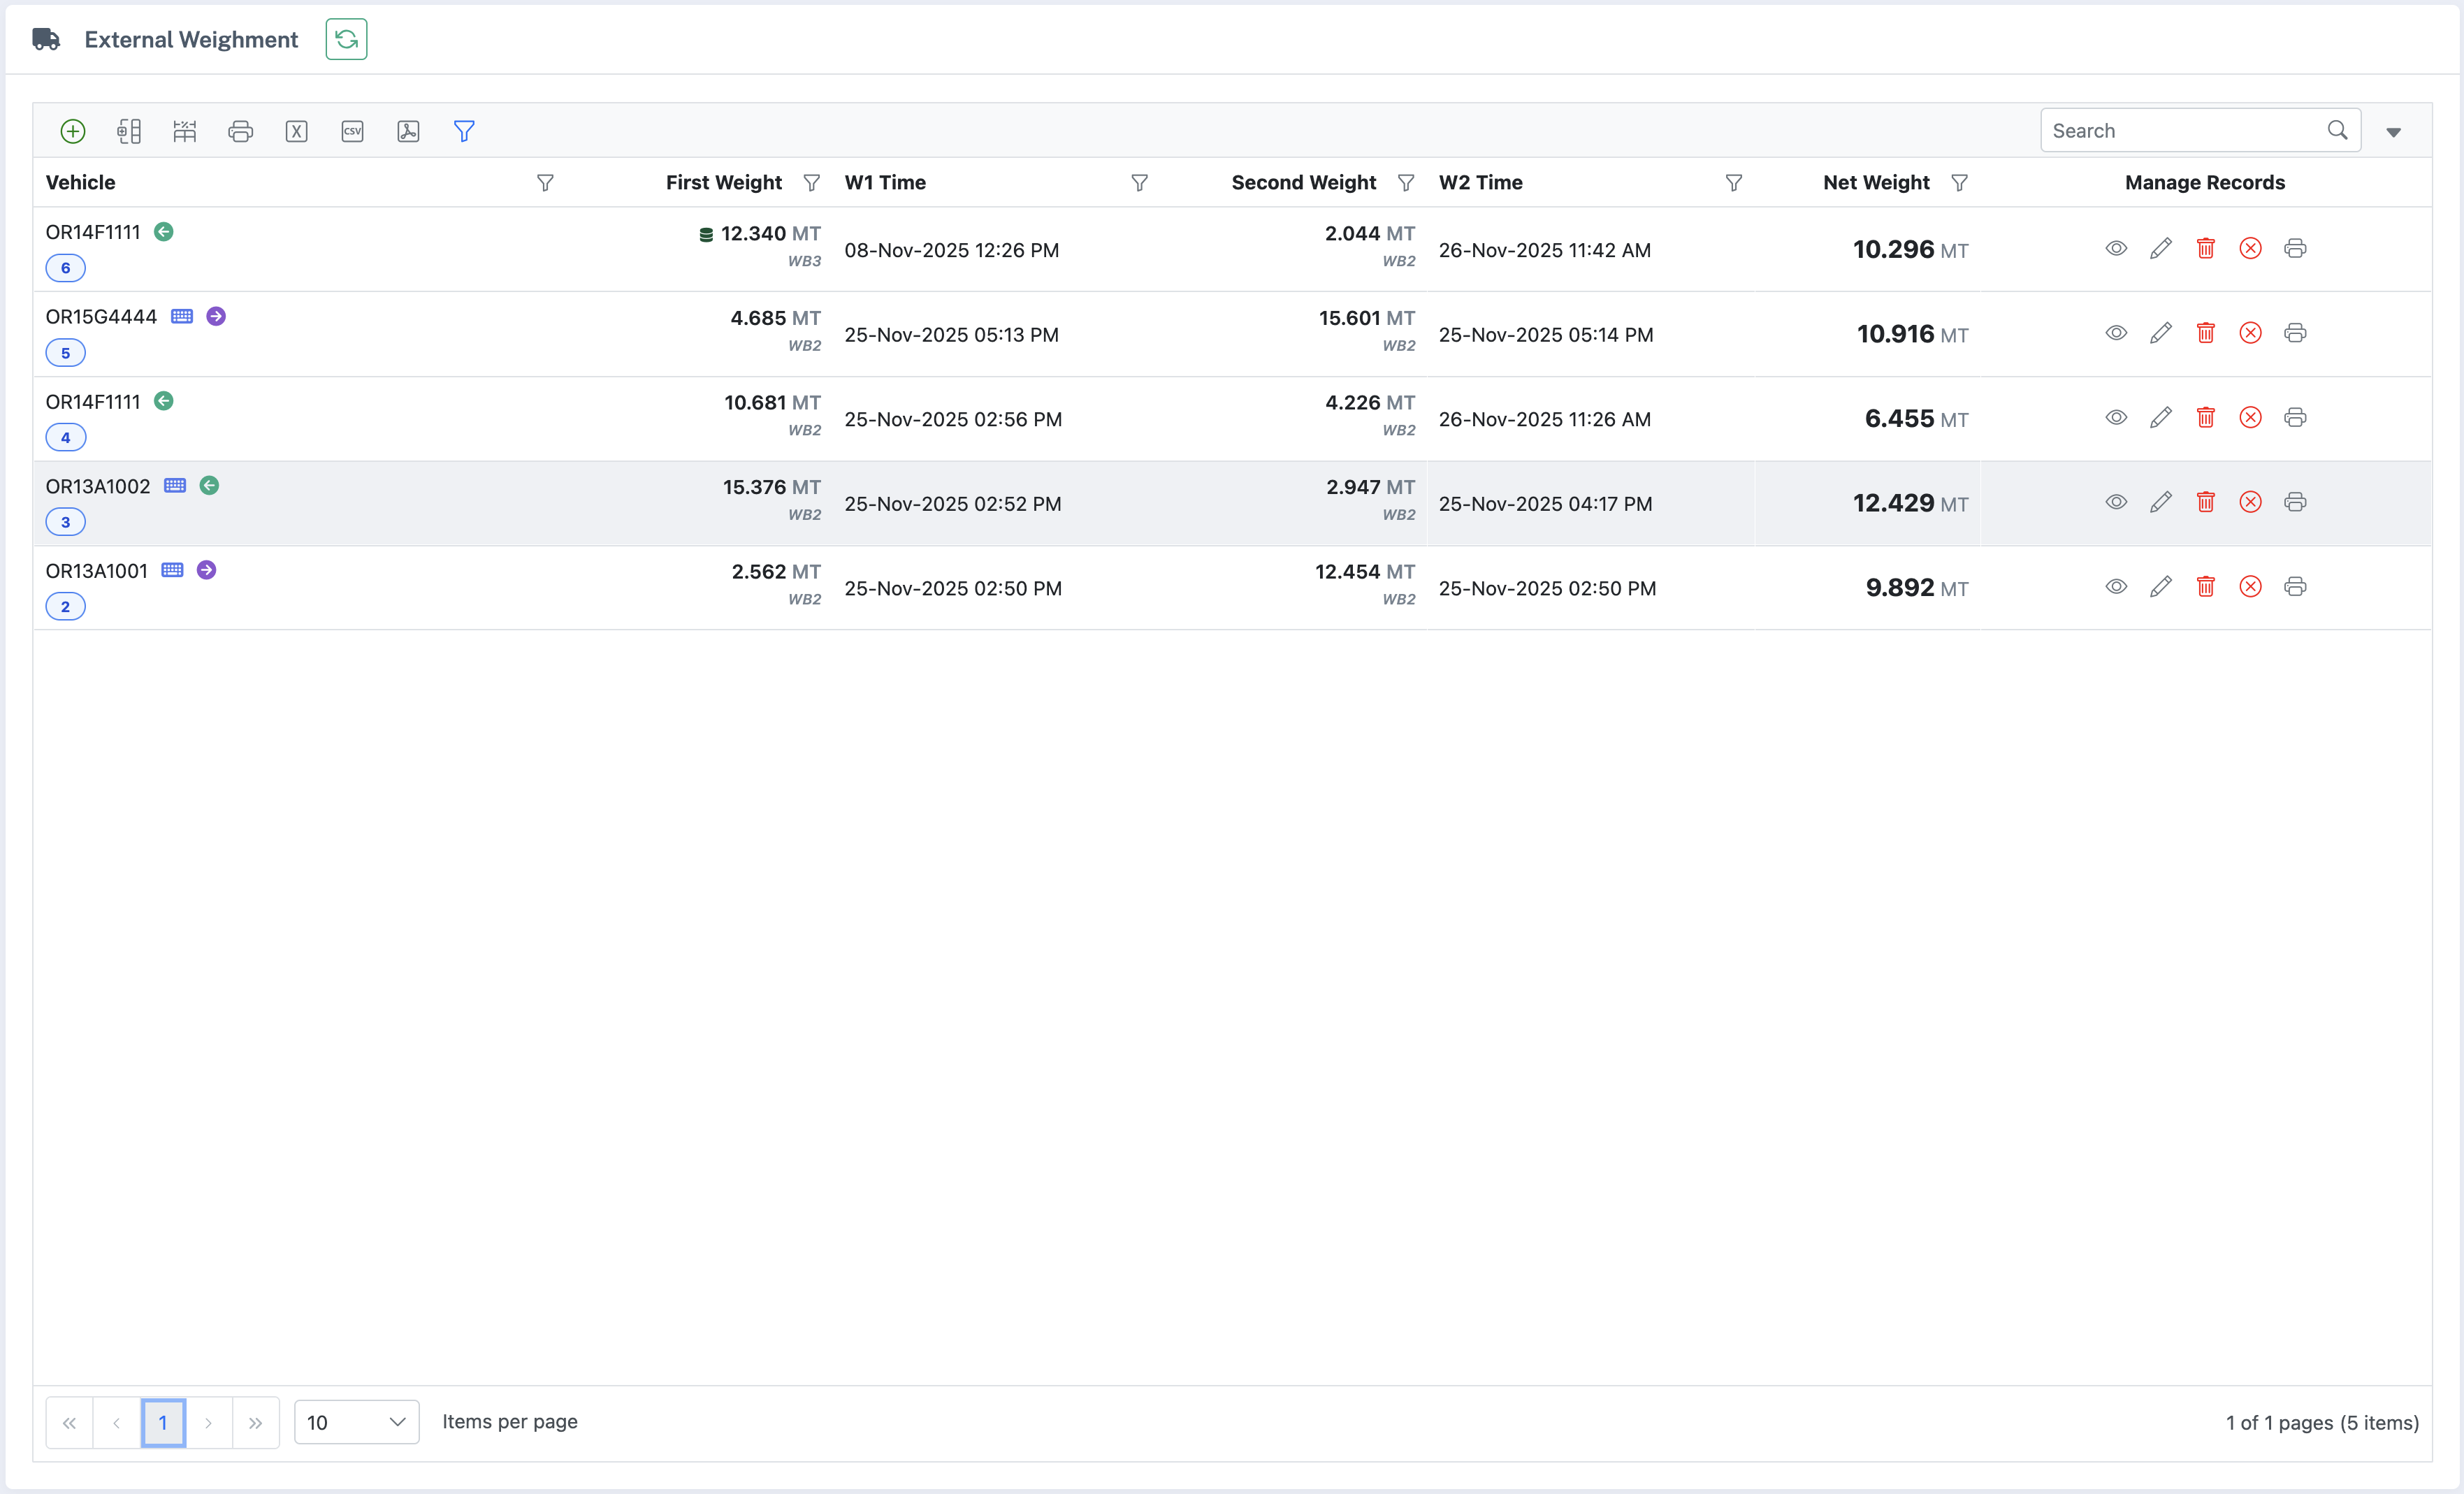
6.3 Common Grid Layout
Both Internal and External weighment registers share a similar grid layout and toolbar. Typical columns include:
- Record No / ID
- Vehicle No
- Product / Material
- Transporter
- Supplier (External only)
- Weighbridges
- First Weight, Second Weight, Net Weight
- Destination
- Shipment / Invoice No
- Status (Active / Inactive)
6.4 Common Toolbar and Row Actions
Both registers use the same core actions:
Double-click a row to view or edit. Both lists support filter, resize, group, and export. Only a few columns differ.
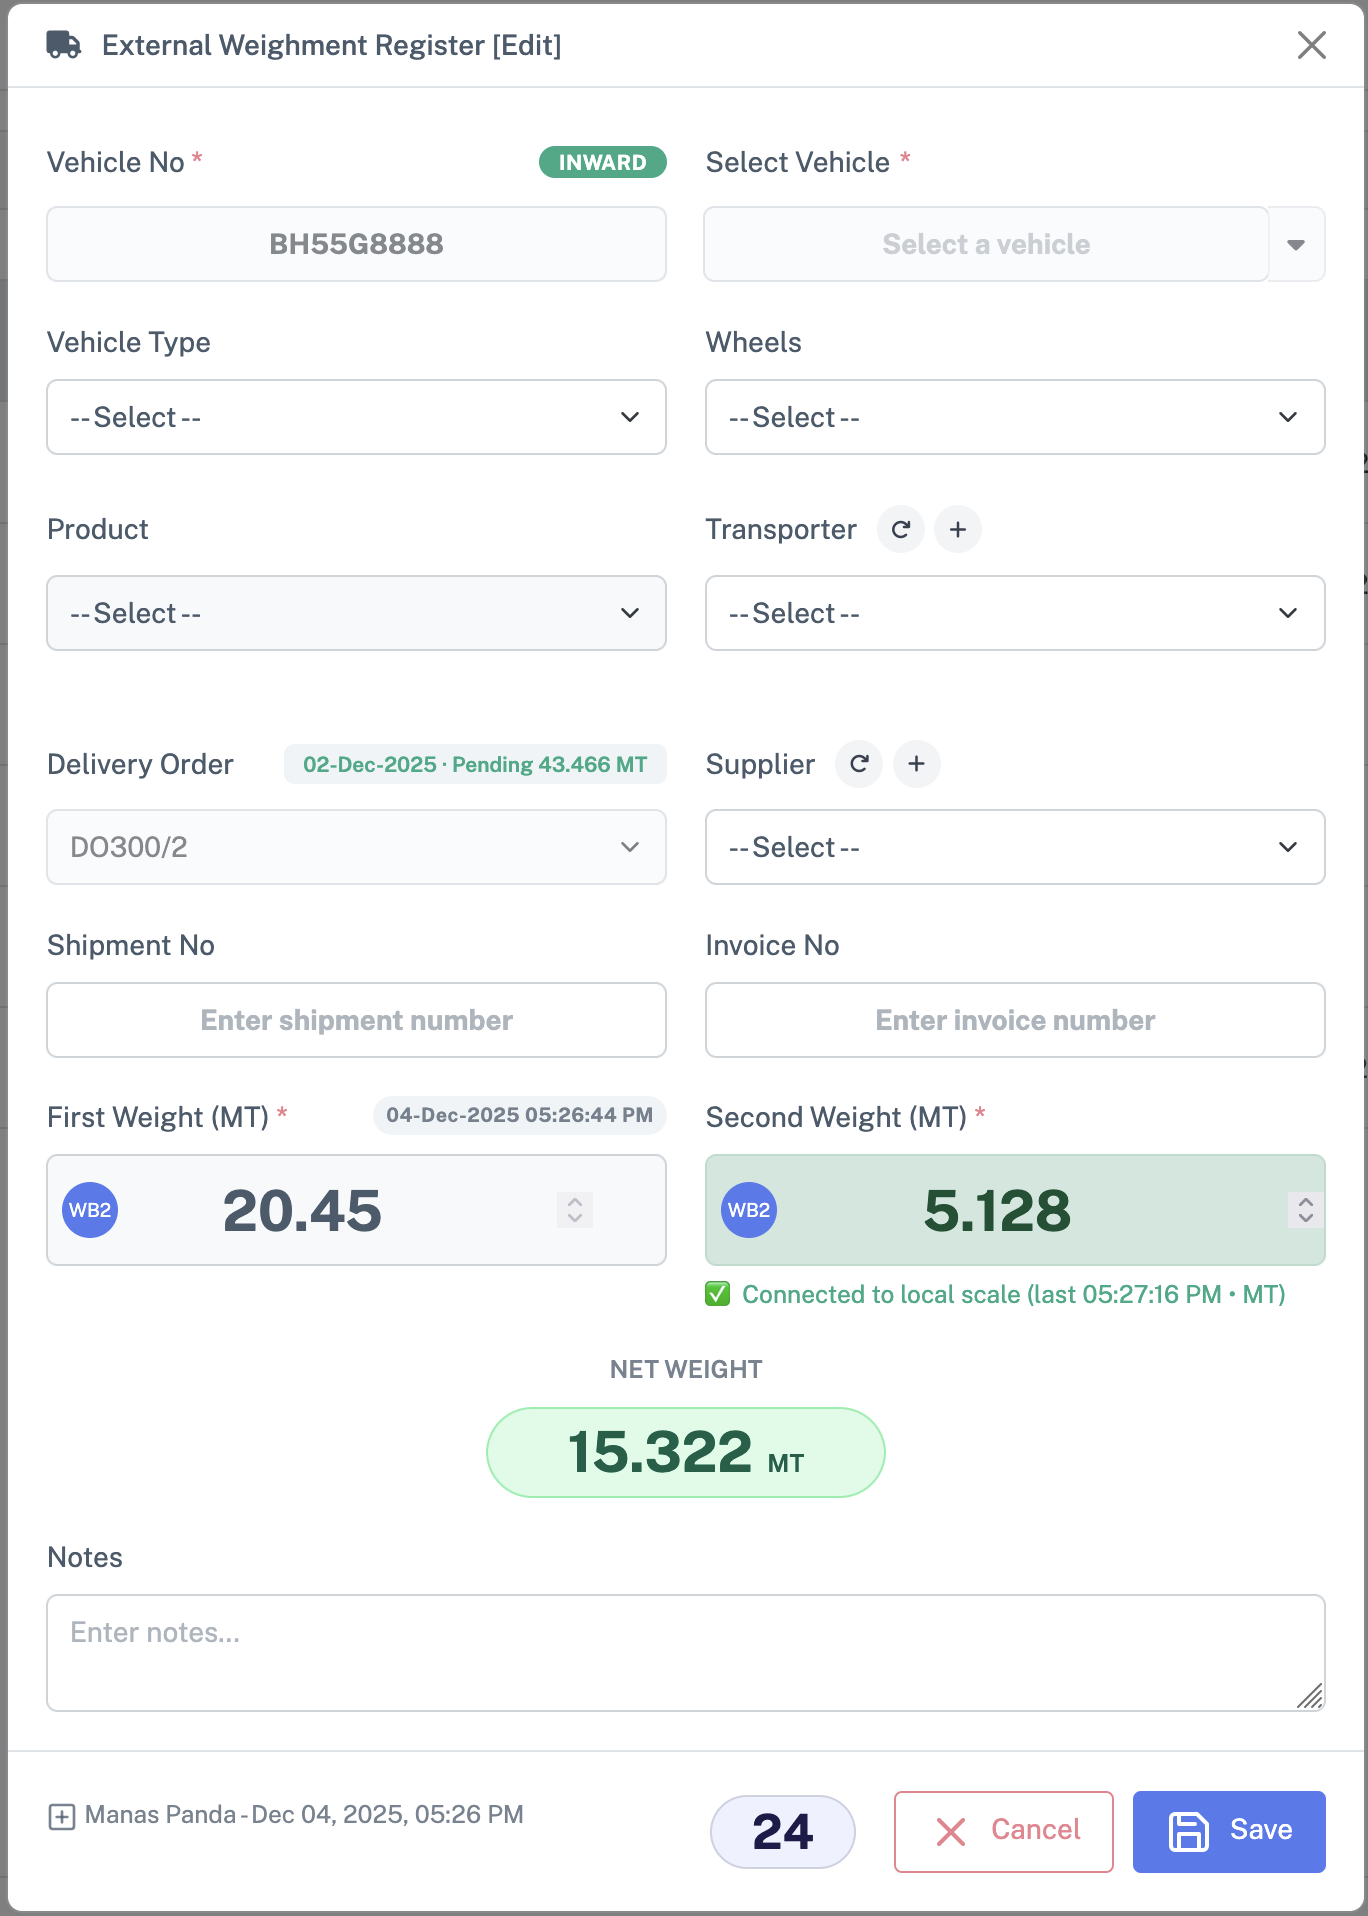
7. Internal Weighment – Detailed Workflow
7.1 Opening Internal Weighment Screen
- From left menu, select Weighment → Internal Weighment
- The Internal Weighment Register grid appears
7.2 Adding a New Internal Weighment
- Click Add in toolbar
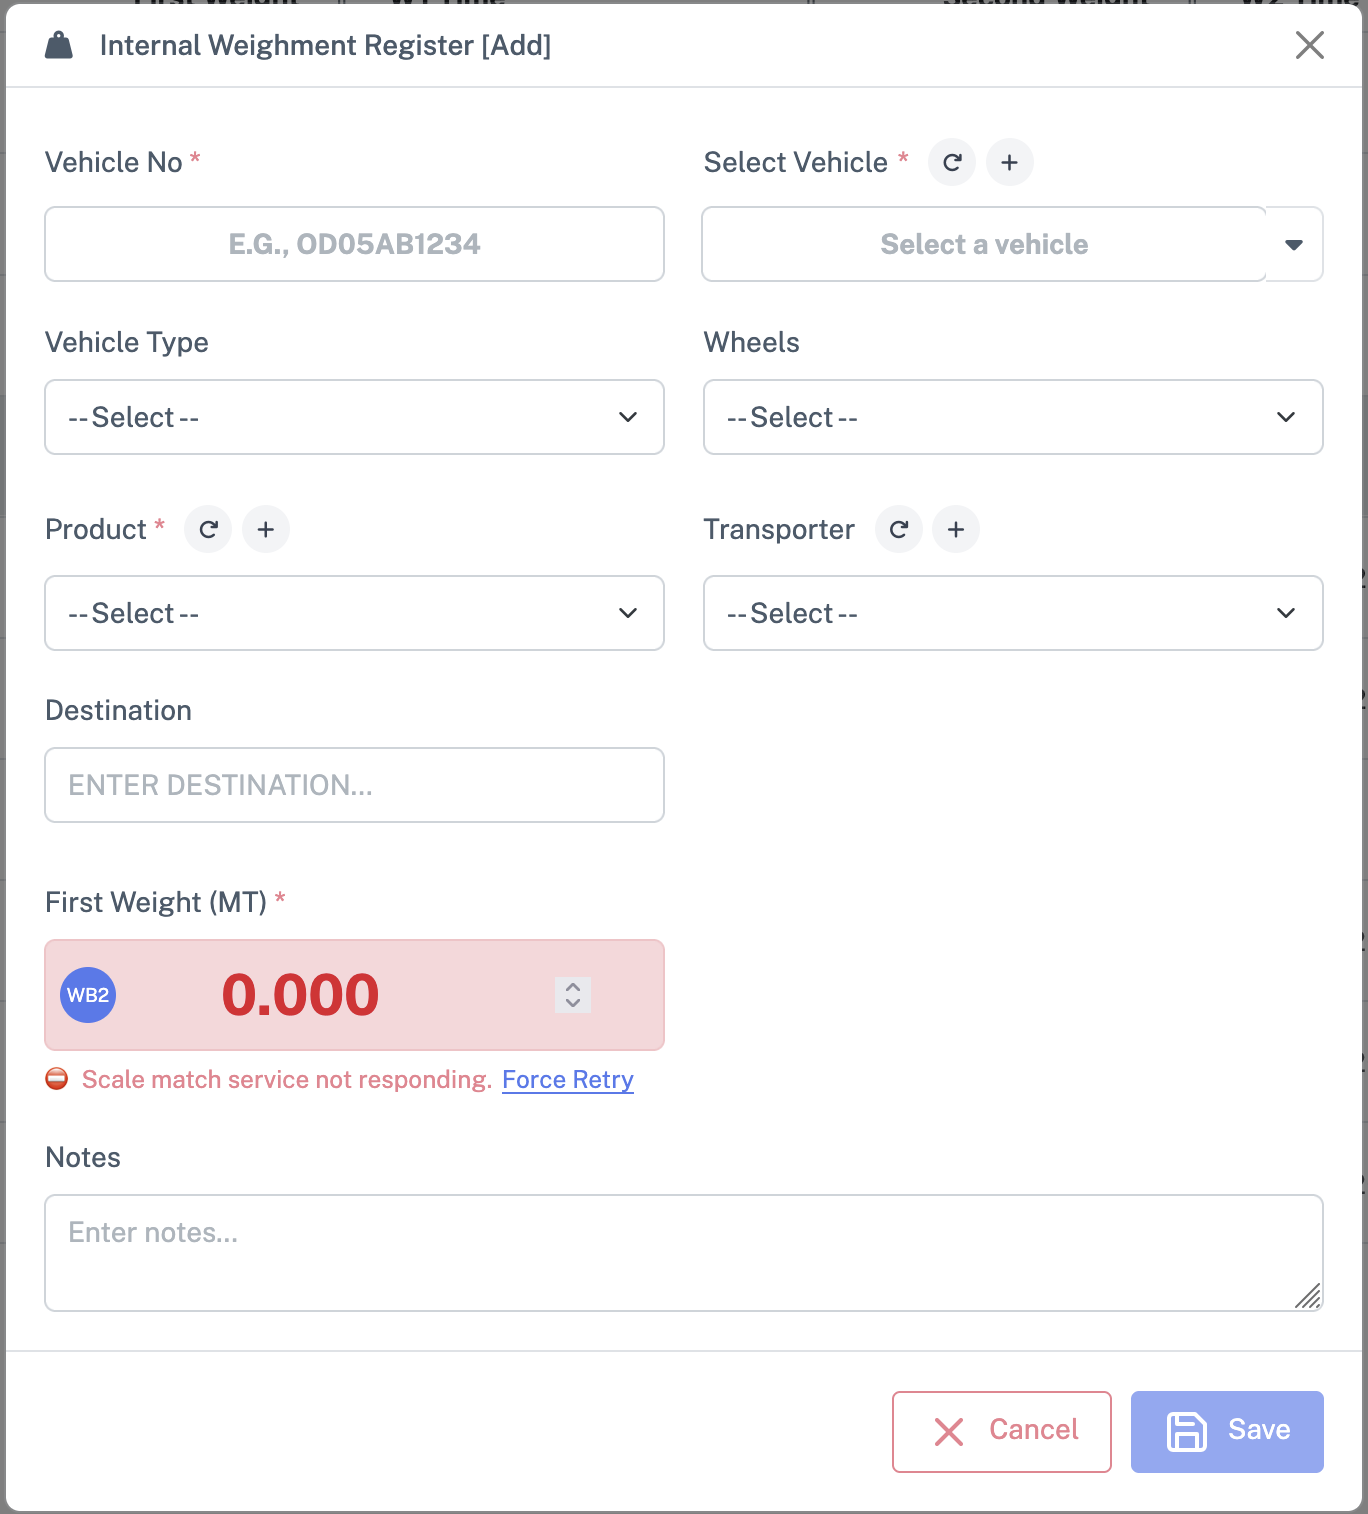
- Internal Weighment Register [Add] modal opens
7.2.1 Header & Assigned Weighbridge
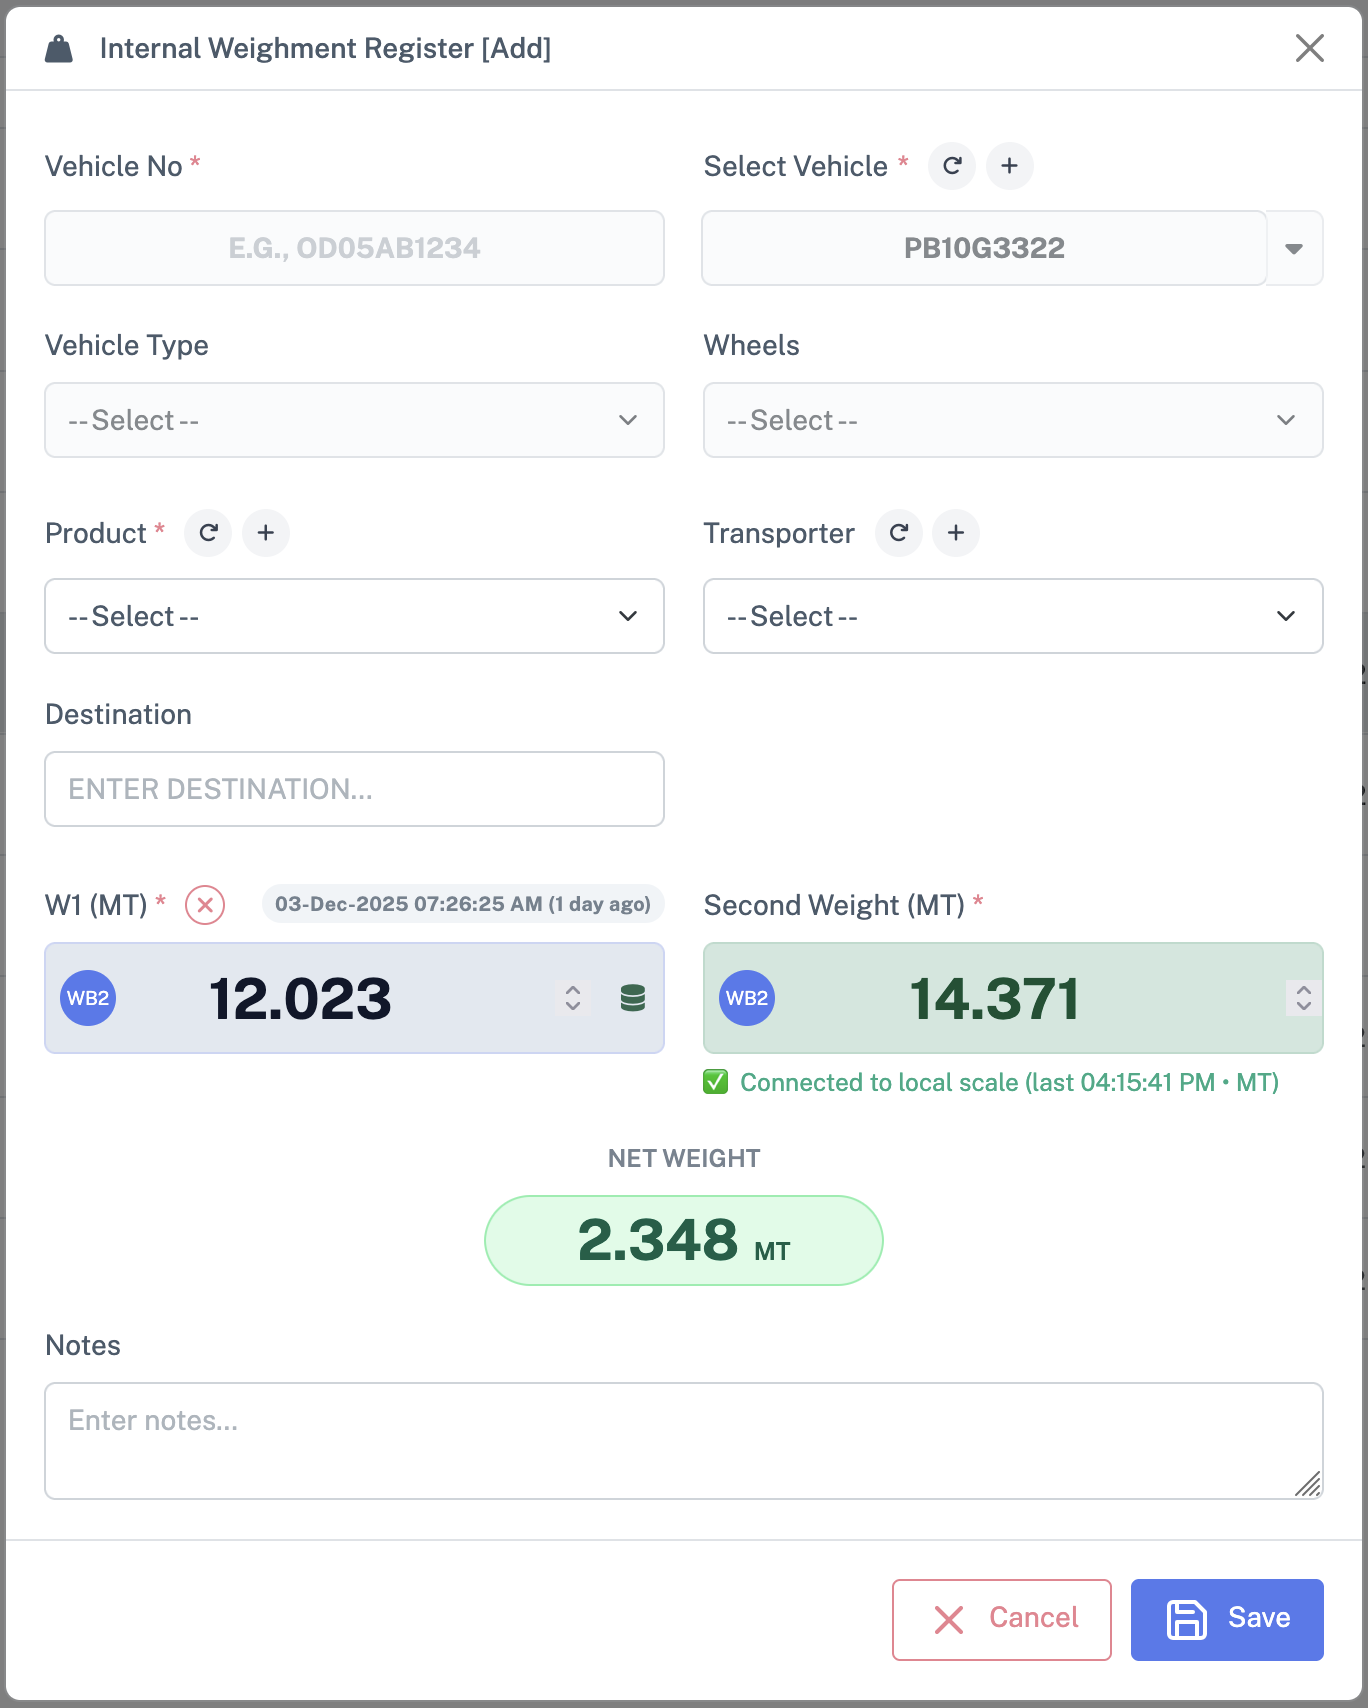
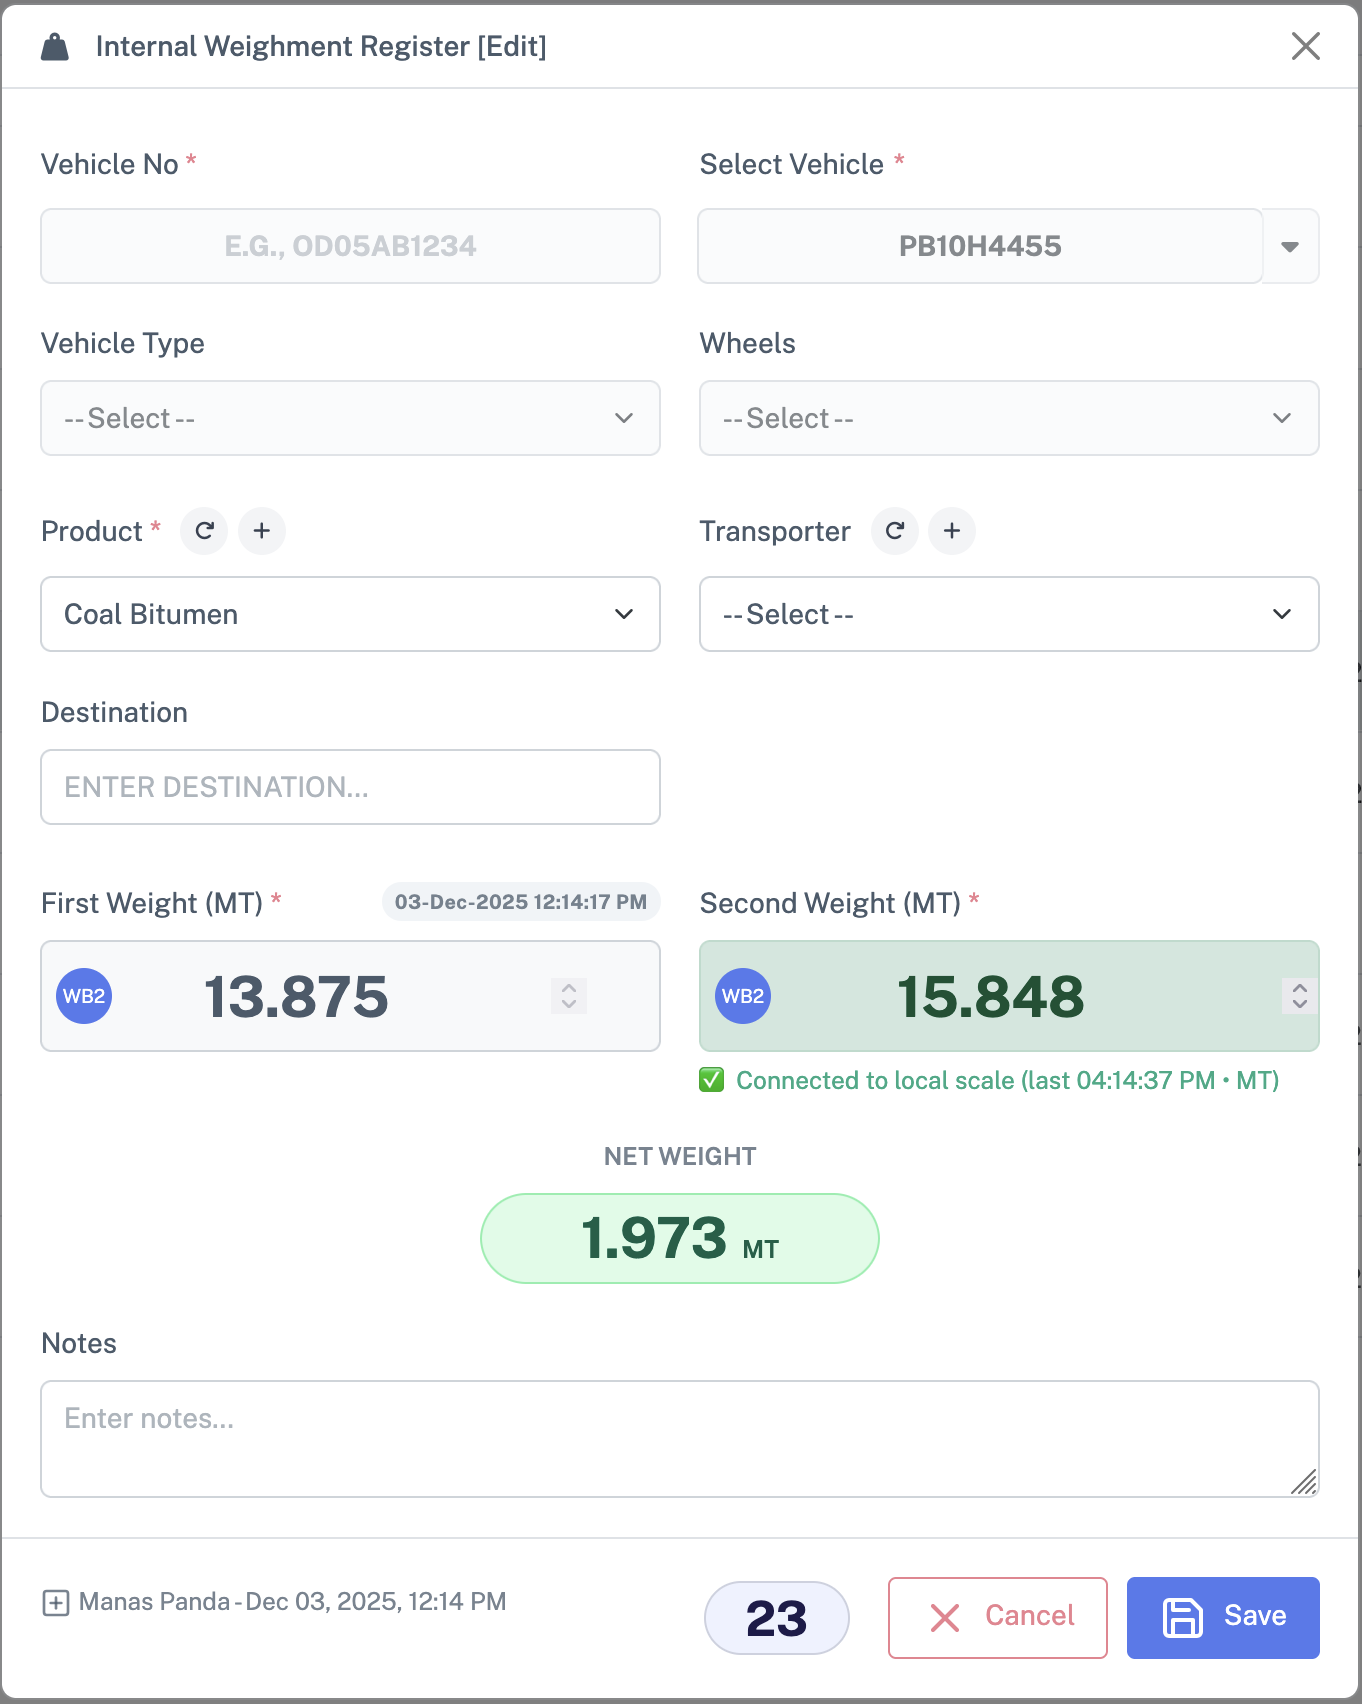
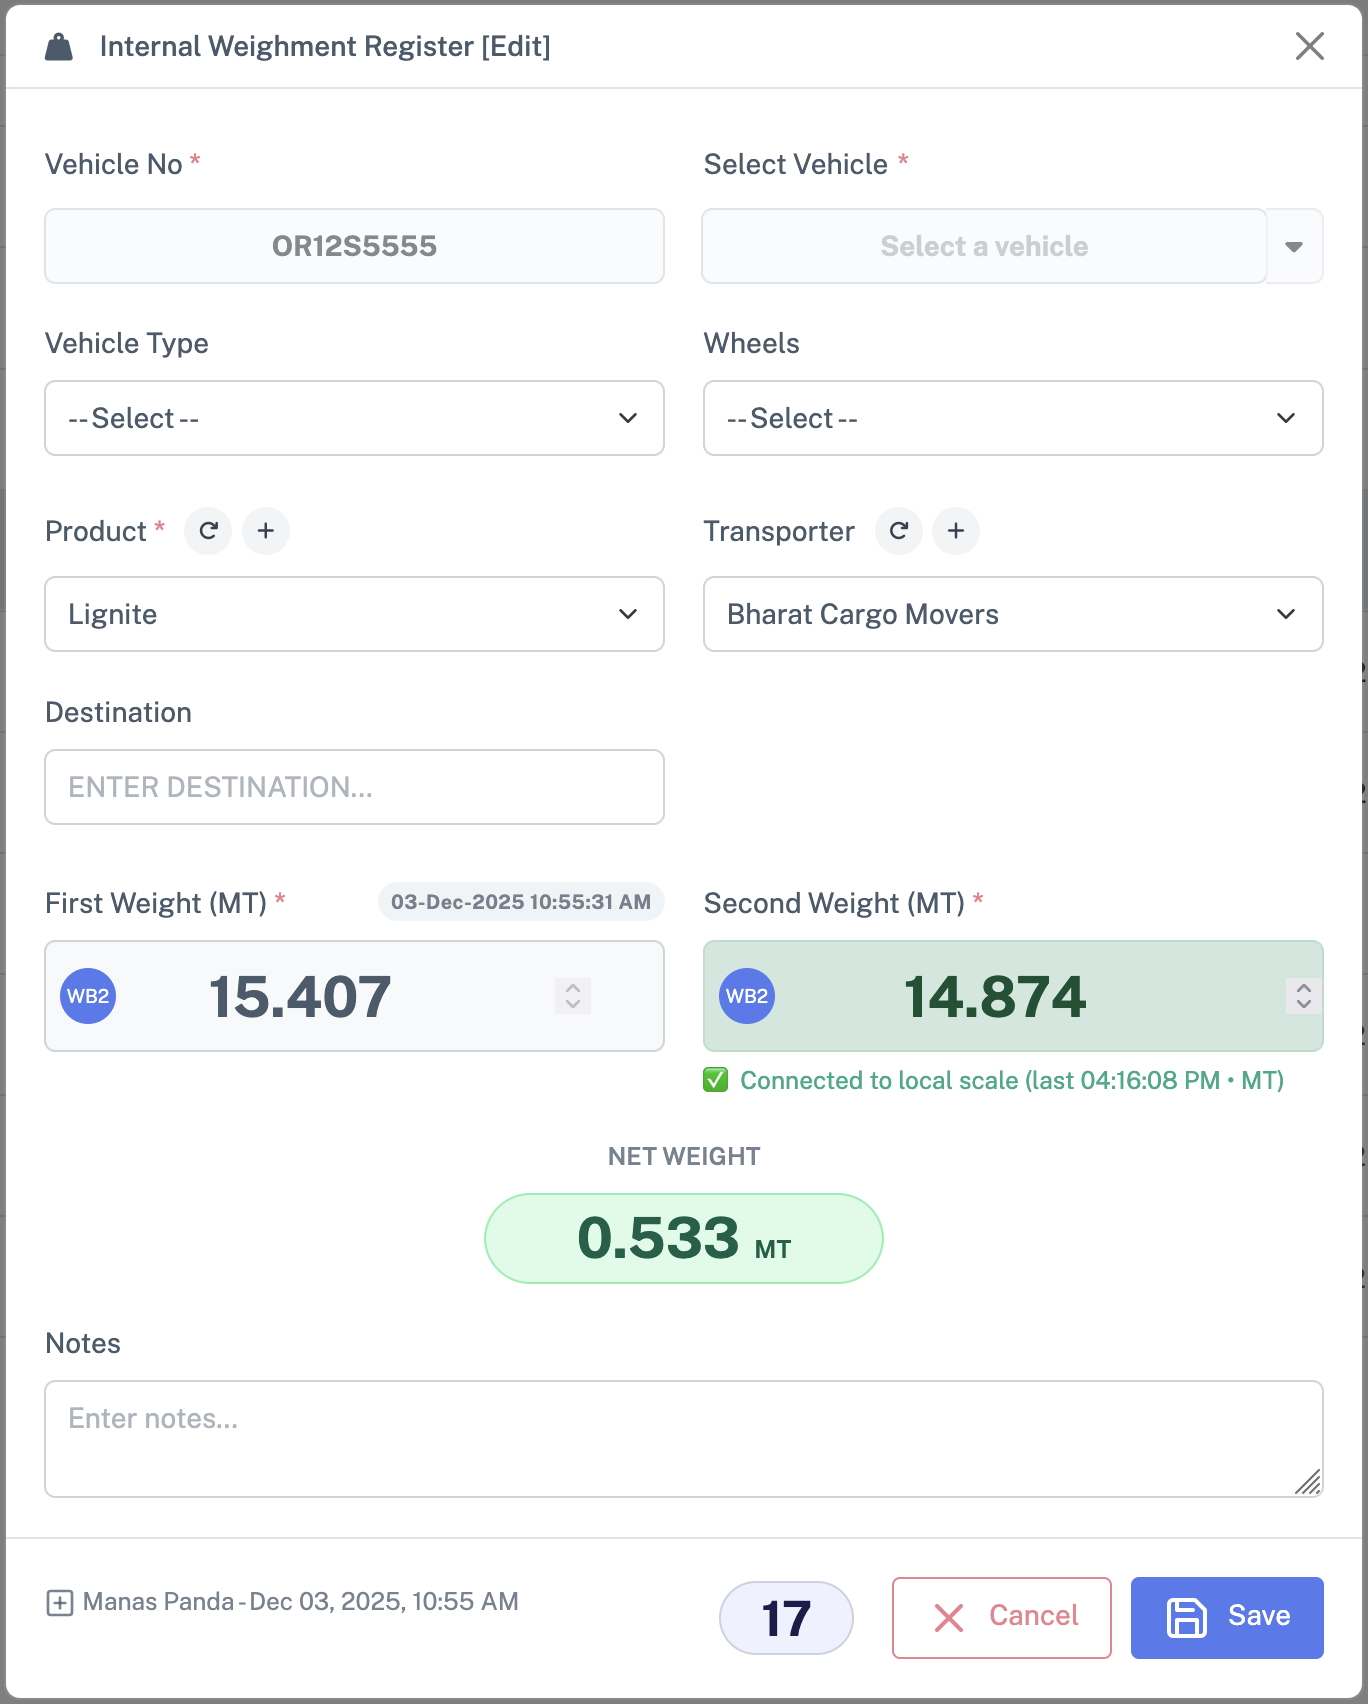
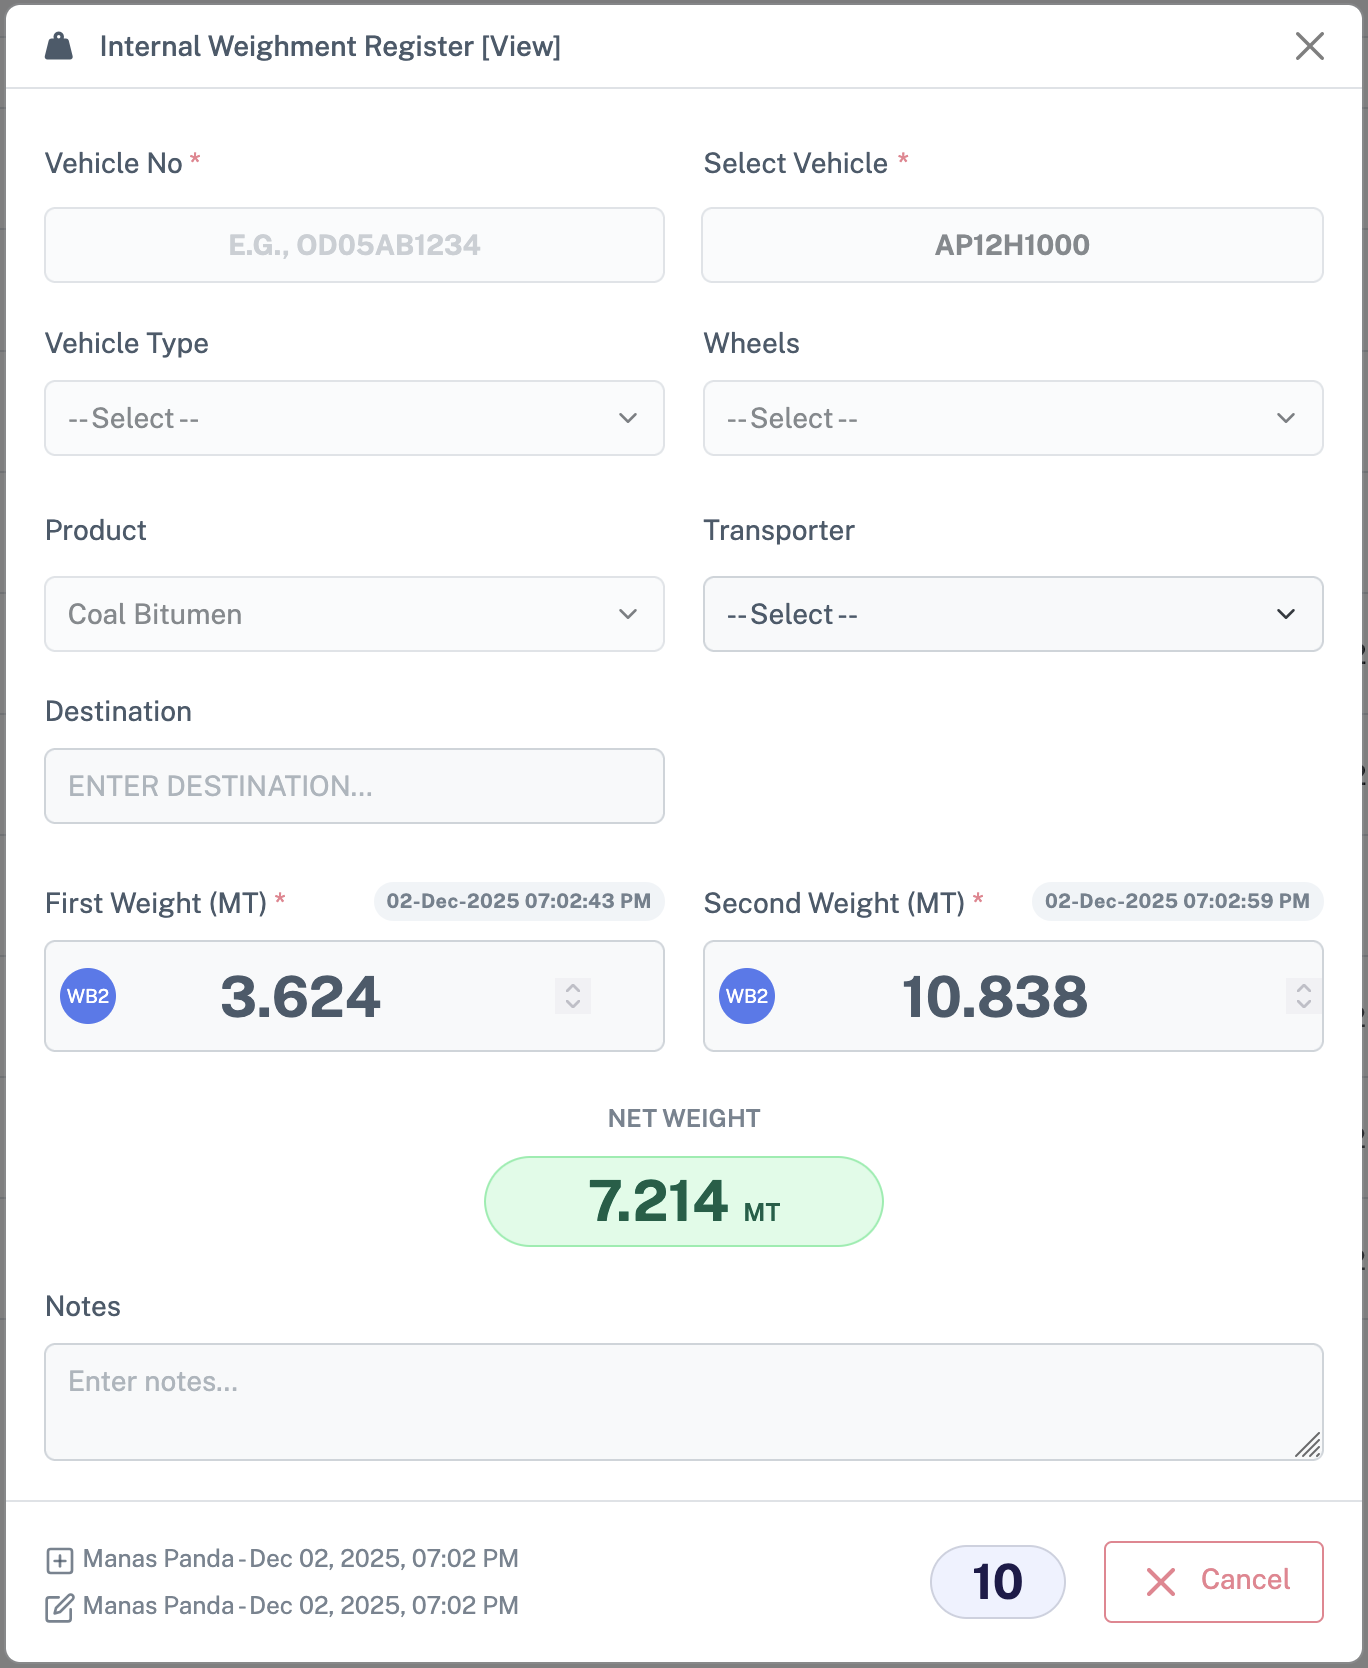
The top of the modal shows the title Internal Weighment Register [Add] and a Weighbridge badge with name and status (Active / Locked / Inactive).
Before proceeding, confirm the weighbridge is Active and Unlocked, and the correct Company is selected.
7.2.2 Vehicle Information
Left side – Vehicle No: Type the vehicle number. If not in masters, manual entry lets you edit Vehicle Type and Wheels.
Right side – Select Vehicle: Dropdown of existing vehicles with inline Reload and Add buttons next to the label. Reload refreshes the dropdown; Add opens a small form to create a new vehicle. After saving, the new vehicle is automatically selected.
Behavior summary: For manual entry, you type Vehicle No and set Type/Wheels manually. For a selected master vehicle, Type and Wheels are typically auto‑filled and may be locked based on configuration.
7.2.3 Product and Transporter
Product: Dropdown list of products/materials with inline Reload / Add buttons for quick maintenance.
Transporter: Dropdown of transporters, also with inline Reload / Add options.
7.2.4 Other Internal Details
- Destination: Where the material is going (e.g., Yard A, Silo 1).
- Notes: Any remarks (for example, “Reweigh due to earlier error”).
7.3 Capturing Weights for Internal Weighment
7.3.1 First Weight
- Ensure the vehicle is properly positioned on the assigned weighbridge.
- Trigger the first weight via the scale control to request a live reading from the local scale.
- The captured Weight 1 is staged in the form and will be persisted only when the operator clicks Save / Submit.
7.3.2 Second Weight
- When the vehicle returns, position it again on the weighbridge.
- Capture the second weight using the same scale capture control; the value is staged and persisted only after Save / Submit.
- The system computes Net Weight as the difference between weights, using the configured units (Kg/MT).
Validations: The system makes sure the second weight makes sense compared to the first, and automatically converts units if the weighbridges use different ones.
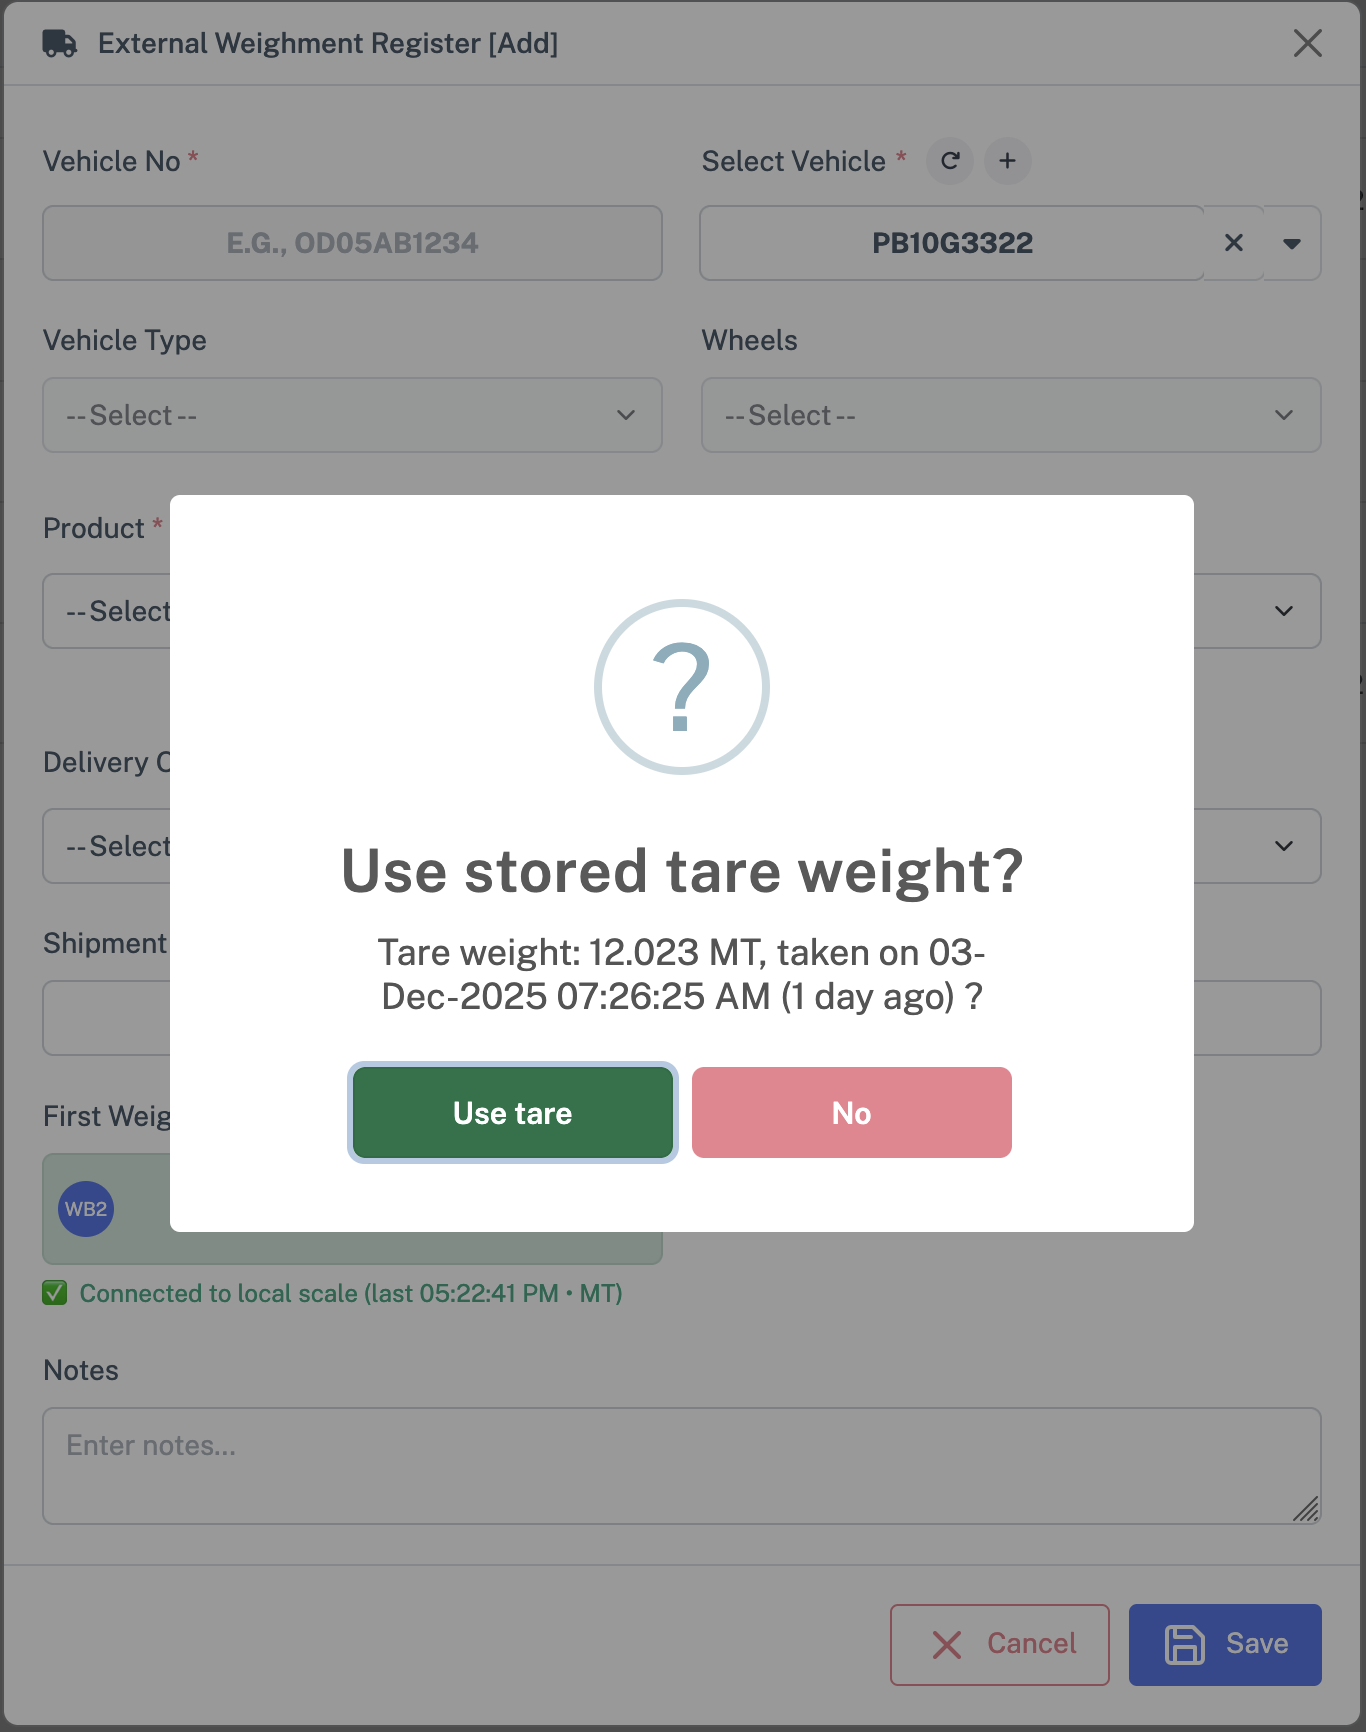
Stored Tare (Tare Weight Master): When a stored tare exists for the vehicle, the system will suggest it (showing the stored date). Operators may apply the suggested tare only if the stored tare's date is within the allowed validity period; expired tares are not suggested.
7.4 Saving and Viewing Internal Weighments
- After all mandatory fields are filled and weights are captured, click Save / Submit.
- On success, a confirmation message appears and the register grid refreshes with the new record.
To view or edit an existing record, either double‑click the row in the Internal Weighment Register or select the row and click Edit on the toolbar.
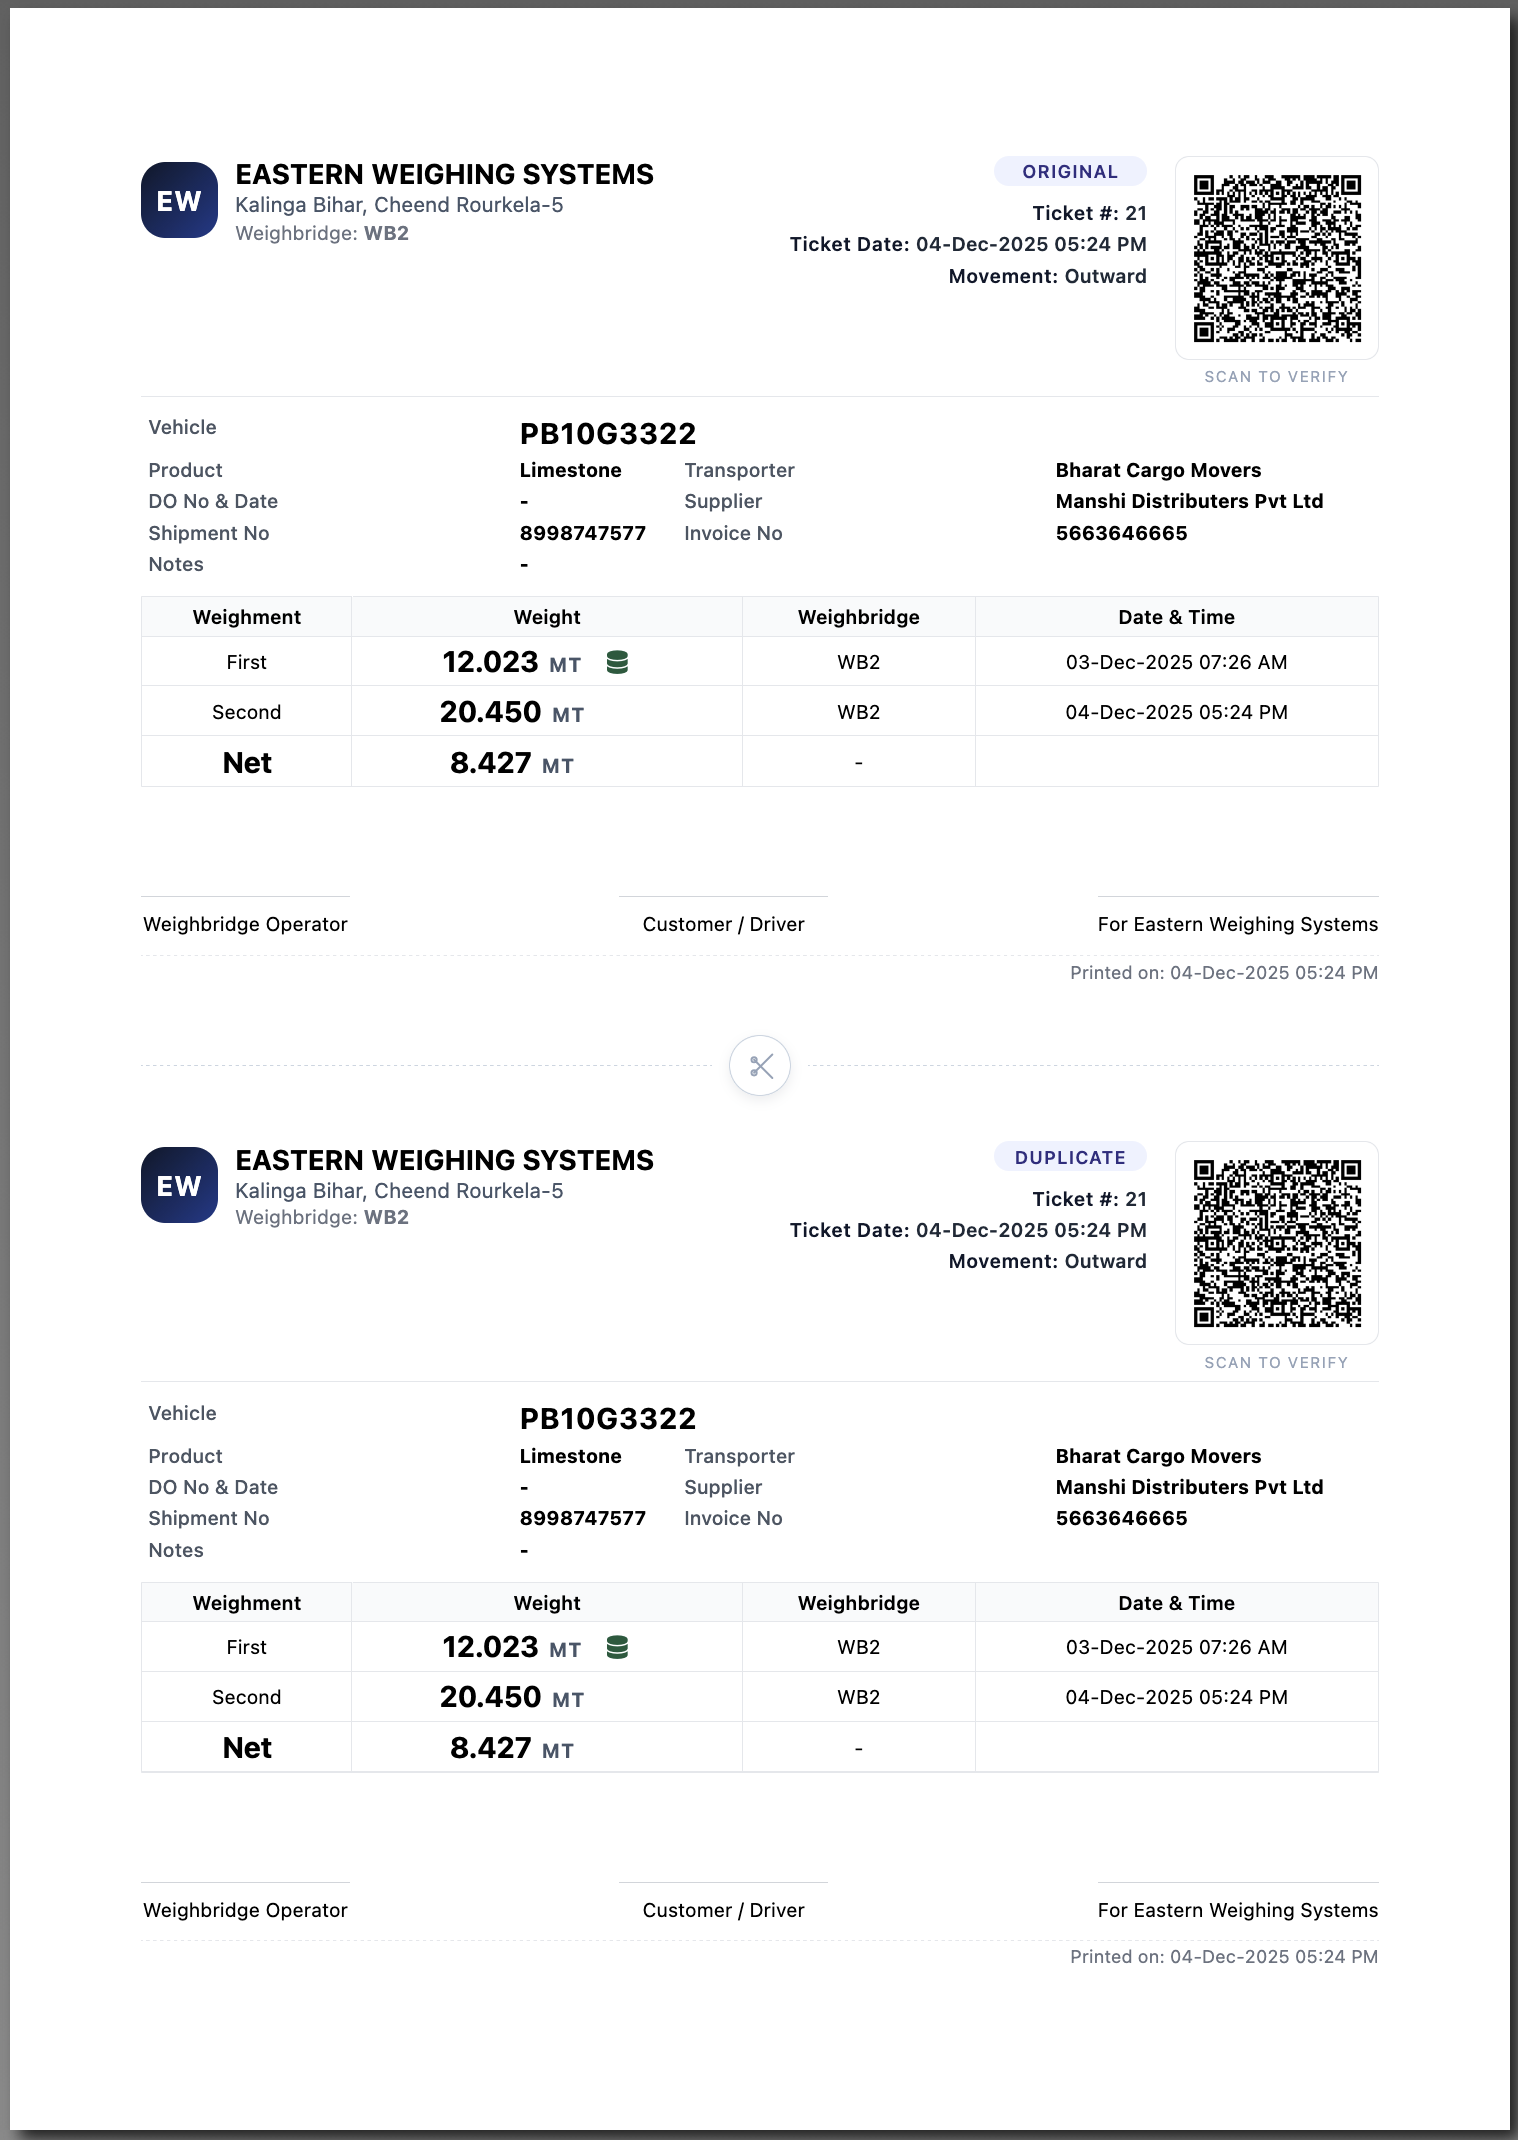
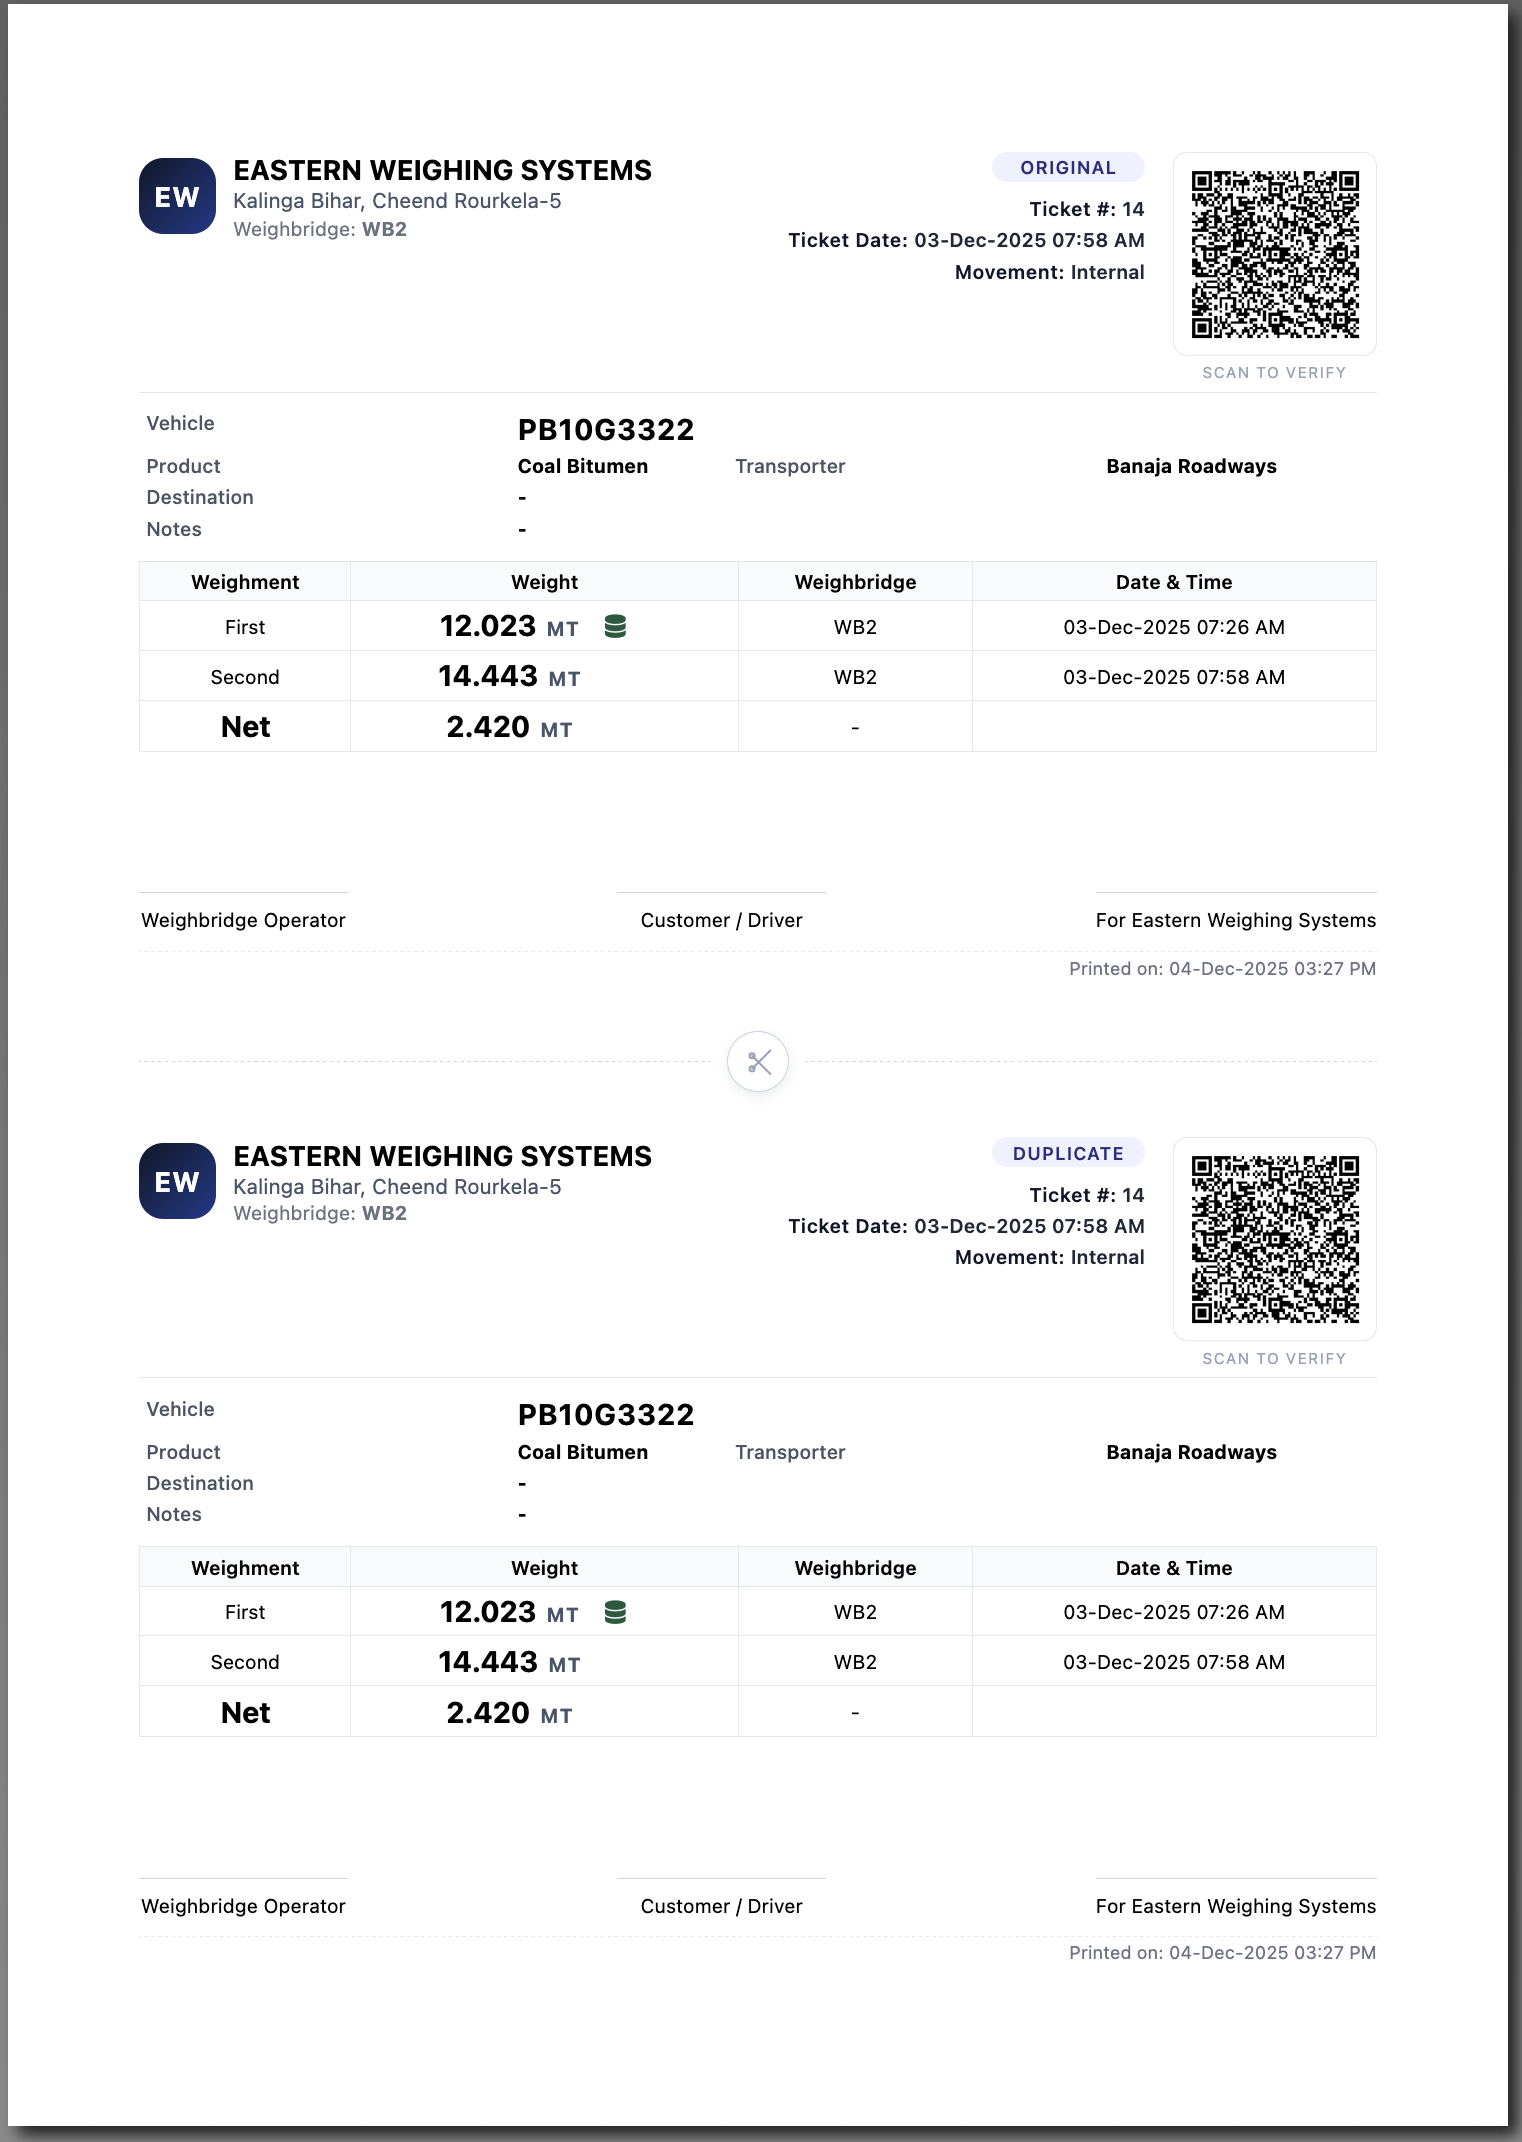
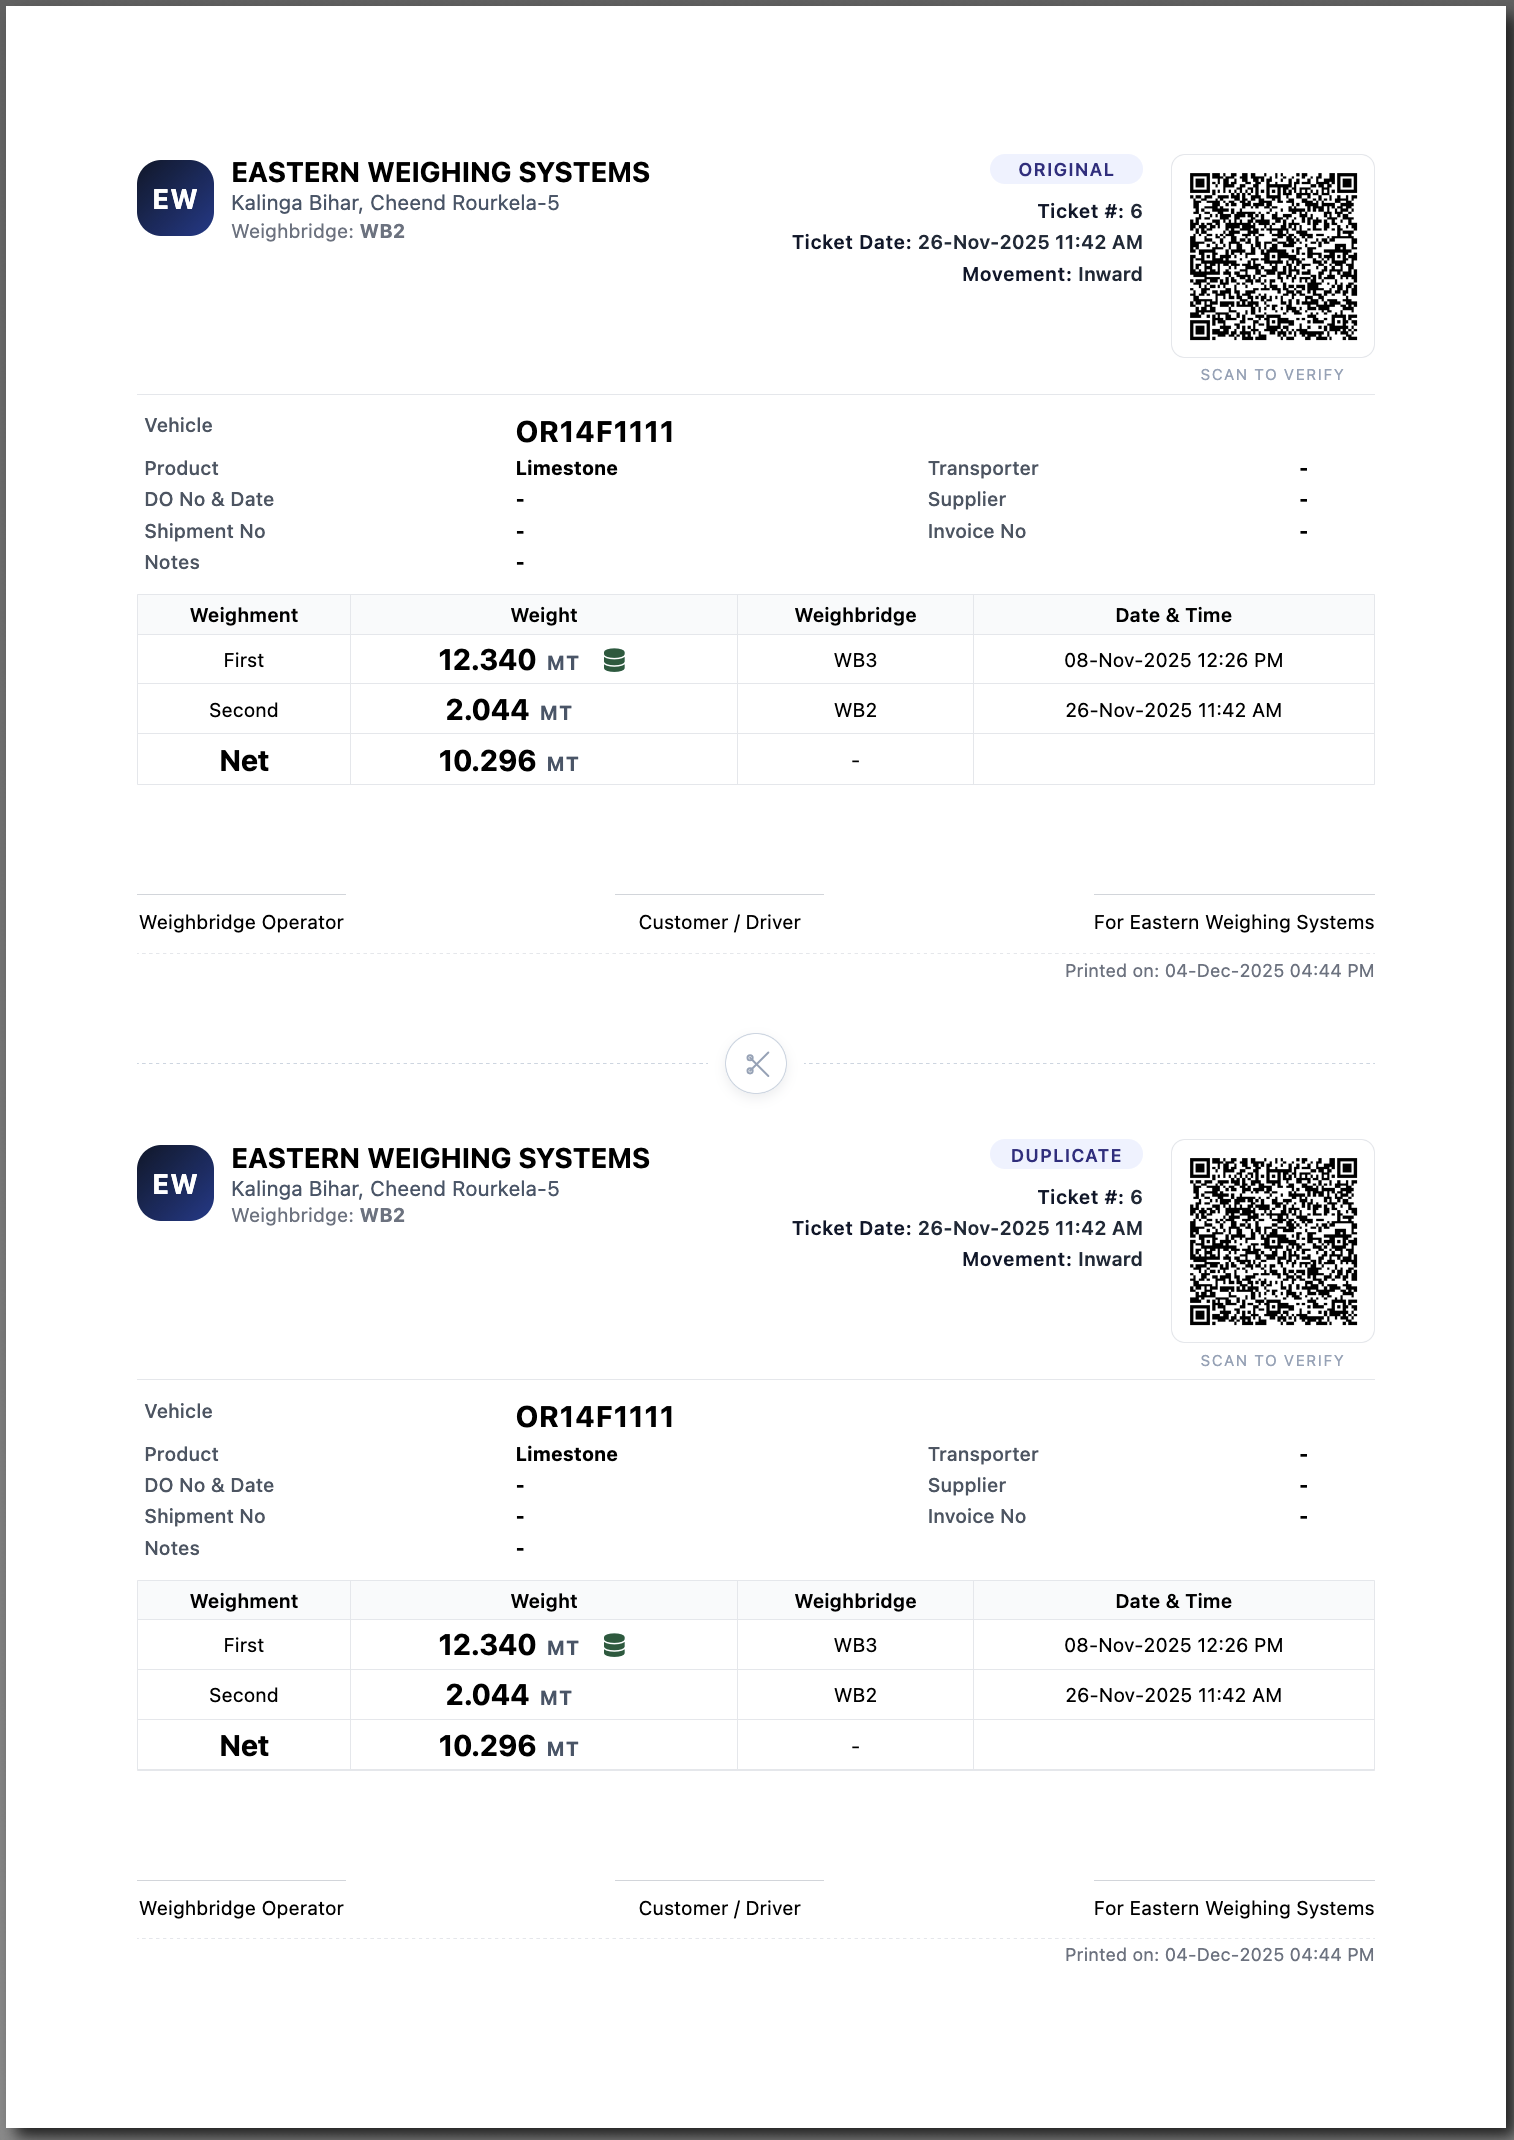
7.5 Printing Internal Weighment Ticket
- Select a record where both weights are available and the status is Active.
- Click Print in the toolbar.
The system decides the print mode:
- Dot‑Matrix Mode (DMP): Sends a specialized payload to the local printing client connected to the weighbridge.
- Standard Mode (A4 Ticket): Opens a printable Weighment Ticket that shows company details, vehicle/product/transporter, weights (1 & 2), net weight, destination, shipment/invoice, notes, and a printed timestamp.
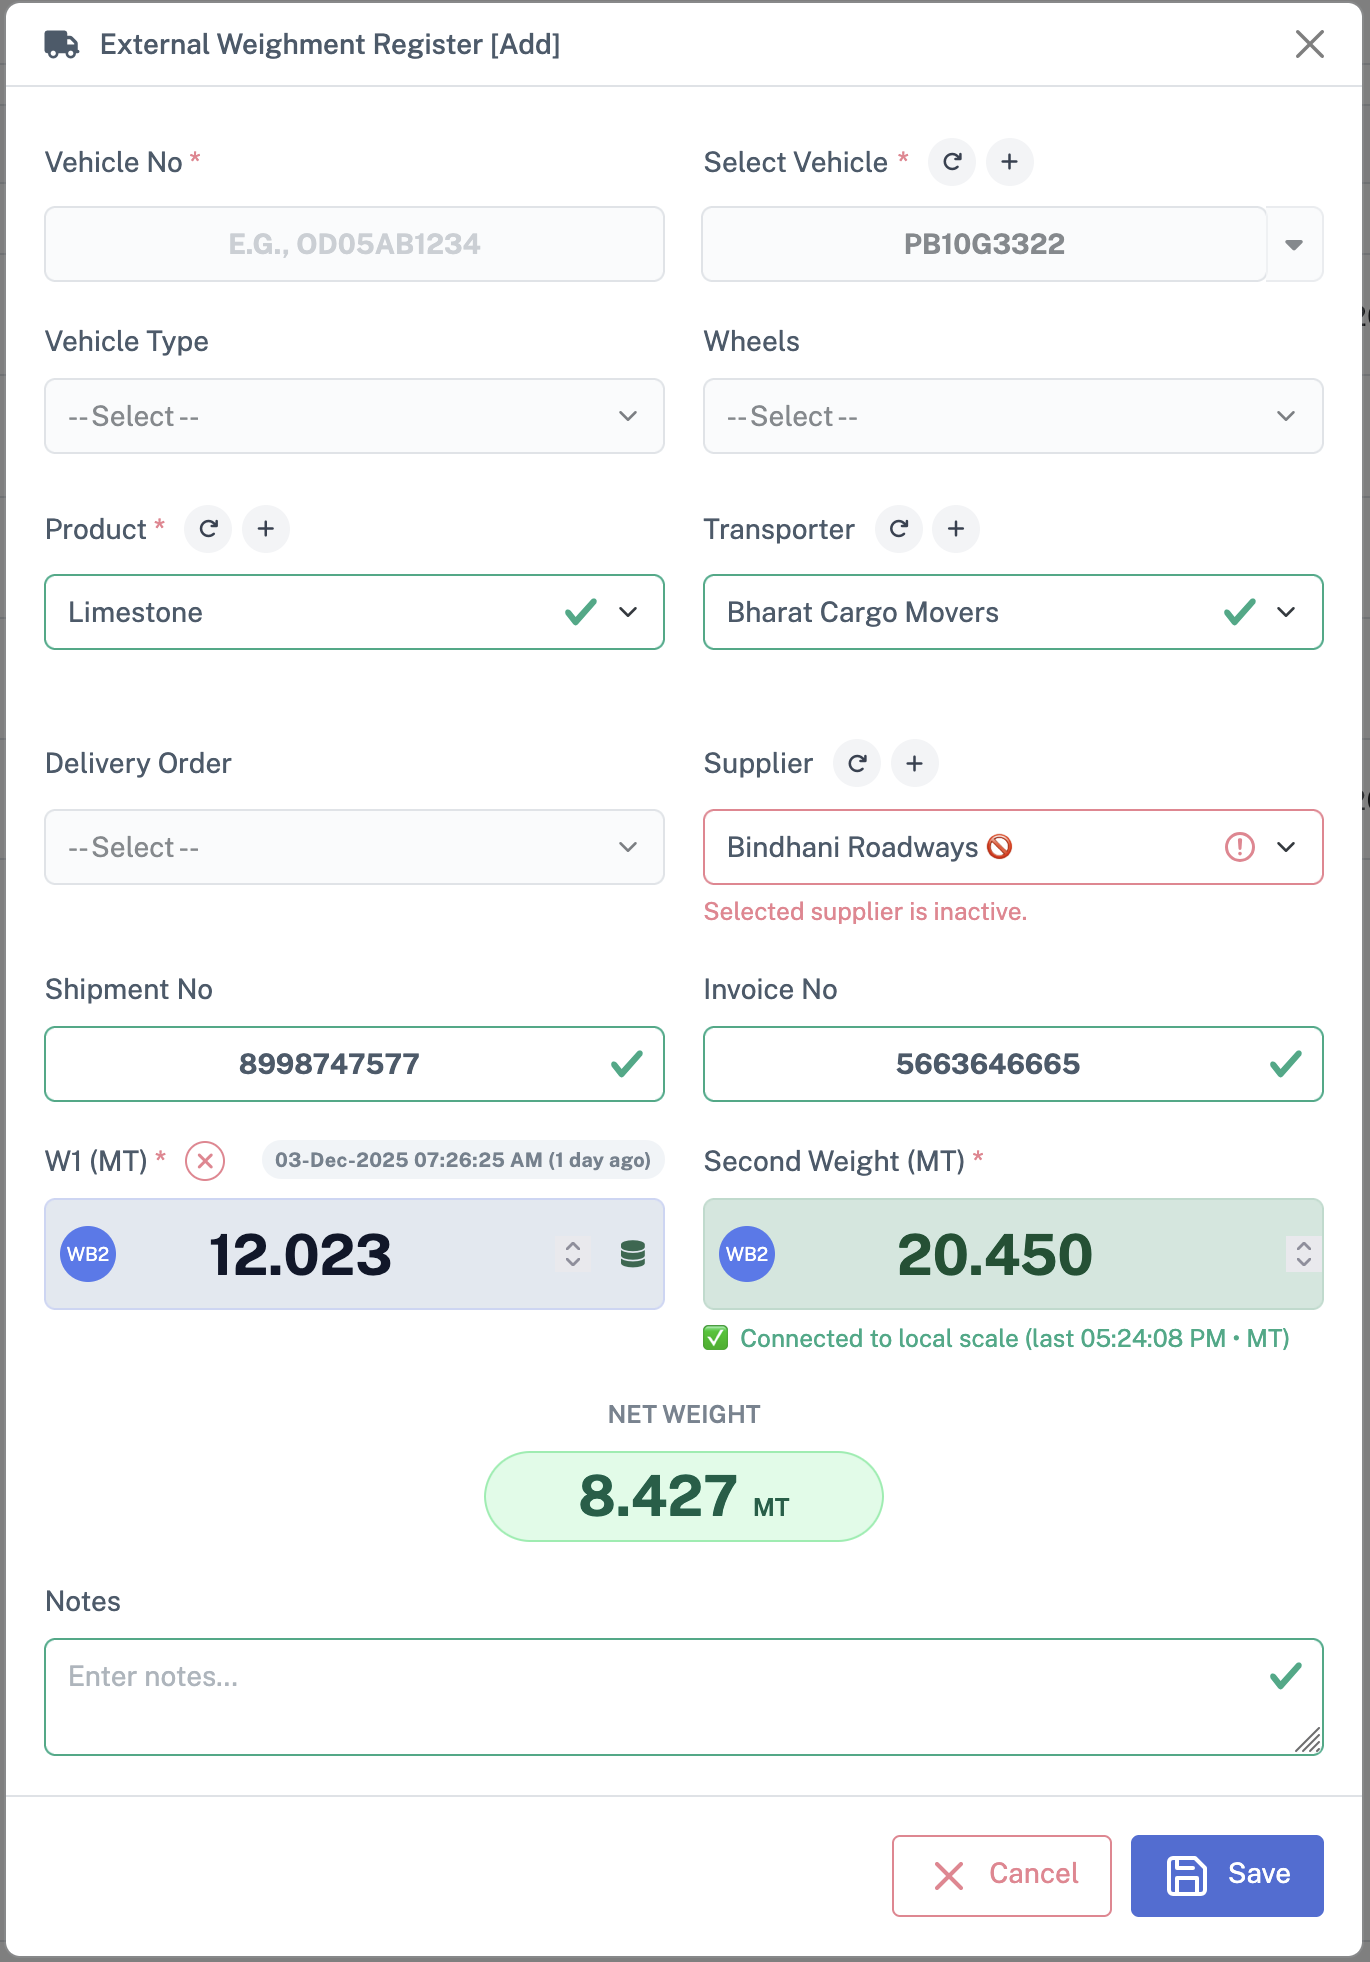
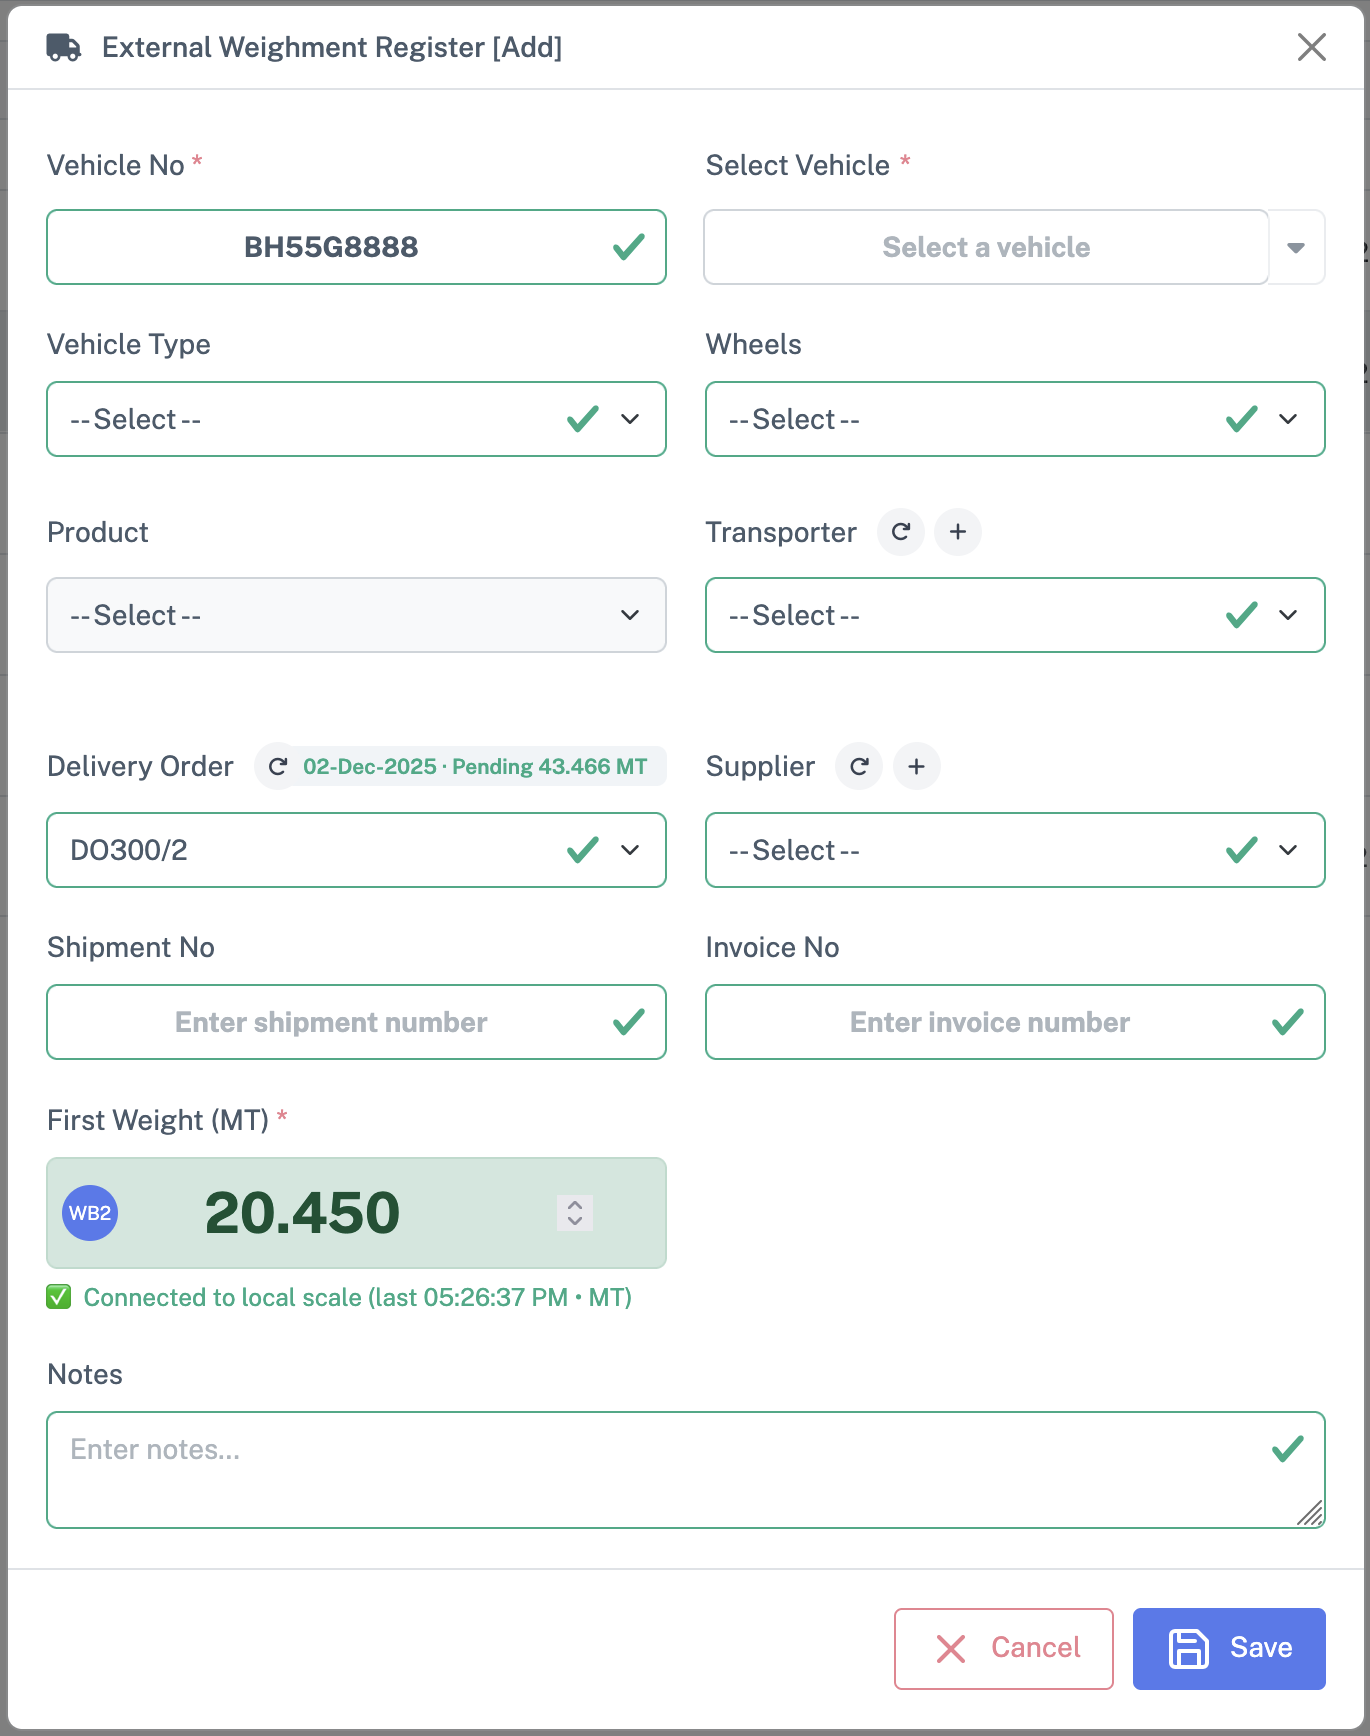
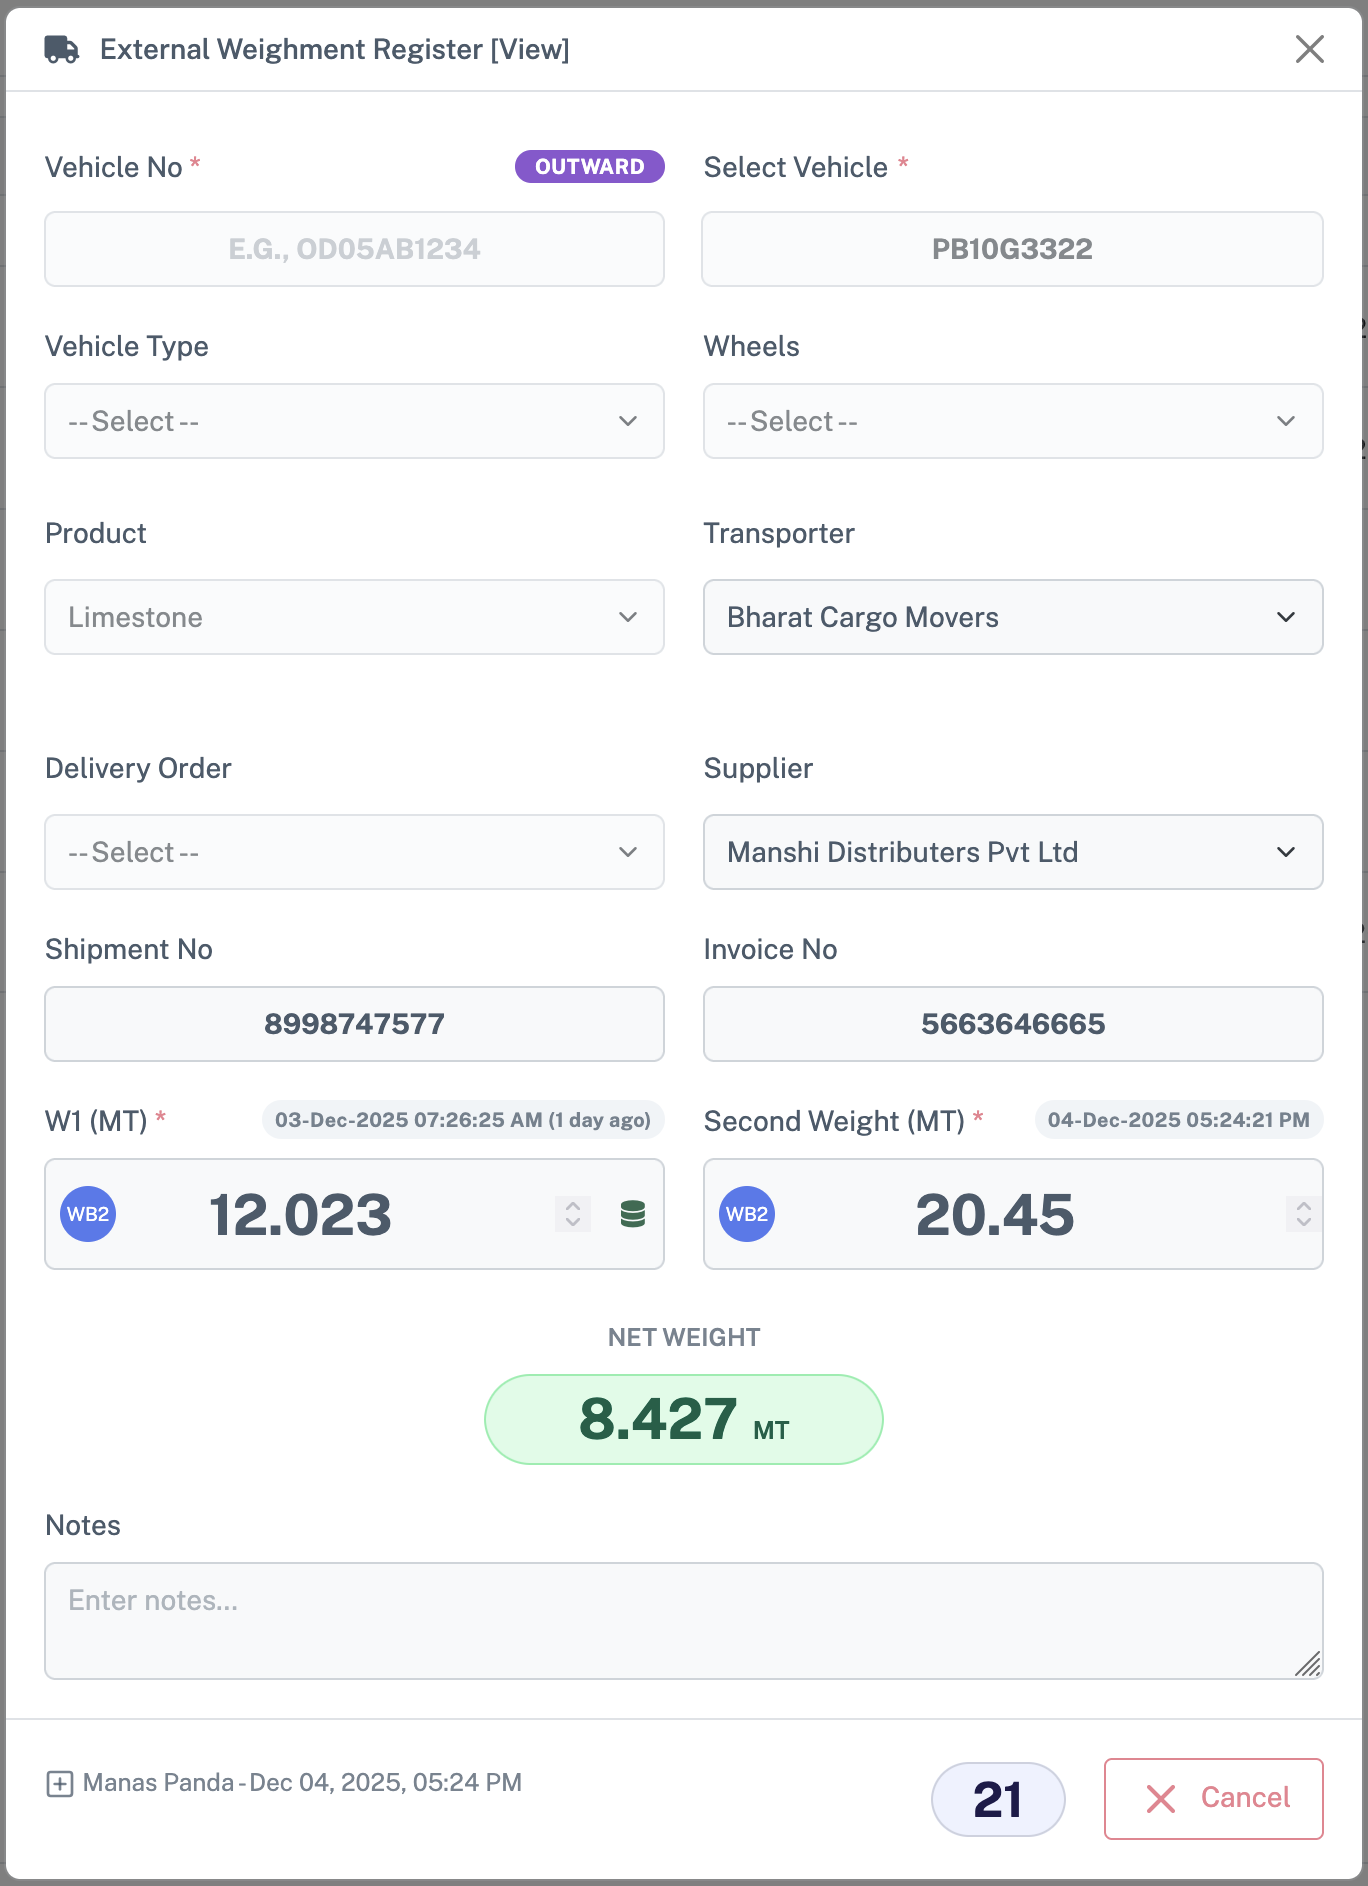
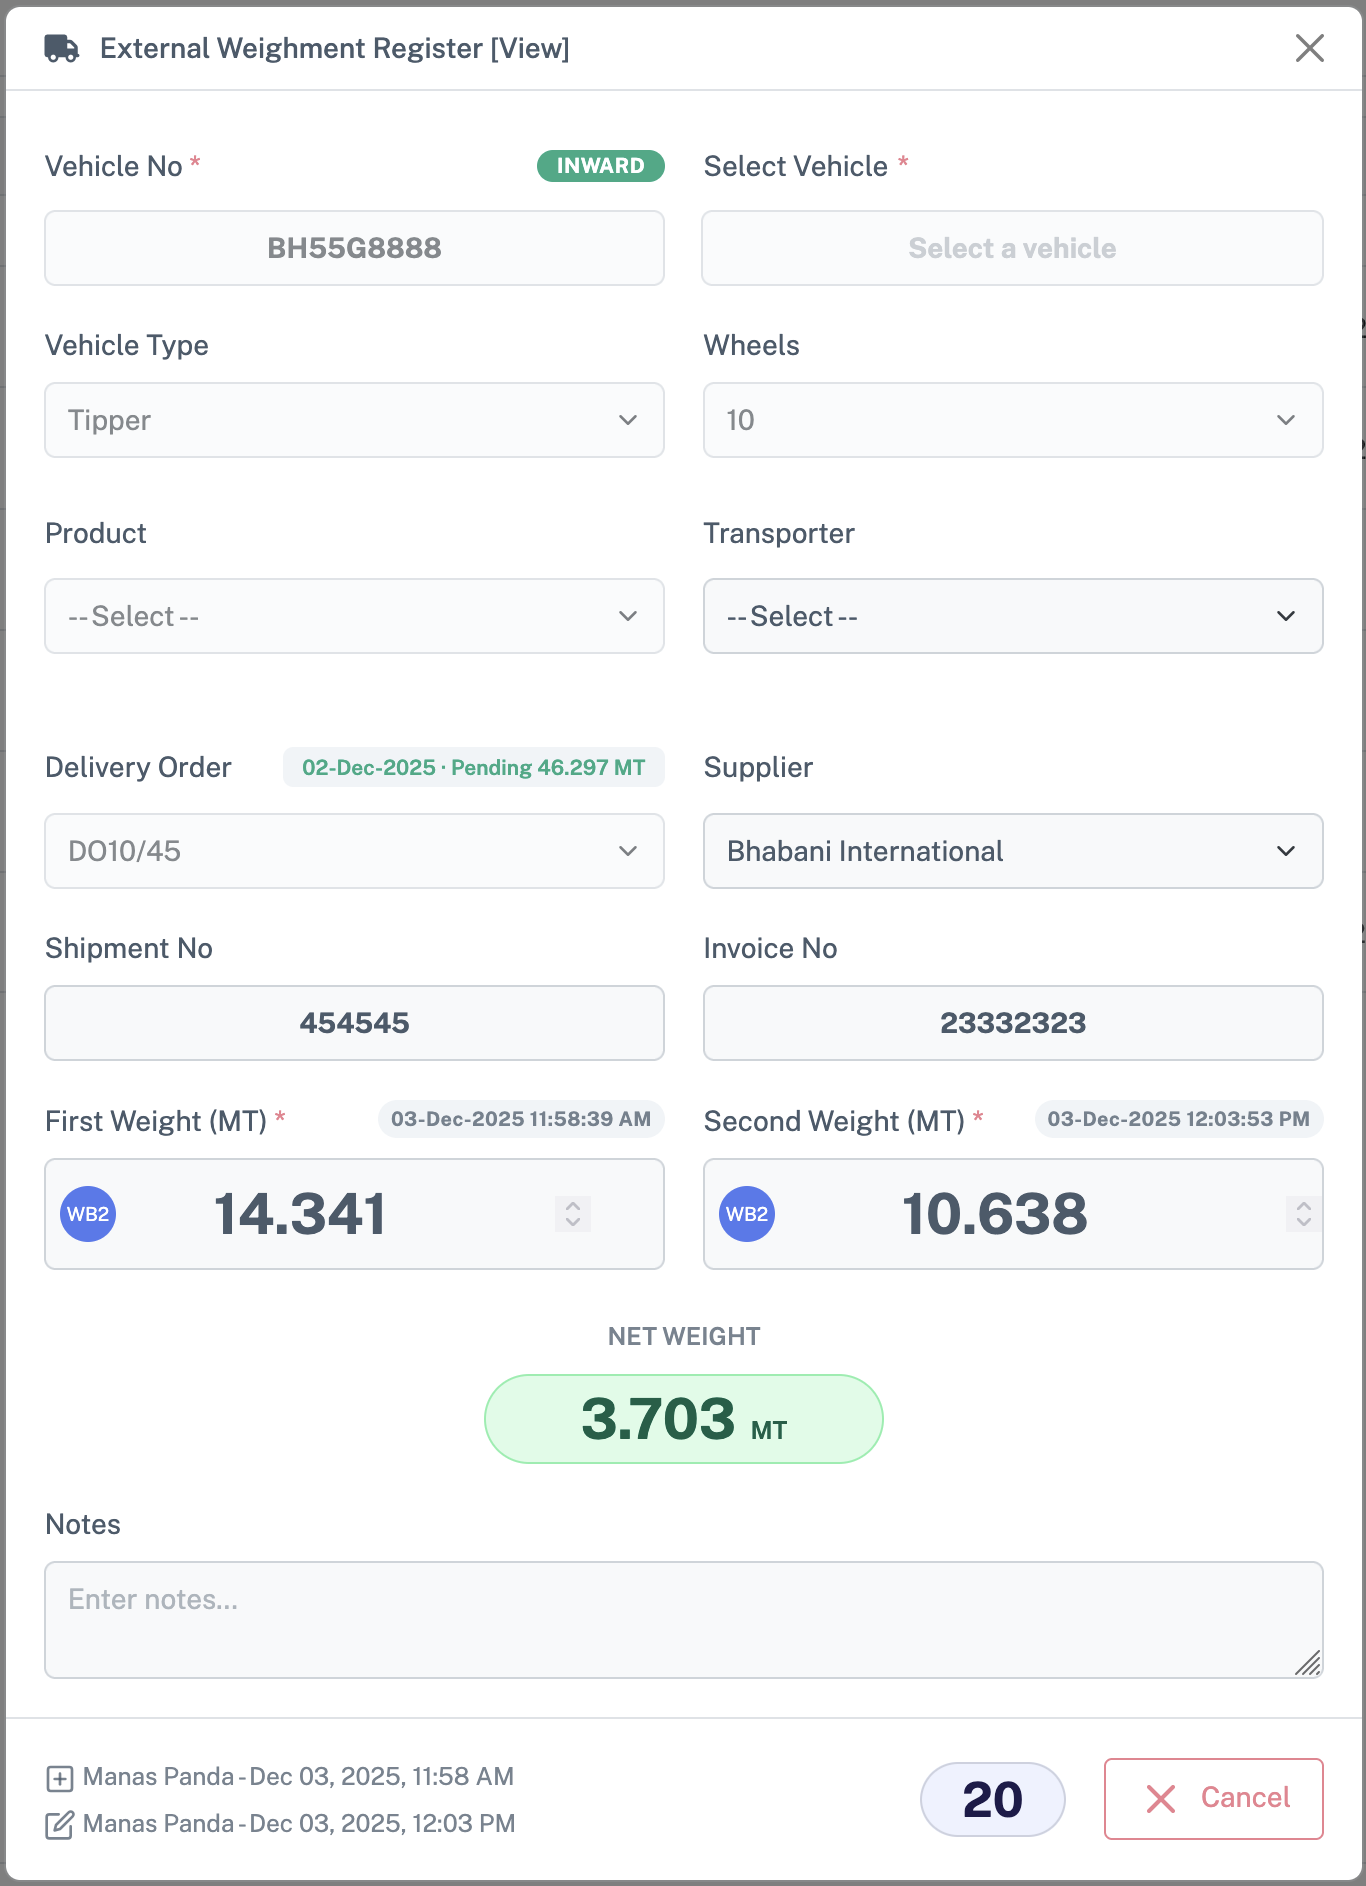
8. External Weighment – Detailed Workflow
8.1 Opening External Weighment Screen
- From the left menu, select Weighment → External Weighment.
- The External Weighment Register grid appears.
8.2 Adding a New External Weighment
- Click Add on the toolbar.
- The External Weighment Register [Add] modal opens.
8.3 Vehicle Section (Same as Internal)
Vehicle handling in External Weighment is identical to Internal Weighment (see 7.2.2 Vehicle Information):
- Vehicle No: Manual entry allowed when the vehicle is not yet in masters.
- Select Vehicle: Dropdown with inline Reload/Add buttons.
- Type & Wheels: For selected master vehicles, Type/Wheels are typically auto‑filled and may be locked as per configuration.
8.4 Product & Transporter (Same as Internal)
- Product: Dropdown plus inline Reload/Add for quick maintenance.
- Transporter: Dropdown plus inline Reload/Add.
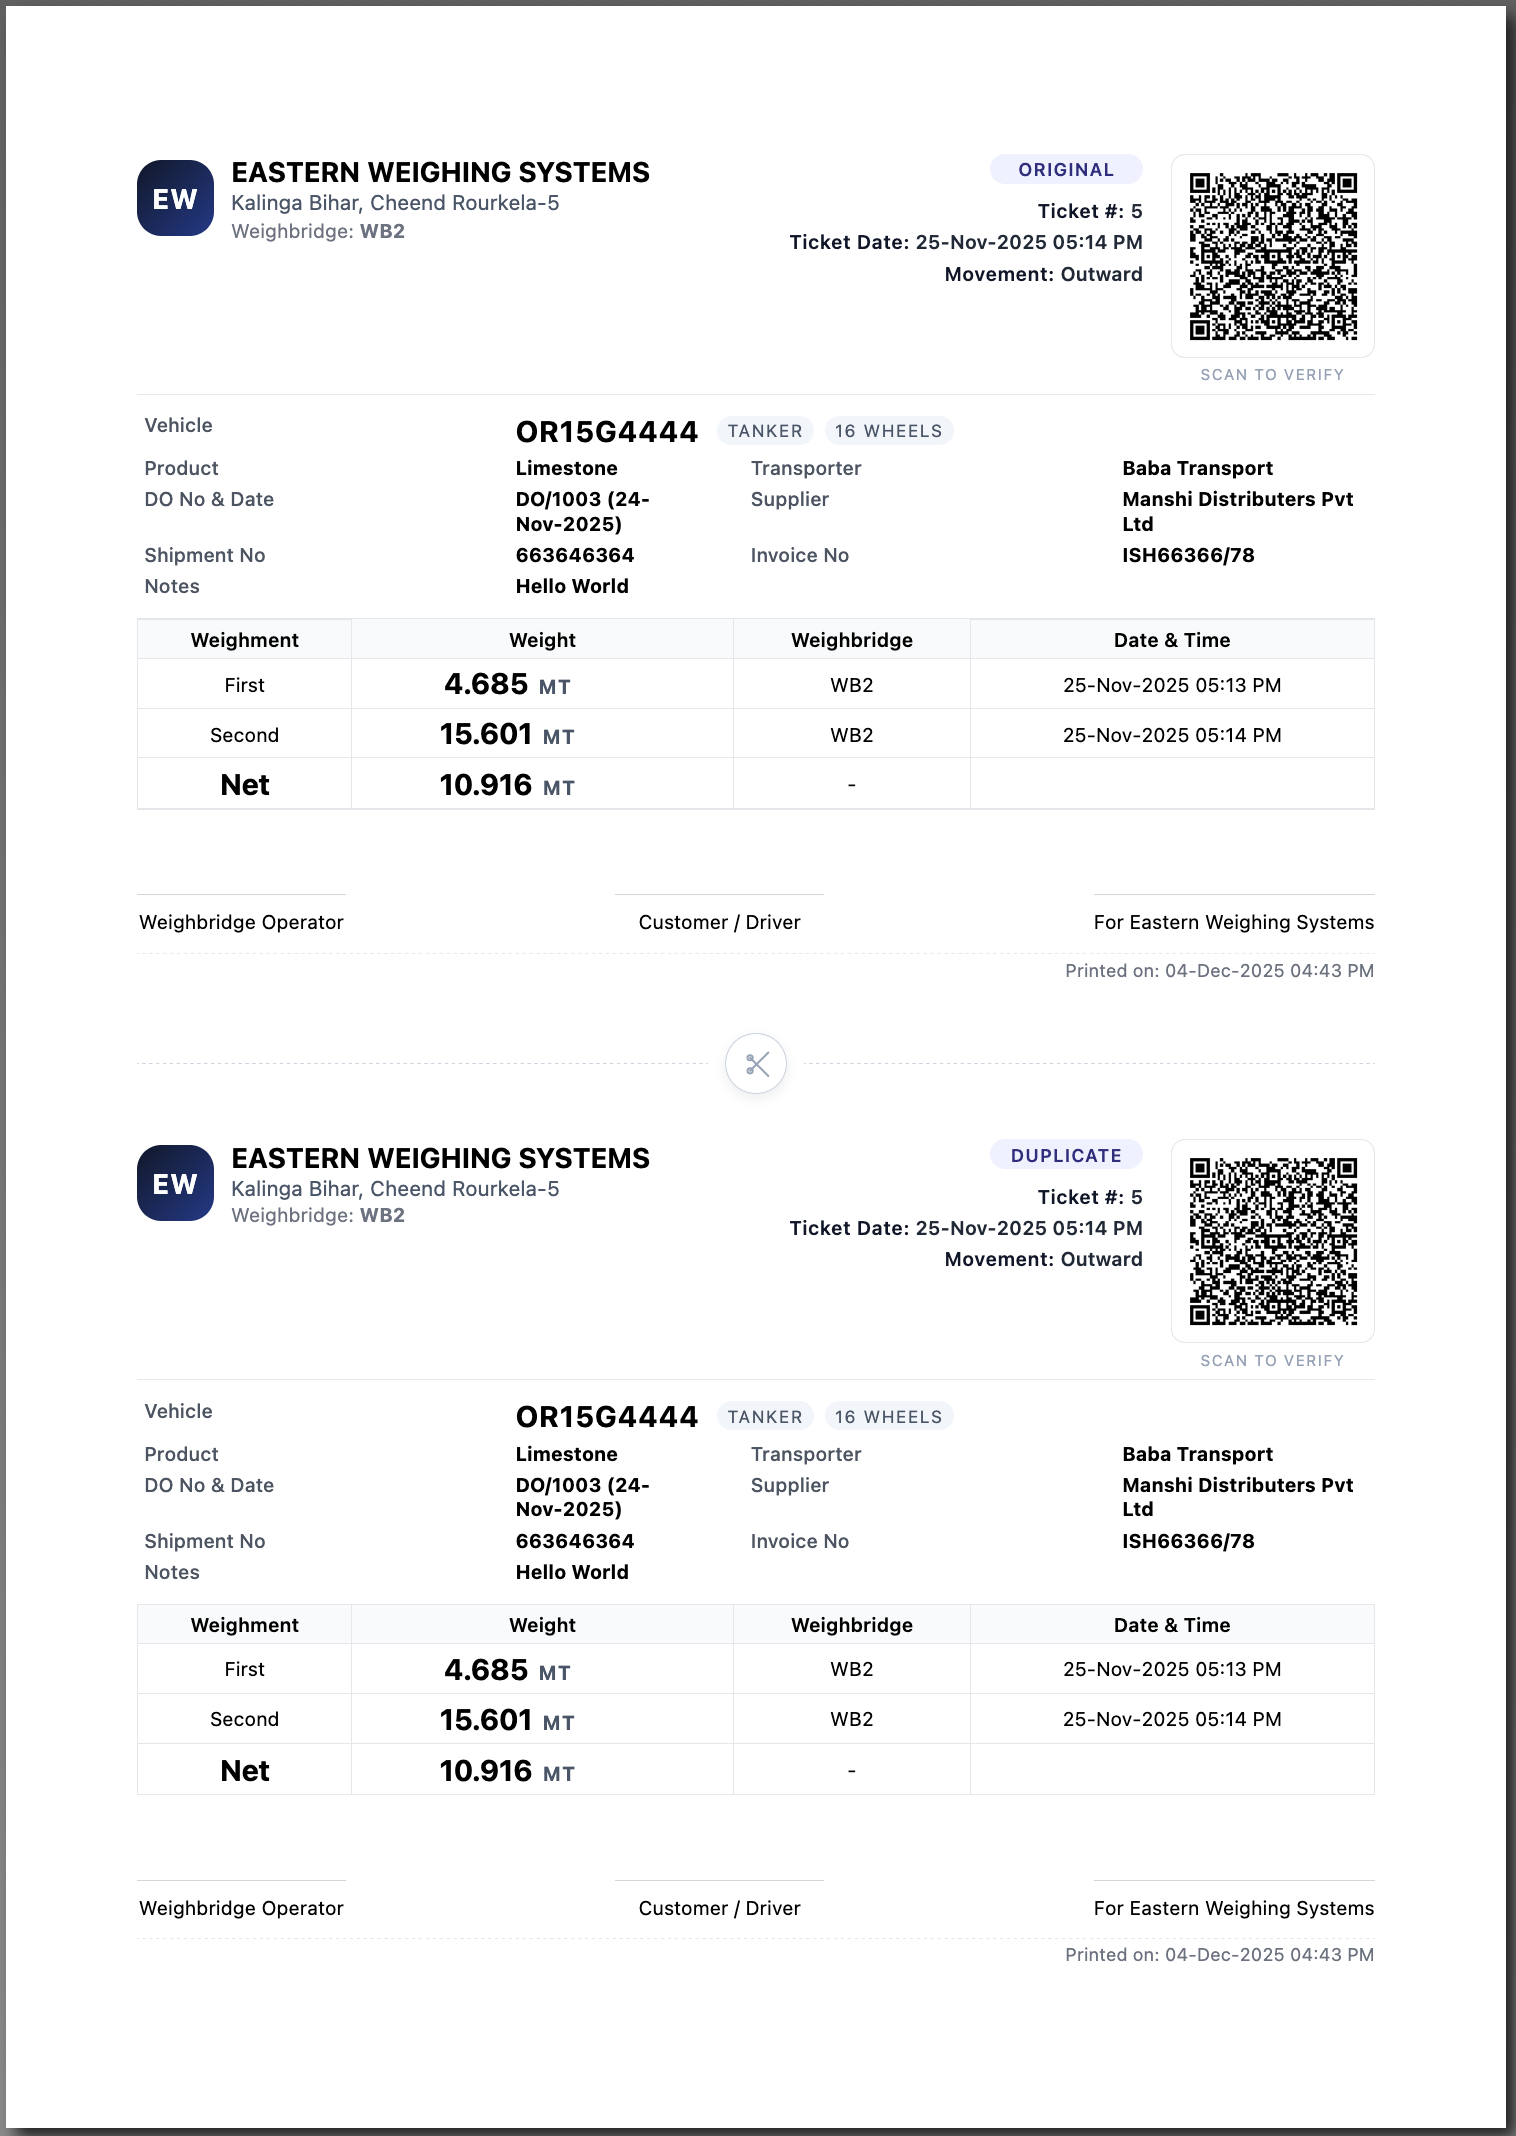
8.5 DO Master (Delivery Order)
Select Delivery Order (DO Master)
Dropdown showing valid DO Master entries for current company
Inline Reload button to update list
DO Info Badge
- DO Date
- Pending quantity for the selected DO line as a badge.
This section is specific to External Weighment and links the weighment to a commercial DO Master (Delivery Order):
Best Practices: Always select the correct DO for the transaction and monitor the pending quantity to avoid over or under delivery.
8.6 Supplier / Customer
- Supplier / Customer Dropdown: Lists existing suppliers/customers.
- Inline Reload/Add buttons:
- Reload updates the list from the server.
- Add opens a small form to create a new supplier/customer; after saving, the new record is auto‑selected.
8.7 Other External Details
- Shipment / Invoice No: Commercial reference numbers for billing.
- Notes: Examples – "Partial delivery against DO 001" or "Customer requested reweigh".
8.8 Weights in External Weighment
The weight capture process is identical to Internal Weighment (see 7.3), but has additional business relevance:
- On acceptance: The first weight may be filled from the stored tare. The second weight is captured as usual.
- Net Weight & DO Linkage: Net weight effectively becomes the delivered quantity for that DO line and may be used for ERP/Accounts posting or billing.
8.9 Saving, Viewing and Printing External Weighments
Saving and viewing behave the same as for Internal Weighments (see 7.4), with these additional considerations:
- Some fields such as DO and Supplier/Customer may become non‑editable once the record is finalized, depending on configuration and permissions.
- Supervisors can typically deactivate erroneous weighments or clear second weight for re‑capture, subject to checks and site policy.
9. Utility Section (Admin)
This section is primarily for administrators / super users.
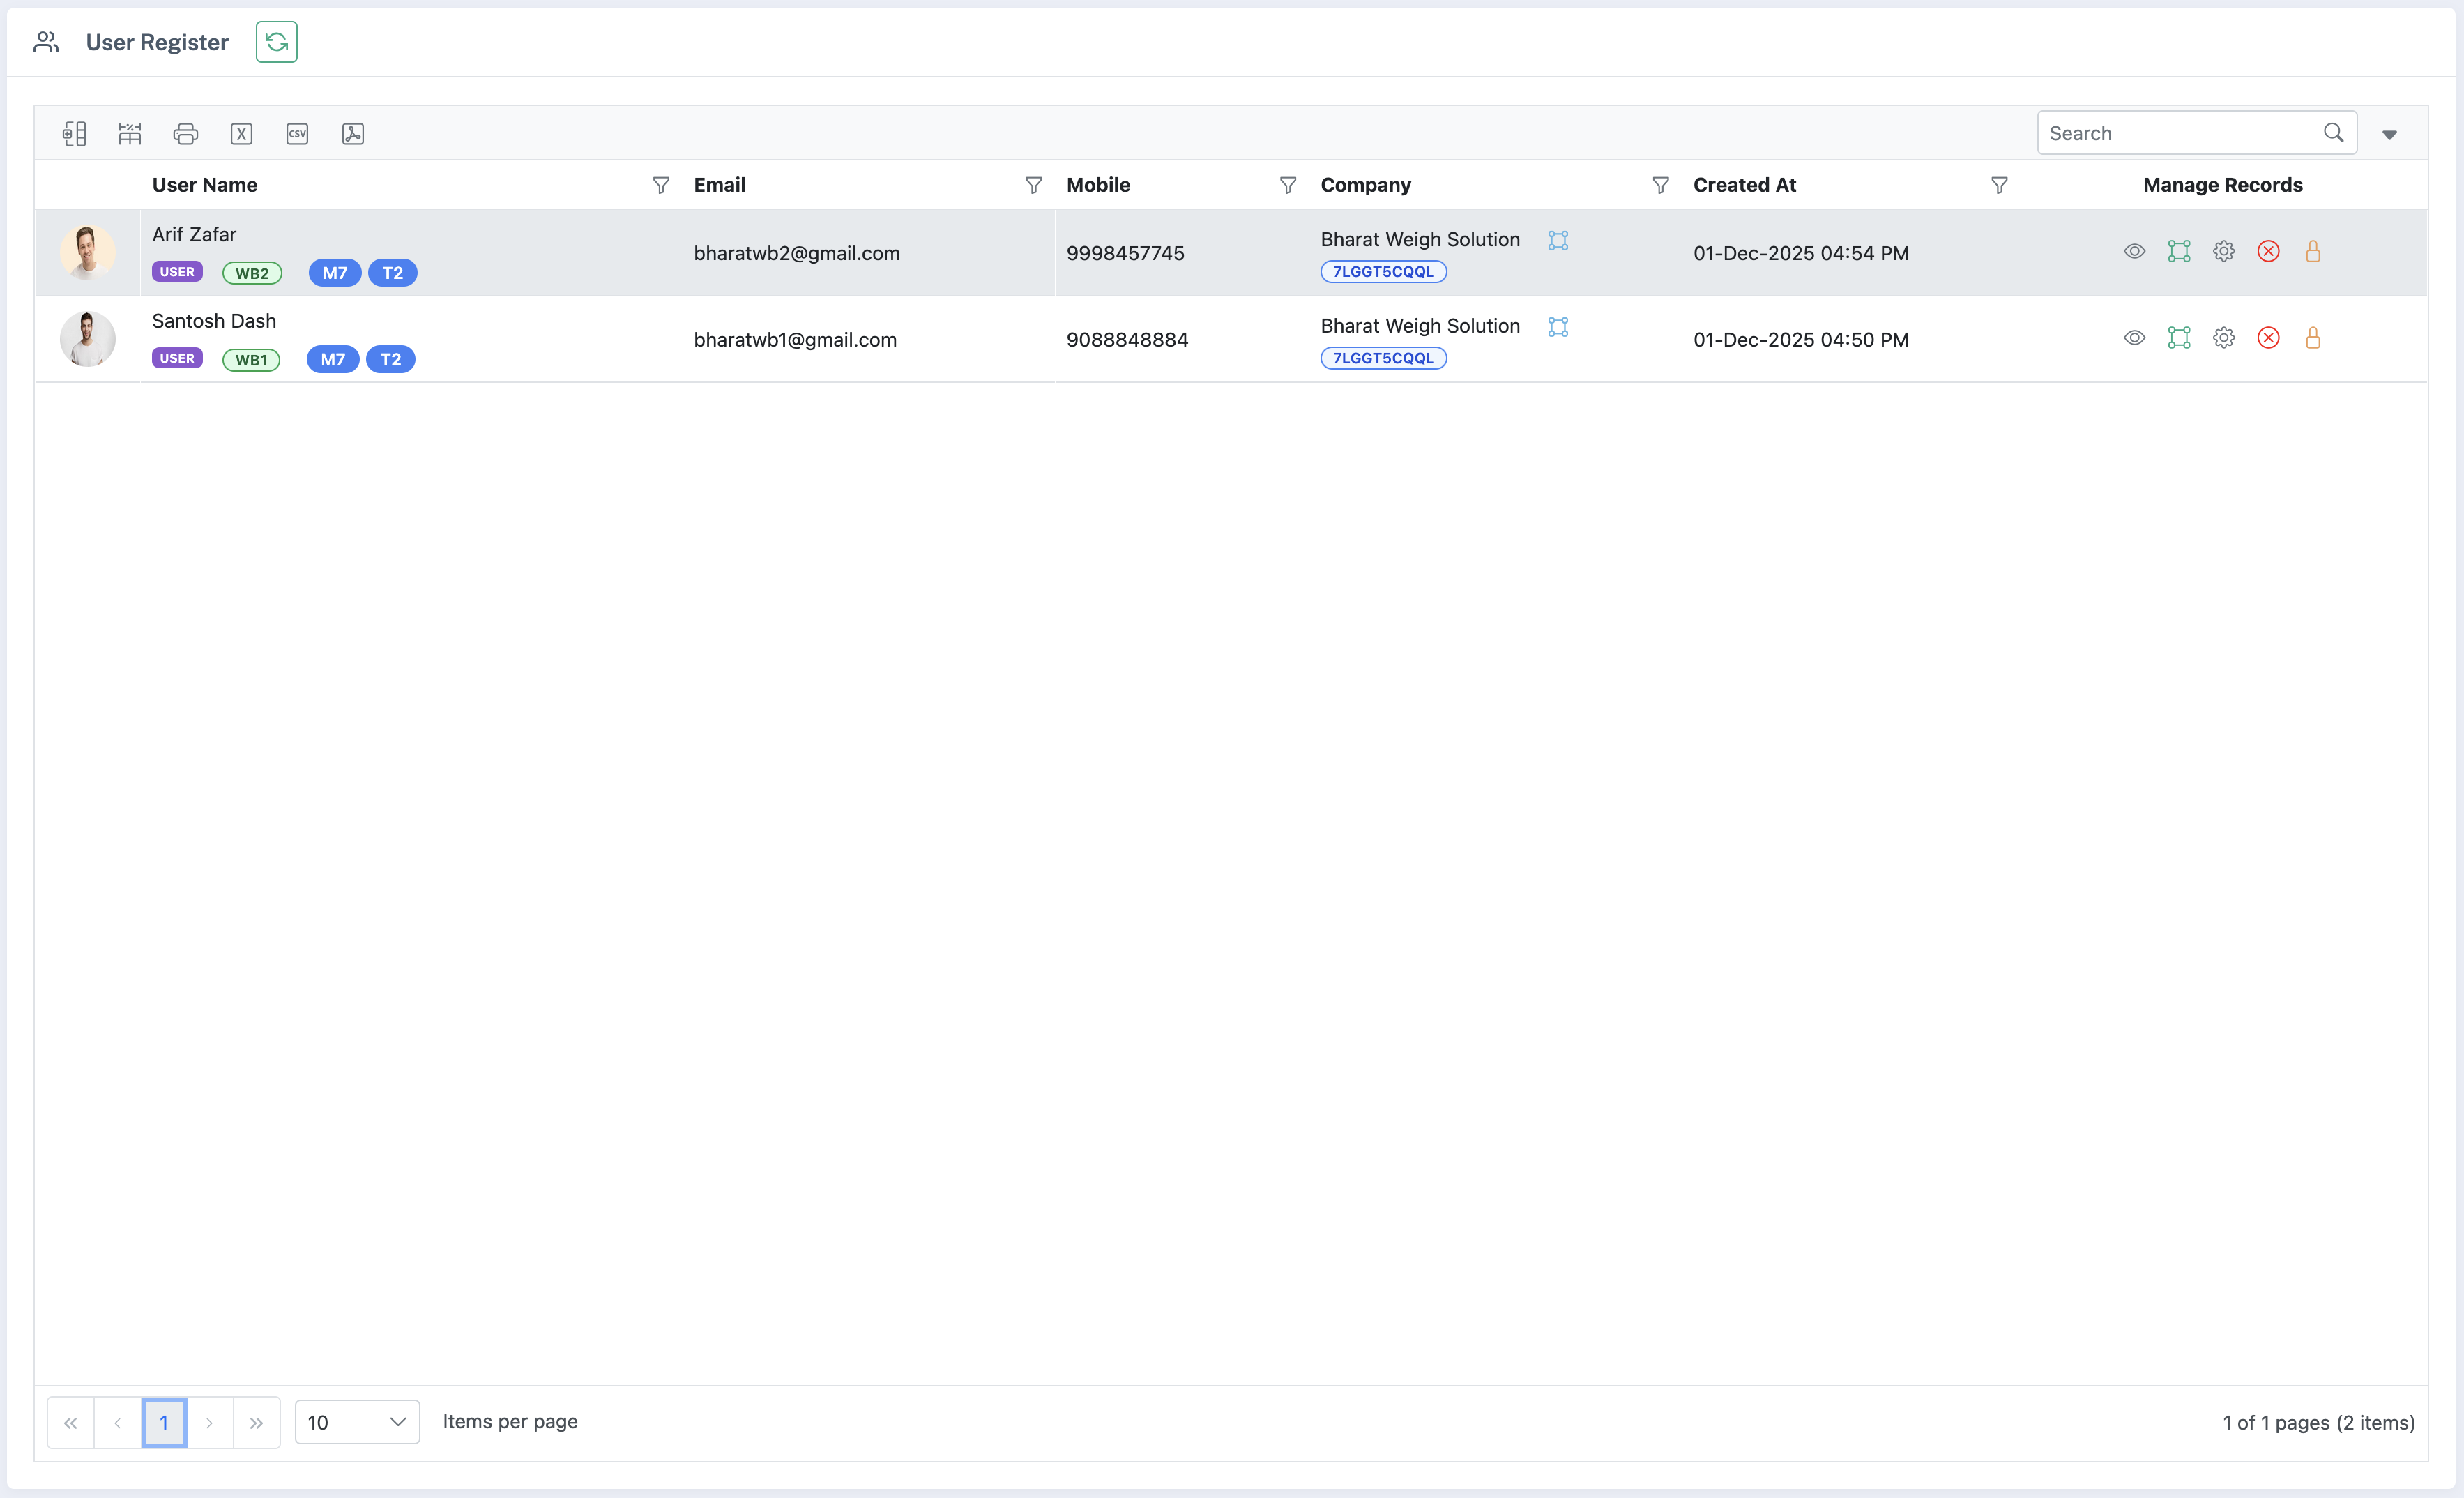
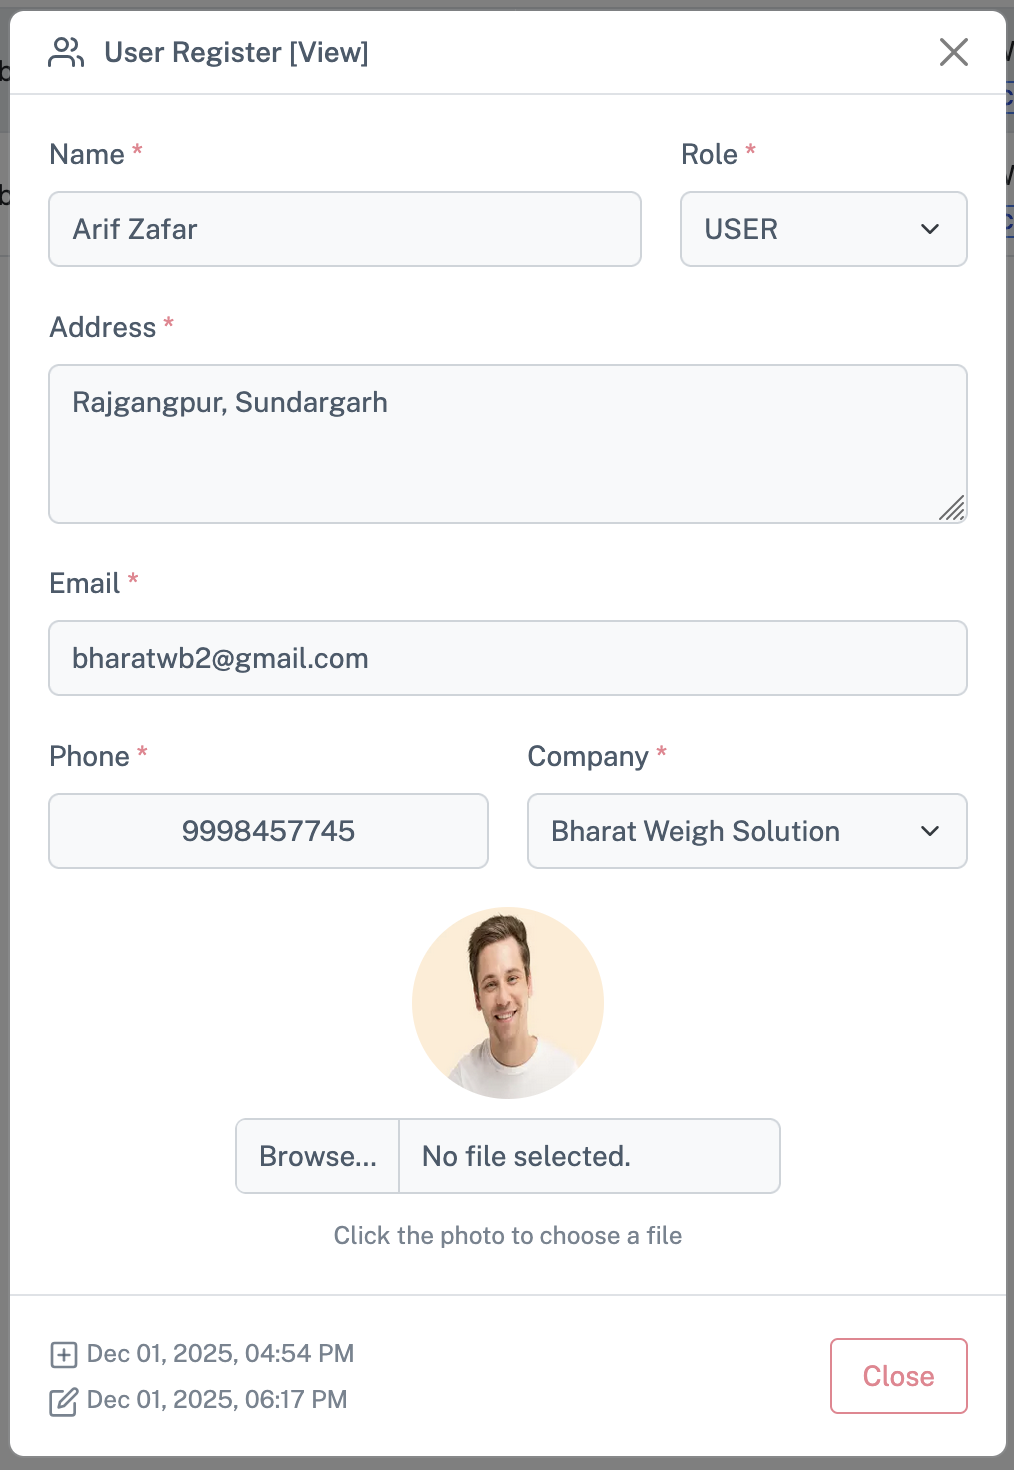
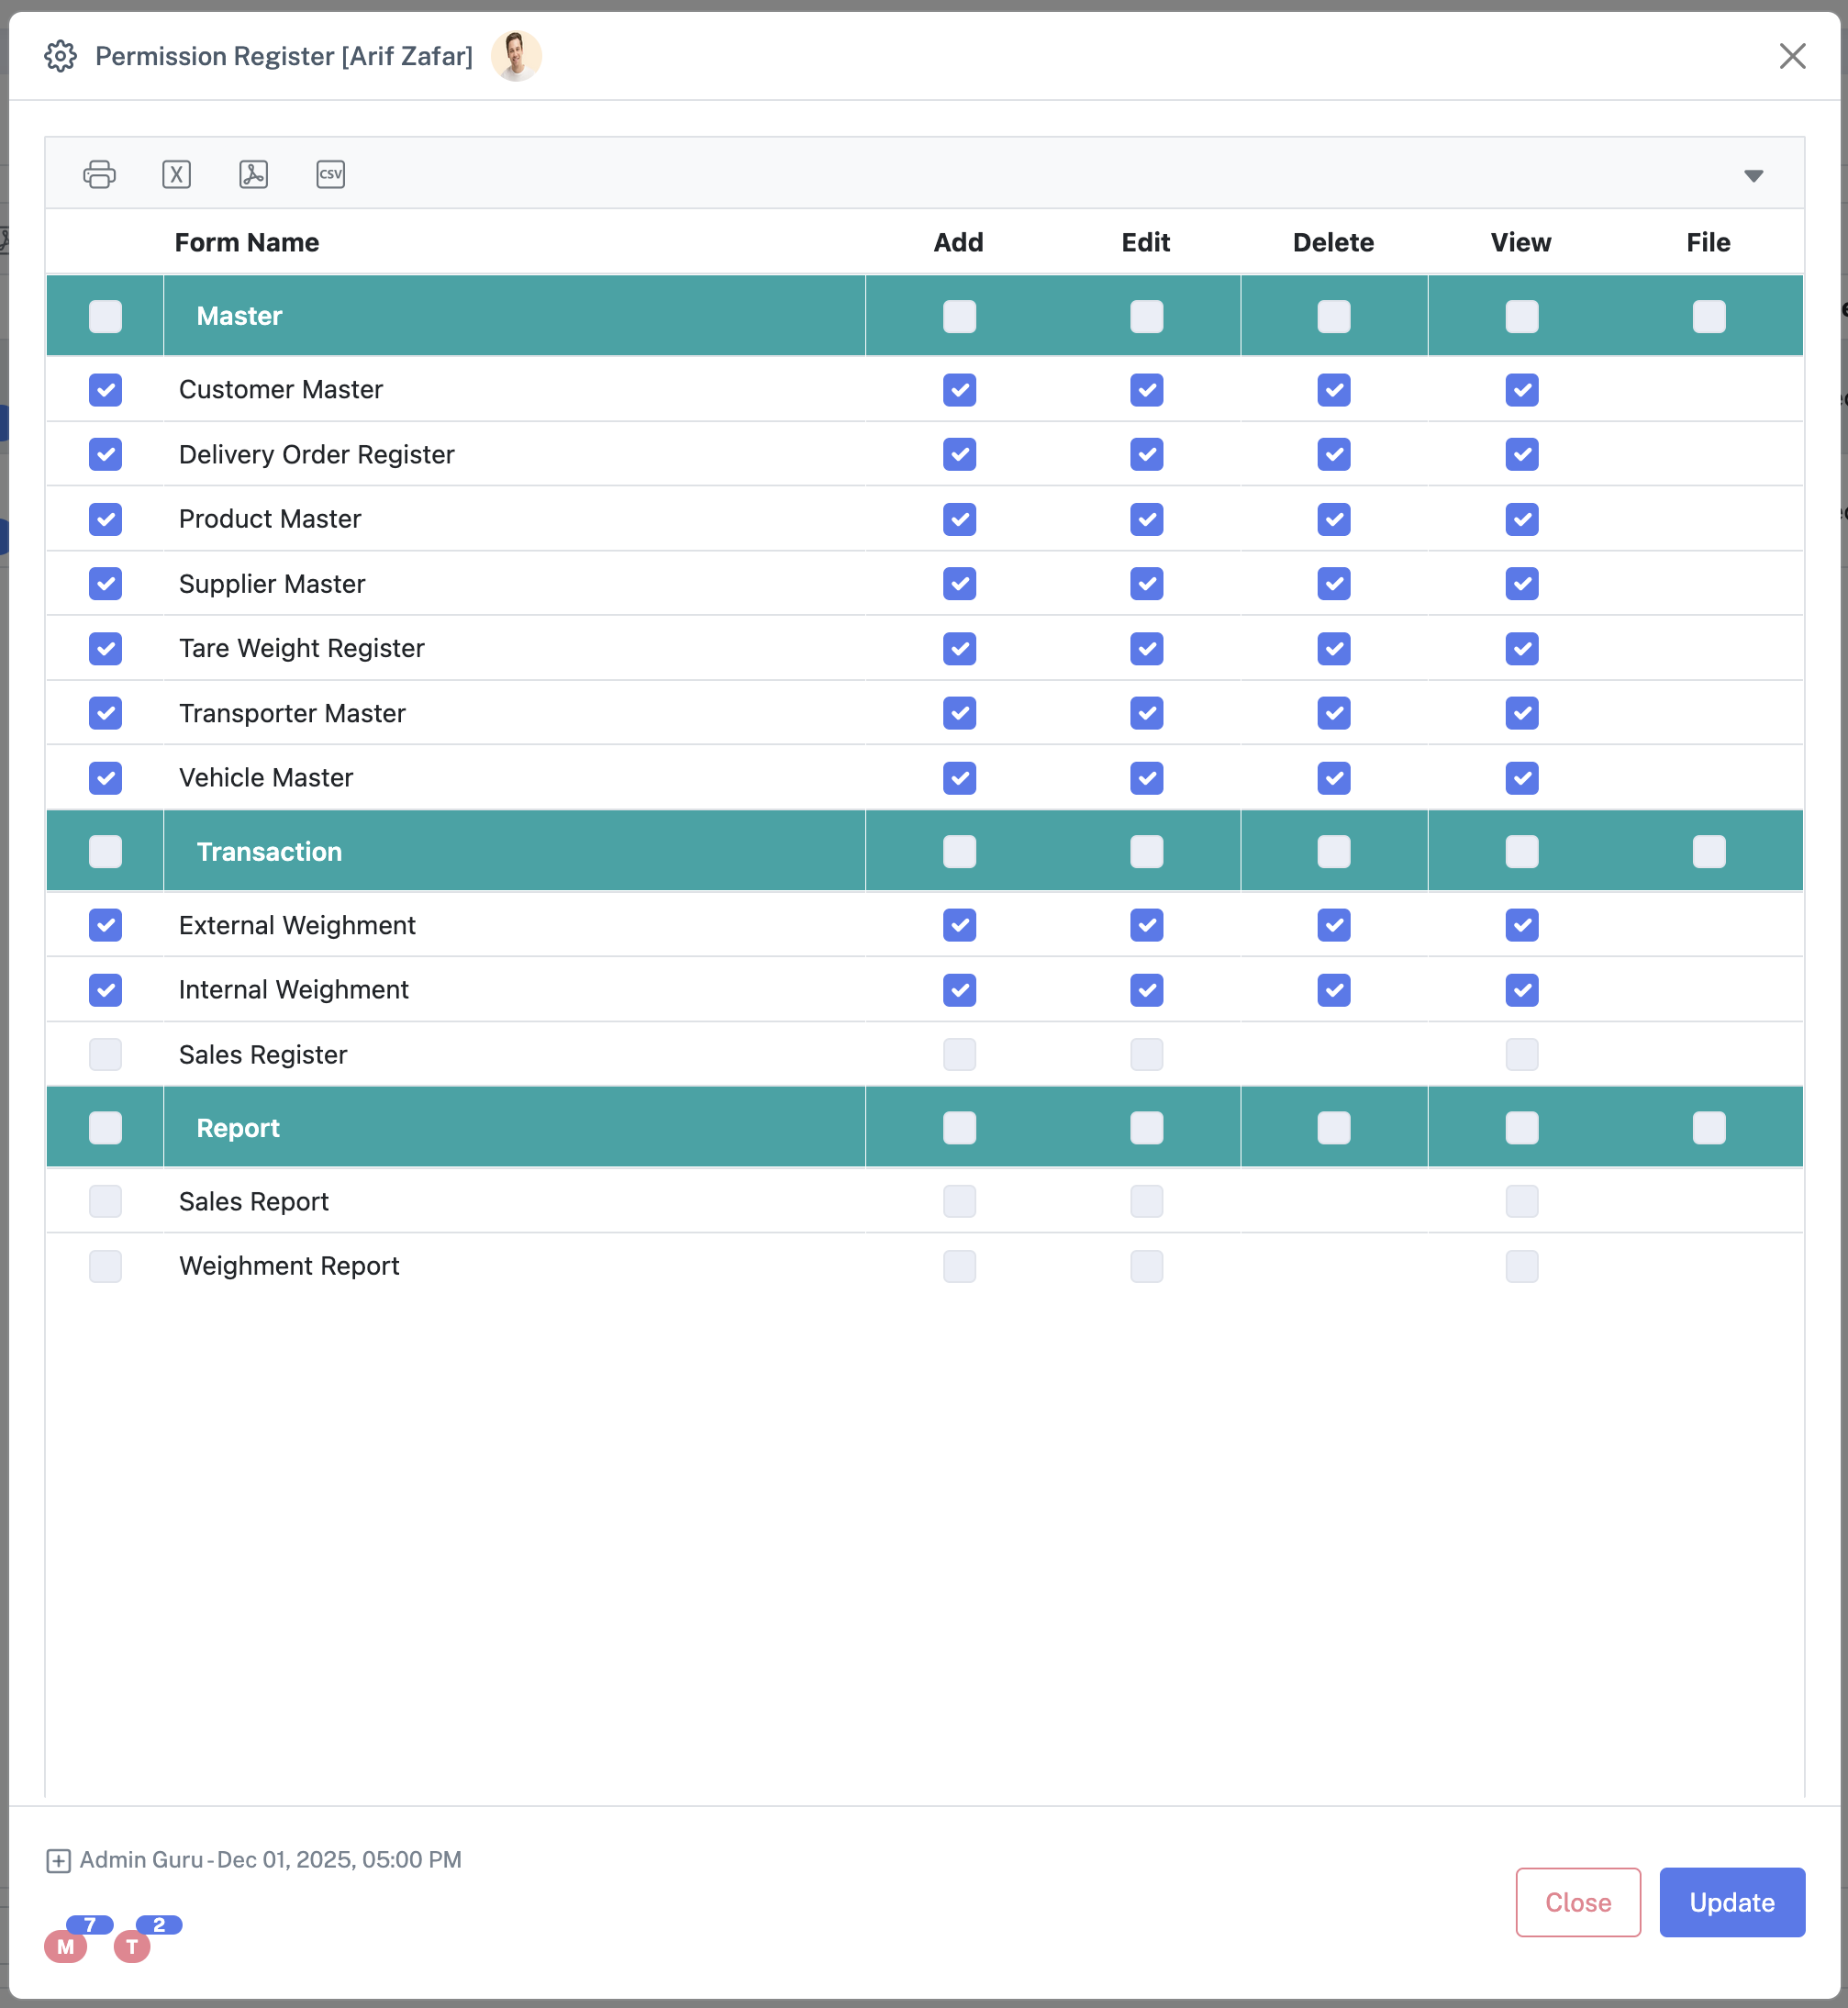
9.1 User Register
- Navigate to Utilities → User Register.
- View users in a grid: Username, Full Name, Email, Role, Assigned Weighbridges, and Status (Active/Inactive).
- Add/Edit/Delete users, assign roles and permissions.
- Assign/Revoke Weighbridge to Operators.
- Configure Weighbridges under Utilities → User Register → Company Column:
- Weighbridge Name & Code
- Company association
- DMP flag (dot matrix printer support)
- Unit (Kg/MT)
- Active / Locked status
9.2 Weighbridge Registration with Local Machine
A local application on the weighbridge computer registers itself with Weighguru:
- Sends:
- Company Code
- Machine Name
- Windows User
- Server validates:
- Company is valid and active
- Weighbridge is active and not locked
- Not already registered
- On success: a registration code and metadata are returned.
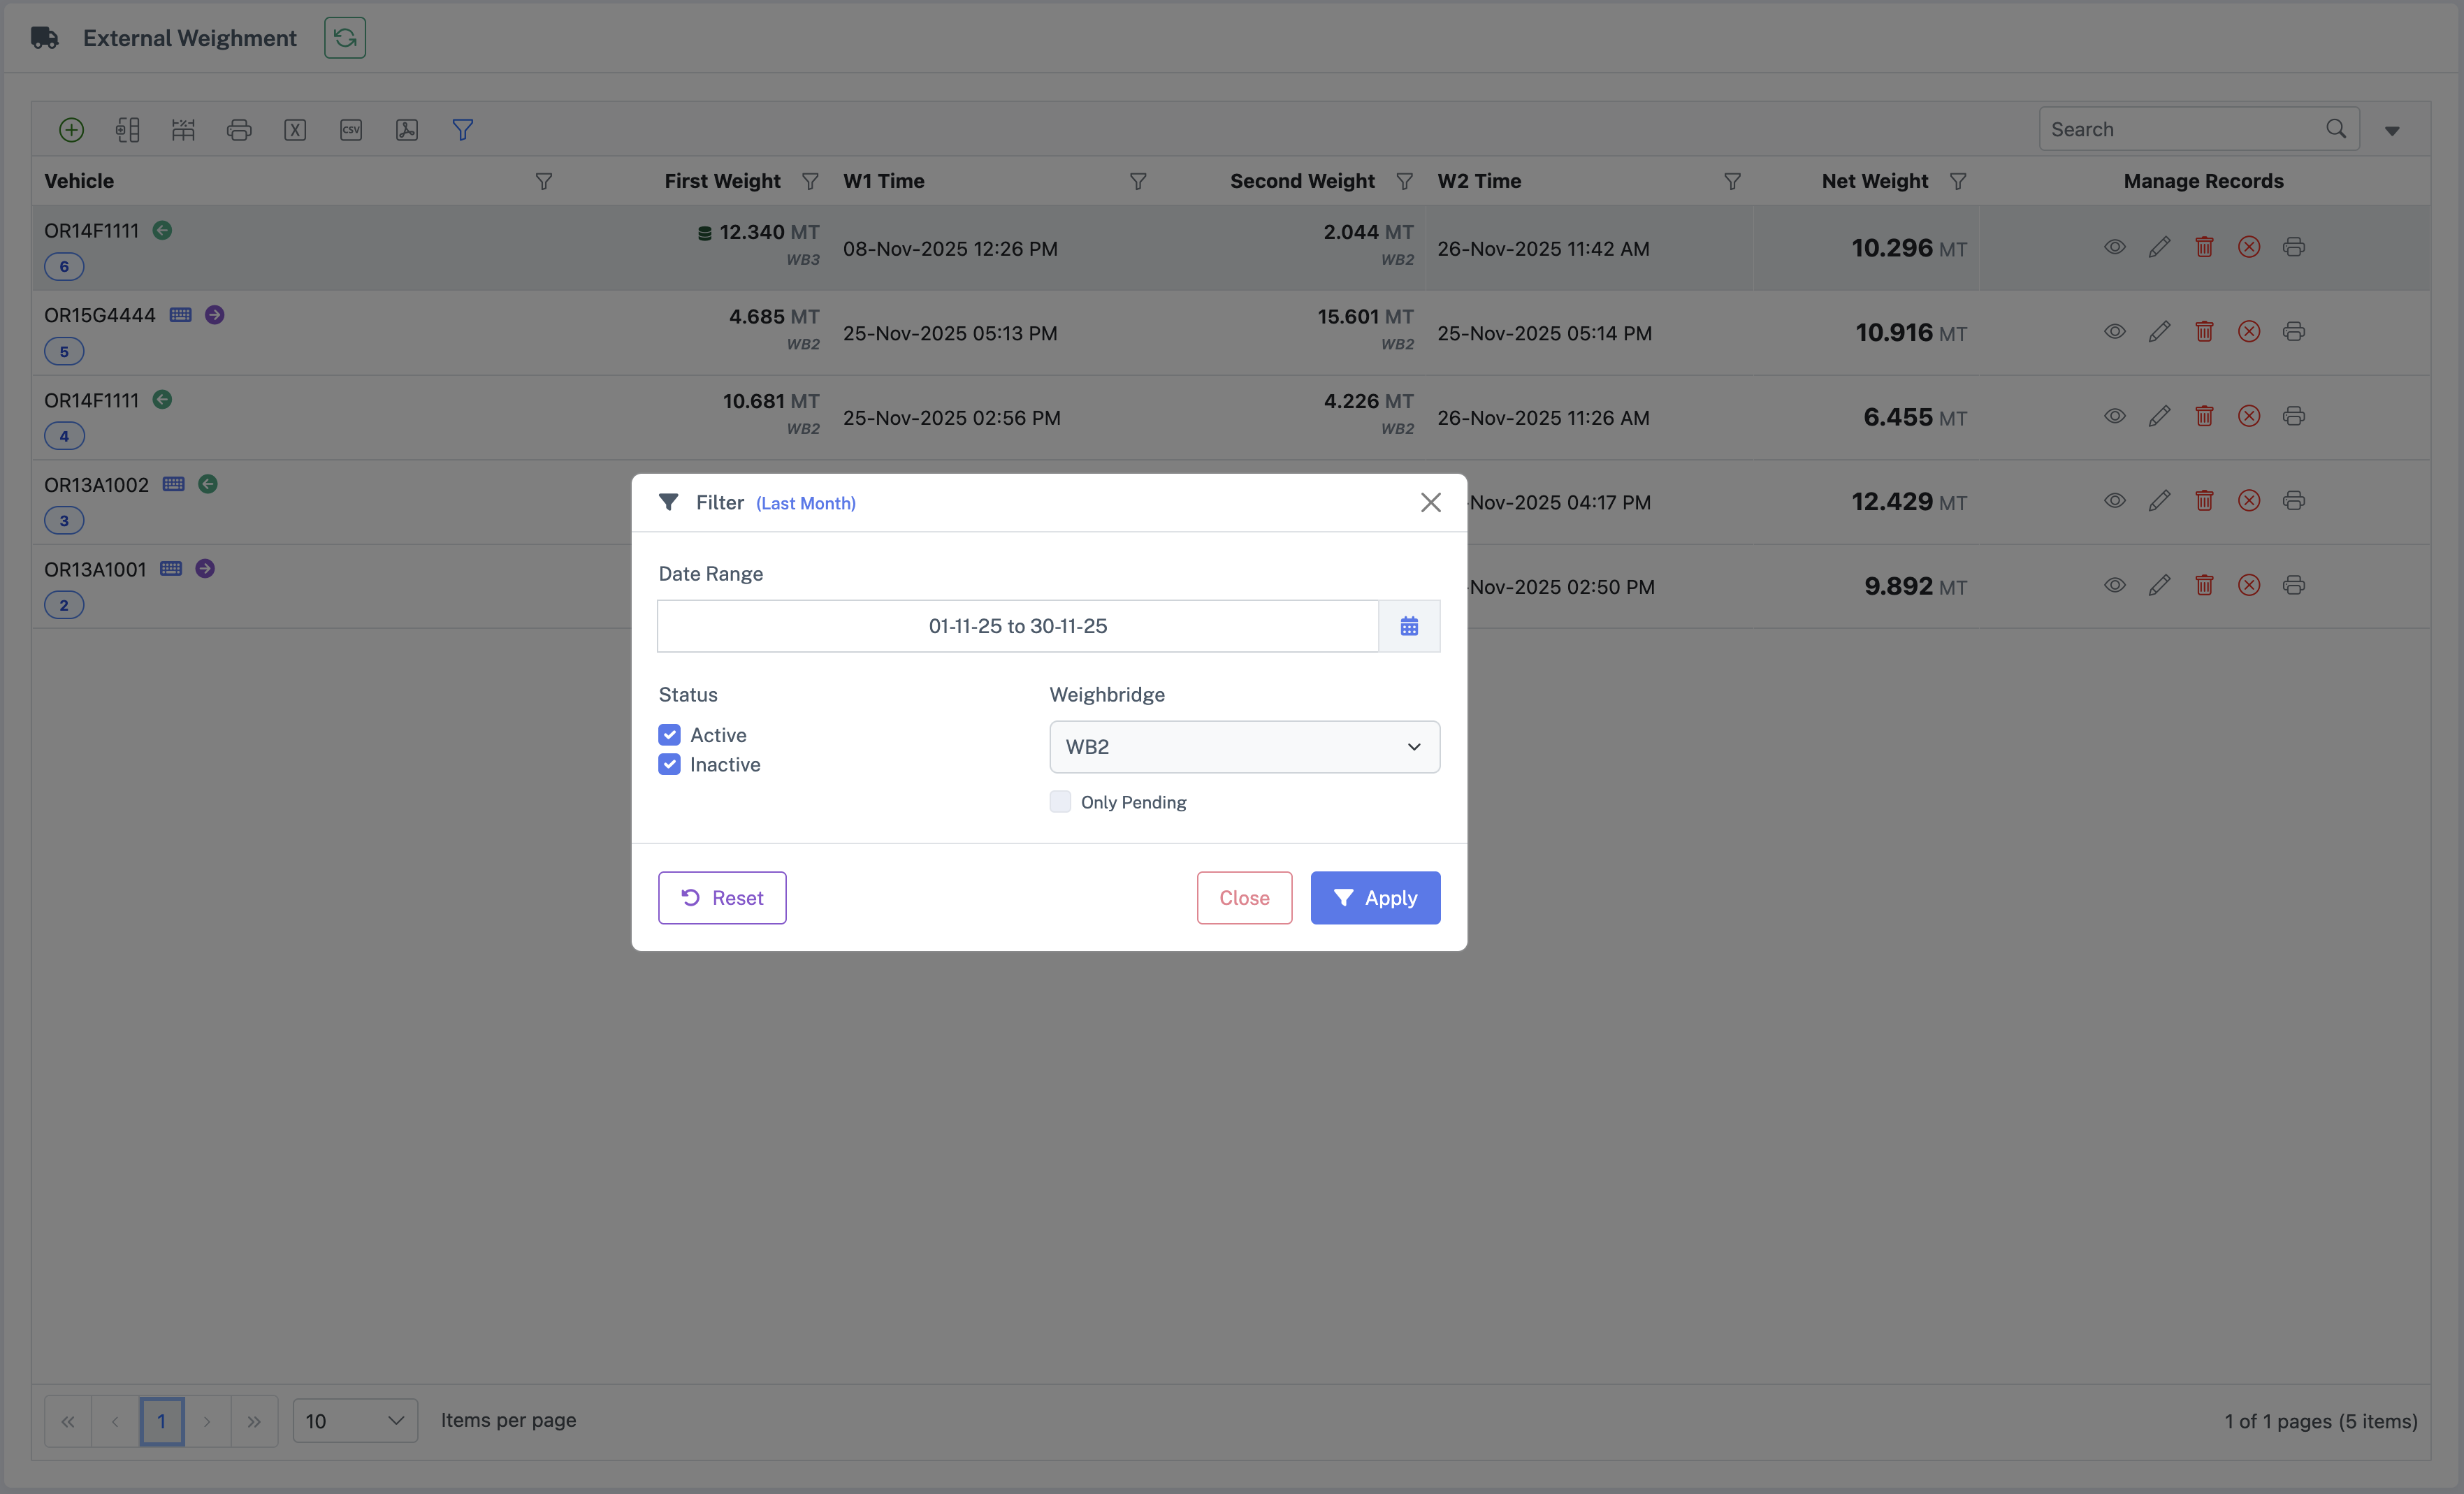
10. Searching, Filtering & Reporting
10.1 Quick Search
Search box above register locates records by:
10.2 Advanced Filters
- Date / Date Range
- Company
- Weighbridge
- Entry Type (Internal/External)
- Product / Transporter / Supplier
- Status (Active/Inactive)
10.3 Grid Tools
Grid Grouping
Group rows by common fields (e.g., Product, Supplier) to summarize totals and quickly review batches.
Column Resize
Drag column edges to resize for better readability; widths persist during the session.
Grid Print
Print the current grid view (with filters applied) to DMP or A4 for filing and audit needs.
Common Search
Use the universal search box to quickly find by Vehicle, Product, Destination or other visible columns.
Column Selection
Show/hide columns to tailor the grid to your task; selections are remembered for the session.
10.4 Reports and Exports
Export filtered results to:
11. Best Practices for Operators and Supervisors
Verify Context Before Weighing
Confirm the chosen Company and assigned Weighbridge are correct, Active, and Unlocked before weighing.
Favor Master Selection
Pick Vehicles, Products, Transporters and Suppliers from dropdowns. Use inline Add only when a master truly does not exist.
Use Stored Tare Carefully
If a stored tare is suggested, check the vehicle number, date, and age. If suspicious, reject it and recapture the weight.
Watch Icons & Badges
Pay attention to Locked/Inactive tags on weighbridges, Stored Tare indicators near weights and DO badges showing pending quantity.
Avoid Guessing Weights
Never enter approximate weights. If you suspect an error, cancel and recapture. Use Clear Second Weight only with proper authorization.
Print and File Tickets
For critical loads, always print the weighment ticket (DMP or A4) and ensure it is signed and filed as per site process.
12. Troubleshooting & Support
12.1 Common Issues
| Issue | Solution |
|---|---|
| Weighbridge is inactive/locked | Contact administrator to activate/unlock |
| No data in register for super admin | Select company in top‑right selector |
| Print not working for dot‑matrix | Check local WeighGuru scale client is running |
| Delivery Order not appearing | Use Reload button, verify DO is valid |
12.2 Getting Help
- Contact your site supervisor or internal IT Personnel
- For escalations: Hepta Infotech Services LLP support (per contract)